Download
1 / 38
1.68k likes | 3.59k Views
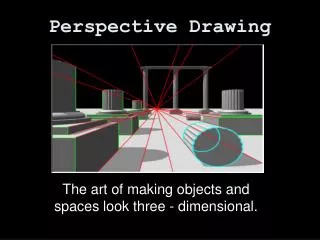
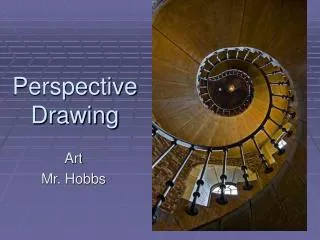
An introduction to Perspective Drawing. In today’s micro lesson we will : Look at a series of works which illustrate how different artists have used perspective techniques to communicate their ideas. Produce a chalk drawing which explores Perspective drawing through Cubism.

E N D
An introduction to Perspective Drawing In today’s micro lesson we will : • Look at a series of works which illustrate how different artists have used perspective techniques to communicate their ideas. • Produce a chalk drawing which exploresPerspective drawing through Cubism. • Present our results to the rest group and describe what we have learned.
Perspective Drawing http://www.youtube.com/watch?v=7ZYBWA-ifEs http://www.youtube.com/watch?v=zMoy4NZGkxc&feature=related
Student Activity: Lets start by depicting perspective at its simplest to suggest DISTANCE/DEPTH. Start with an horizon lineroughly eye-level.
STUDENT ACTIVITY: Draw an outline of a person. Note where the horizon line crosses the figure,in this case at the shoulders.
Now HERE’S the trick!All other figures will cross the horizon line at the same point, (THE SHOULDERS in this case) no matter how far away they are…
Draw other objects in proportion to the figures they are closest to. Let's say in this picture there will be people with dogs. Here's the first one...
Ruleswhen depicting Distance/Depth in a Picture The closer to the viewer (that’s YOU)the objects are the more detail you add - the darker the lines and the brighter the colours. As the objects are further away (toward the horizon) the less detail, the lighter the lines and the duller the colours. This is how you trick the viewer into accepting distance in a picture. LS Lowry – “EASTER FAIR” (1946) The picture shows the Lancashire mill town of Daisy Nook in festival mood the year after the end of World War Two
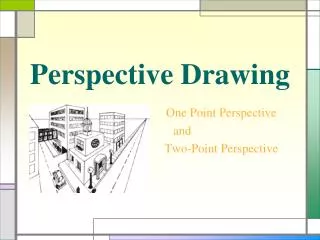
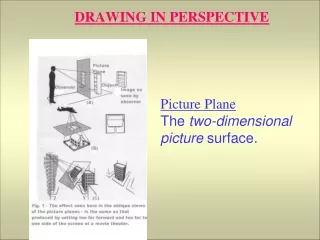
One-point perspective • One-point perspective is when all the major lines of an image convergeon one point. • You can see this effect best illustrated when looking down a set of straight railroad tracks or a long road.
If things are far away enough, they seem to disappear. The vanishing point is the point on the horizon (at eye-level) where everything disappears.
How to Draw with One Point Perspective How’s it done?. http://www.youtube.com/watch?v=7ZYBWA-ifEs
Two -point perspective Two-point perspective consists of two vanishing points that are both situated on a horizon line. “Nighthawks” by Edward Hopper (1946)
Three -point perspective When we view an object from the top, we are most likely viewing it in three-point perspective. “The Clock Tower” by Pots Damer
By keeping your eye fixed in one position you can create lots of crazy, imaginative things using perspective.
Use simple Perspective to create an illusion of Distance Look at my face…Close one eye and place your thumb and forefinger in front of the open eye forming a letter C. Can you trap my face between your fingers?
This technique is called Forced Perspective.By keeping the eye in one fixed position, an optical illusionis created which makes an object appear farther away, closer, larger or smallerthan it actually is.
…and If it's far away, it looks much smaller like the girl in the distance.
Reverse Perspective Reverse perspectivealso called inverse perspective, inverted perspective or Byzantine perspective. The further the objects are from the viewer’s eye, the larger they are drawn. The lines diverge (widen) towards the horizon, rather than converge (meet) as in Linear Perspective Technically, the vanishing points are placed outside the painting creating the illusion that they are getting smaller in front of the painting. The throne and footstool in this icon show reverse perspective, with lines converging (and GETTING SMALLER) towards the viewer. The camera only has one eye http://www.youtube.com/watch?v=zMoy4NZGkxc&feature=related
Foreshortening in Perspective • Foreshortening refers to the visual effector optical illusion that an object or distance appears shorter than it actually is because it is angled toward the viewer.
Foreshortening is used a lot in comic books and is used to give the impression of three-dimensional volume and create drama in a picture. ARMS, LEGS, HANDS FEET & MUSCLES may all appear much bigger or come out much further when in comparison to the rest of the body.
Pavement Art – 3D illusions http://www.youtube.com/watch?v=3SNYtd0Ayt0&feature=related
Pavement Art may use Three, Four even Six-PointPerspective. Foreshortening is also used to create the 3D effects. Artist: Julian Beever
Below is an example of how a drawing would look viewed from the wrong angle
Artist - Manfred Stader • Pavement art probably started in Italy. • There were artists even before Leonardo da Vinci's time (1475) who chalked on pavements. • Many historians say that you can trace pavement art right back to cave paintings 40,000 years ago. • Pavement artists include: • Julian Beever • Manfred Stader • Kurt Wenner • Jo Hill • Jenny McCracken Artist - Kurt Wenner
Perspective is also used to convey emotions, feelings & mood. “Crows over the Wheatfield” by Vincent Van Gogh
Van Gogh recorded this view of a field through changing seasons - with flowers in the spring , fresh wheat raising in autumn, in winter frost and with a reaper in the field in summer.
BREAKING THE RULES: A Cubist painting ignores the traditions of perspective drawing and shows you many views of a object at one time. Pablo Picasso (1881-1973) - Factory, Horta de Ebbo (oil on canvas, 1909)
But unlike the Cubists, Cézanne was not interested in creating an illusion of depth in his painting . • Cézanne felt perspective denied the fact that a painting is a flat two-dimensional object. • He liked to flatten the space in his paintings placing more emphasis on their surface and concentrating on the arrangement of colour. • It was this flat abstract approach that appealed to the Cubists and their early paintings. Cézanne was a big influence on Cubist art. Paul Cézanne (1839-1906)Bibemus Quarry (oil on canvas, 1895)
The Cubists wanted to shows several views of an object at any one time. • For Example • When you look at an object your eye scans it, stopping to register on a certain detail before moving on to the next point of interest and so on. • You can also change your viewpoint of the object allowing you to look at it from above, below or from the side. • The Cubists wanted to examine the way that we see things. • The Cubists suggested that your sight of an object is the sum of many different views and your memory of an object is not constructed from one angle, as in perspective, but from many angles selected by your sight and movement. Georges Braque (1882-1963)Viaduct at L'Estaque (oil on canvas, 1908)
Drawing in the Cubist style • Activity: • Produce a drawing of ONEviewpoint of the box looking at it from either the side or from above or below. • Use chalks to depict the side you are looking at. Add shading to suggest light and shade. • Bring all drawings together to create one big CUBIST drawing. • Drawing Tips • Look at the box in front of you. • Scan the boxes with your eye looking up and down, side to side. • Stop to register on a certain detail before moving on to the next point of interest and so on.
Summary • Today we have looked briefly at techniques used in Perspective Drawing. • We have seen examples of Perspective Drawing in the work of other artists. • We have learned that Perspective can convey qualities of feelings andmoods and can communicate information or suggest optical and 3D illusions. • We have experimented with perspective to produce a Cubist drawing. • Gained experience and developed further communication skills by presenting our drawings to others.