Download

1 / 7
70 likes | 177 Views
Learn how to integrate a JSF Mini-Calendar Control in your EGL application, and manipulate values using JavaScript at run-time. This step-by-step guide details setup and customization.

E N D
Using JSF Mini-Calendar Controls This section describes how to use a JSF Mini-Calendar Control with EGL It also shows how to use JavaScript to modify values at run-time. Note that there are a few steps that, for the release were necessary, but for future releases may not be. We have documented these steps inside this section.
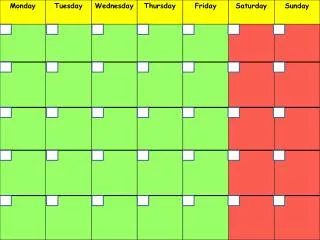
JSF Mini-Calendar Controls You may want to use JSF mini-calendar components (see page below) in your application – as a central visual motif. Here’s a simple page that contains a JSF Mini-Calendar that allows users to: • Select a date • Upon selection, that calendar-date value is copied (via JavaScript) to an input field • And then upon the user hitting Enter (form submit), the value is used in EGL logic JSF Mini-Calendar Control Input field, valued via JavaScript JSF Error Messages component
Create the Page – 1 of 4 • From Project Explorer, create a .JSP page named: miniCalendarPage.jsp • Change the page header text • Add a JSF Select - Calendar component • From the next slide, create the JSFHandler code…
Create the JSFHandler – 2 of 4 • From the Notes section below, copy the JSFHandler source over (completely replace the existing) boiler-plate code. • Note the following: • Dates – with dateFormat specified – Note that this is necessary for this release • The date2 field specified as allowing nulls – to display as a blank on-screen • Setting the date2 field to null • Displaying the selected date as a string, which is formatted using an EGL built-in function Save your code
Customize the Mini-Calendar – 3 of 4 • From Page Designer / From Page Data: • Drag and drop date1 on top of the Calendar • From the Calendar’s properties, specify a custom Date Pattern • *** With the Calendar selected, from source mode, add the single line shown here – into the calendar’s JSF properties • <hx:convertDateTime type="date" pattern="yyyy/MM/dd" />
Create the Page – 4 of 4 – Add the JavaScript and Finish the Page • With the Calendar selected, from the QuickEdit view, add the following statement (shown below) to the onchange function. • Note this will make the value of the date2 field, equal to what is selected in the Mini-Calendar. • Finally, from Page Data: • Drag and drop date2 on the page – and make it an input field • From Options – de-select the command buttons • Ensure that an ErrorMessages control is placed on the field • Drag and drop the showTheDate function on the page, where it will become a Submit Button document.getElementById('form1:textDate21').value = thisObj.value;
Run The Page on the Server Run the page on the server Select a date Note that this will populate the empty input field Click the Submit Button JSF Mini-Calendar Control Input field, valued via JavaScript JSF Error Messages component