Download
1 / 11

E N D
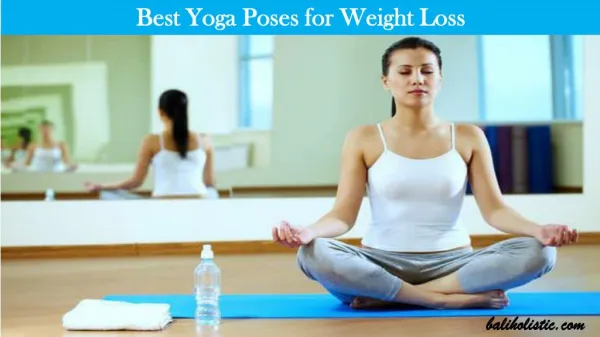
Step by StepSit comfortably in Siddhasana (as shown) or stand in Tadasana. Inhale and bring your palms together. Rest the thumbs lightly on your sternum. Press the hands firmly but evenly against each other. Make sure that one hand (usually your right hand if you are right-handed, your left if left-handed) doesn't dominate the other. If you find such imbalance, release the dominant hand slightly but don't increase the pressure of the non-dominant hand. Bow your head slightly, drawing the crease of the neck toward the center of your head. Lift your sternum into your thumbs and lengthen down along the back of the armpits, making the back elbows heavy. Practicing Anjali Mudra is an excellent way to induce a meditative state of awareness. Start your practice sitting in meditation in Anjali Mudra for 5 minutes. You can also use this hand position in Tadasana prior to beginning the Sun Salutation sequence, contemplating the "sun" or light of awareness the yogis say is resident in your heart. Name of Pose: Salutation Seal anjali = a gesture of reverence, benediction, salutation (from anj, "to honor, celebrate") mudra = seal (The gesture "seals" energy in the body and "seals" your relationship with the Divine.)
Bhujangasana (Cobra Pose) This posture promotes flexibility in the spine and encourages the chest to open. • Step by Step (Cobra Pose) • 1- Lie prone on the floor. Stretch your legs back, tops of the feet on the floor. Spread your hands on the floor under your shoulders. Hug the elbows back into your body. • - Press the tops of the feet and thighs and the pubis firmly into the floor. • - On an inhalation, begin to straighten the arms to lift the chest off the floor, going only to the height at which you can maintain a connection through your pubis to your legs. Press the tailbone toward the pubis and lift the pubis toward the navel. Narrow the hip points. Firm but don't harden the buttocks. • - Firm the shoulder blades against the back, puffing the side ribs forward. Lift through the top of the sternum but avoid pushing the front ribs forward, which only hardens the lower back. Distribute the backbend evenly throughout the entire spine. • - Hold the pose anywhere from 15 to 30 seconds, breathing easily. Release back to the floor with an exhalation
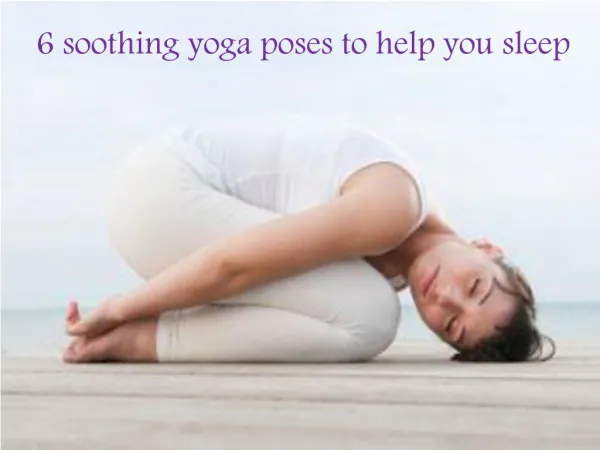
Step by Step • 1- Kneel on the floor. Touch your big toes together and sit on your heels, then separate your knees about as wide as your hips. • - Exhale and lay your torso down between your thighs. Broaden your sacrum across the back of your pelvis and narrow your hip points toward the navel, so that they nestle down onto the inner thighs. Lengthen your tailbone away from the back of the pelvis while you lift the base of your skull away from the back of your neck. • - Lay your hands on the floor alongside your torso, palms up, and release the fronts of your shoulders toward the floor. Feel how the weight of the front shoulders pulls the shoulder blades wide across your back. • - Balasana is a resting pose. Stay anywhere from 30 seconds to a few minutes. Beginners can also use Balasana to get a taste of a deep forward bend, where the torso rests on the thighs. Stay in the pose from 1 to 3 minutes. To come up, first lengthen the front torso, and then with an inhalation lift from the tailbone as it presses down and into the pelvis. • Modifications & Props • If you have difficulty sitting on your heels in this pose, place a thickly folded blanket between your back thighs and calves. • Variation • To increase the length of the torso, stretch your arms forward. Lift your buttocks just slightly away from your heels. Reach the arms longer while you draw the shoulder blades down the back. Then without moving the hands, sit the buttocks down on the heels again. Balasana (Child's Pose) is a restful pose that can be sequenced between more challenging asanas.
Name of Pose: Vrksasana (Tree Pose)Vrksasana clarifies just how challenging it can be to stand on one leg. • Step by Step • 1- Stand in Tadasana. Shift your weight slightly onto the left foot, keeping the inner foot firm to the floor, and bend your right knee. Reach down with your right hand and clasp your right ankle. • - Draw your right foot up and place the sole against the inner left thigh; if possible, press the right heel into the inner left groin, toes pointing toward the floor. The center of your pelvis should be directly over the left foot. • - Rest your hands on the top rim of your pelvis. Make sure the pelvis is in a neutral position, with the top rim parallel to the floor. • - Lengthen your tailbone toward the floor. Firmly press the right foot sole against the inner thigh and resist with the outer left leg. Press your hands together in Anjali Mudra. Gaze softly at a fixed point in front of you on the floor about 4 or 5 feet away. • - Stay for 30 seconds to 1 minute. Step back to Tadasana with an exhalation and repeat for the same length of time with the legs reversed. • Modifications & Props • You can stand with your back braced against a wall if you feel unsteady in this pose.
Step by Step Stand with the bases of your big toes touching, heels slightly apart (so that your second toes are parallel). Lift and spread your toes and the balls of your feet, then lay them softly down on the floor. Rock back and forth and side to side. Gradually reduce this swaying to a standstill, with your weight balanced evenly on the feet. Firm your thigh muscles and lift the knee caps, without hardening your lower belly. Lift the inner ankles to strengthen the inner arches, then imagine a line of energy all the way up along your inner thighs to your groins, and from there through the core of your torso, neck, and head, and out through the crown of your head. Turn the upper thighs slightly inward. Lengthen your tailbone toward the floor and lift the pubis toward the navel. Press your shoulder blades into your back, then widen them across and release them down your back. Without pushing your lower front ribs forward, lift the top of your sternum straight toward the ceiling. Widen your collarbones. Hang your arms beside the torso. Balance the crown of your head directly over the center of your pelvis, with the underside of your chin parallel to the floor, throat soft, and the tongue wide and flat on the floor of your mouth. Soften your eyes. Tadasana is usually the starting position for all the standing poses. But it's useful to practice Tadasana as a pose in itself. Stay in the pose for 30 seconds to 1 minute, breathing easily. Tadasana (Mountain Pose)Tadasana can be practiced as a starting position for standing poses, in between standing poses, or by itself to improve posture.
Parivrtta Trikonasana (Revolved Triangle Pose) Parivrtta Trikonasana is usually sequenced just after (as a counterpose to) Trikonasana. You can also use this pose as a standing preparation for seated forward bends and twists. Step by Step • Stand in Tadasana. With an exhalation, step or lightly jump your feet 3½ to 4 feet apart. Raise your arms parallel to the floor and reach them actively out to the sides, shoulder blades wide, palms down. Turn your left foot in 45 to 60 degrees to the right and your right foot out to the right 90 degrees. Align the right heel with the left heel. Firm your thighs and turn your right thigh outward, so that the center of the right kneecap is in line with the center of the right ankle. • With an exhalation, turn your torso to the right, and square your hip points as much as possible with the front edge of your sticky mat. As you bring the left hip around to the right, resist the head of the left thigh bone back and firmly ground the left heel. • With another exhalation, turn your torso further to the right and lean forward over the front leg. Reach your left hand down, either to the floor (inside or outside the foot) or, if the floor is too far away, onto a block positioned against your inner right foot. Allow the left hip to drop slightly toward the floor. You may feel the right hip slip out to the side and lift up toward the shoulder, and the torso hunch over the front leg. To counteract this, press the outer right thigh actively to the left and release the right hip away from the right shoulder. Use your right hand, if necessary, to create these two movements, hooking the thumb into the right hip crease. • Beginning students should keep their head in a neutral position, looking straight forward, or turn it to look at the floor. More experienced students can turn the head and gaze up at the top thumb. From the center of the back, between the shoulder blades, press the arms away from the torso. Bring most of your weight to bear on the back heel and the front hand. • Stay in this pose anywhere from 30 seconds to one minute. Exhale, release the twist, and bring your torso back to upright with an inhalation. Repeat for the same length of time with the legs reversed, twisting to the left.
Step by Step Lie supine on the floor, and if necessary, place a thickly folded blanket under your shoulders to protect your neck. Bend your knees and set your feet on the floor, heels as close to the sitting bones as possible. Exhale and, pressing your inner feet and arms actively into the floor, push your tailbone upward toward the pubis, firming (but not hardening) the buttocks, and lift the buttocks off the floor. Keep your thighs and inner feet parallel. Clasp the hands below your pelvis and extend through the arms to help you stay on the tops of your shoulders. Lift your buttocks until the thighs are about parallel to the floor. Keep your knees directly over the heels, but push them forward, away from the hips, and lengthen the tailbone toward the backs of the knees. Lift the pubis toward the navel. Lift your chin slightly away from the sternum and, firming the shoulder blades against your back, press the top of the sternum toward the chin. Firm the outer arms, broaden the shoulder blades, and try to lift the space between them at the base of the neck (where it's resting on the blanket) up into the torso. Stay in the pose anywhere from 30 seconds to 1 minute. Release with an exhalation, rolling the spine slowly down onto the floor. Setu Bandha Sarvangasana (Bridge Pose) This active version of Bridge Pose calms the brain and rejuvenates tired legs.
Step by Step Lie supine on the floor, legs strongly extended. If your head doesn't rest comfortably on the floor, support it on a folded blanket. Exhale, bend the left knee, and draw the thigh into your torso. Hug the thigh to your belly. Press the front of the right thigh heavily to the floor, and push actively through the right heel. Loop a strap around the arch of the left foot and hold the strap in both hands. Inhale and straighten the knee, pressing the left heel up toward the ceiling. Walk your hands up the strap until the elbows are fully extended. Broaden the shoulder blades across your back. Keeping the hands as high on the strap as possible, press the shoulder blades lightly into the floor. Widen the collarbones away from the sternum. Extend up first through the back of the left heel, and once the back of the leg between the heel and sitting bone is fully lengthened, lift through the ball of the big toe. Begin with the raised leg perpendicular to the floor. Release the head of the thigh bone more deeply into the pelvis and, as you do, draw the foot a little closer to your head, increasing the stretch on the back of the leg. You can stay here in this stretch, or turn the leg outward from the hip joint, so the knee and toes look to the left. Pinning the top of the right thigh to the floor, exhale and swing the left leg out to the left and hold it a few inches off the floor. Continue rotating the leg. As you feel the outer thigh move away from the left side of the torso, try to bring the left foot in line with the left shoulder joint. Inhale to bring the leg back to vertical. Lighten your grip on the strap as you do, so that you challenge the muscles of the inner thigh and hip to do the work. Hold the vertical position of the leg anywhere from 1 to 3 minutes, and the side position for an equal length of time. Once you have returned to vertical release the strap, hold the leg in place for 30 seconds or so, then slowly release as you exhale. Repeat on the right for the same length of time. (Reclining Big Toe Pose)Supta Padangusthasana (Reclining Big Toe Pose) provides relief from backache and stretches the hips, hamstrings, and calves.(soup-TAH pod-ang-goosh-TAHS-anna)
Step by Step Sit on the floor with your buttocks lifted on a folded blanket and your legs straight in front of you. Inhale, bend your right knee, and draw the heel back toward your perineum. Rest your right foot sole lightly against your inner left thigh, and lay the outer right leg on the floor, with the shin at a right angle to the left leg (if your right knee doesn't rest comfortably on the floor, support it with a folded blanket). Press your right hand against the inner right groin, where the thigh joins the pelvis, and your left hand on the floor beside the hip. Exhale and turn the torso slightly to the left, lifting the torso as you push down on and ground the inner right thigh. Line up your navel with the middle of the left thigh. You can just stay here, using a strap to help you lengthen the spine evenly, grounding through the sitting bones. Or, when you are ready, you can drop the strap and reach out with your right hand to take the inner left foot, thumb on the sole. Inhale and lift the front torso, pressing the top of the left thigh into the floor and extending actively through the left heel. Use the pressure of the left hand on the floor to increase the twist to the left. Then reach your left hand to the outside of the foot. With the arms fully extended, lengthen the front torso from the pubis to the top of the sternum. Exhale and extend forward from the groins, not the hips. Be sure not to pull yourself forcefully into the forward bend, hunching the back and shortening the front torso. As you descend, bend your elbows out to the sides and lift them away from the floor. Lengthen forward into a comfortable stretch. The lower belly should touch the thighs first, the head last. Stay in the pose anywhere from 1 to 3 minutes. Come up with an inhalation and repeat the instructions with the legs reversed for the same length of time. Janu Sirsasana (Head-to-Knee Pose) A forward bend for all levels of students, Janu Sirsasana is also a spinal twist.
Step by Step In Savasana it's essential that the body be placed in a neutral position. Sit on the floor with your knees bent, feet on the floor, and lean back onto your forearms. Lift your pelvis slightly off the floor and, with your hands, push the back of the pelvis toward the tailbone, then return the pelvis to the floor. Inhale and slowly extend the right leg, then the left, pushing through the heels. Release both legs, softening the groins, and see that the legs are angled evenly relative to the mid-line of the torso, and that the feet turn out equally. Narrow the front pelvis and soften (but don't flatten) the lower back. With your hands lift the base of the skull away from the back of the neck and release the back of the neck down toward the tailbone. If you have any difficulty doing this, support the back of the head and neck on a folded blanket. Broaden the base of the skull too, and lift the crease of the neck diagonally into the center of the head. Make sure your ears are equidistant from your shoulders. Reach your arms toward the ceiling, perpendicular to the floor. Rock slightly from side to side and broaden the back ribs and the shoulder blades away from the spine. Then release the arms to the floor, angled evenly relative to the mid-line of torso. Turn the arms outward and stretch them away from the space between the shoulder blades. Rest the backs of the hands on the floor as close as you comfortably can to the index finger knuckles. Make sure the shoulder blades are resting evenly on the floor. Imagine the lower tips of the shoulder blades are lifting diagonally into your back toward the top of the sternum. From here, spread the collarbones. In addition to quieting the physical body in Savasana, it's also necessary to pacify the sense organs. Soften the root of the tongue, the wings of the nose, the channels of the inner ears, and the skin of the forehead, especially around the bridge of the nose between the eyebrows. Let the eyes sink to the back of the head, then turn them downward to gaze at the heart. Release your brain to the back of the head. Stay in this pose for 5 minutes for every 30 minutes of practice. To exit, first roll gently with an exhalation onto one side, preferably the right. Take 2 or 3 breaths. With another exhalation press your hands against the floor and lift your torso, dragging your head slowly after. The head should always come up last. Savasana (Corpse Pose) Savasana is a pose of total relaxation—making it one of the most challenging asanas.