A Step-by-Step Tutorial on Setting Up Your Google Merchant Center Account
0 likes | 16 Views
Google Merchant Center is a powerful tool that helps businesses manage their product information and make it available to shoppers across Google. By using Google Merchant Center, you can upload your store, brand, and product data to Google and make it available to shoppers in various Google services. This tutorial will guide you through the process of setting up your Google Merchant Center account, optimizing your product data, and using the features available to enhance your online presence.

A Step-by-Step Tutorial on Setting Up Your Google Merchant Center Account
E N D
Presentation Transcript
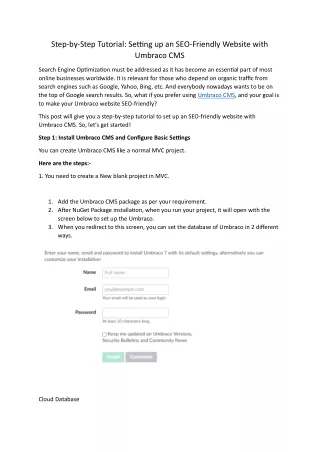
Google Merchant Center is a powerful tool that helps businesses manage their product information and make it available to shoppers across Google. By using Google Merchant Center, you can upload your store, brand, and product data to Google and make it available to shoppers in various Google services. This tutorial will guide you through the process of setting up your Google Merchant Center account, optimizing your product data, and using the features available to enhance your online presence. Step 1: Creating a Google Merchant Center Account Sign In to Google Merchant Center: 1. Visit the Google Merchant Center website. 2. Sign in with your Google account. If you don’t have a Google account, you’ll need to create one. Enter Your Business Information: 1. Provide your business name, country, and time zone. Ensure that the business name matches your store’s branding and legal entity. 2. Click on "Continue" to proceed. Agree to the Terms and Conditions: 1. Read through Google’s terms and conditions. 2. Check the box to agree to the terms and click on “Create Account.” Step 2: Setting Up Your Account Verify and Claim Your Website URL: 1. Navigate to the “Business information” section. 2. Enter your website URL and click on “Save.” 3. To verify your website, Google provides several methods: HTML file upload, HTML tag, Google Analytics, or Google Tag Manager. Choose the method that suits you best and follow the instructions. 4. After verifying, click on “Claim URL” to associate your website with your Merchant Center account. Set Up Shipping and Tax Information: 1. Go to the “Shipping and returns” section. 2. Click on “Add a shipping service” to configure your shipping settings. You can specify shipping methods, costs, and delivery times. 3. In the “Tax” section, configure the tax rates for the regions you operate in. Ensure that these settings comply with local regulations. Step 3: Uploading Your Product Data Create a Product Feed: 1. Navigate to the “Products” tab. 2. Click on “Feeds” and then “Add a primary feed.” 3. Enter the necessary information, including the target country, language, and destinations (e.g., Shopping ads, Surfaces across Google).
4. Select the input method for your product data: Google Sheets, scheduled fetch, upload, or Content API. For beginners, Google Sheets is often the easiest option. Prepare Your Product Data: 1. If using Google Sheets, download the template provided by Google Merchant Center. 2. Fill out the template with your product information, including attributes such as ID, title, description, link, image link, price, and availability. Ensure that your data complies with Google’s product data specification. Upload Your Product Feed: 1. Once your product data is ready, upload the feed to Google Merchant Center. 2. Google will process the feed and may take some time to review your products. Any errors or issues will be flagged, and you’ll need to address them to ensure your products are approved. Step 4: Optimizing Your Product Listings Enhance Product Titles and Descriptions: 1. Use clear and concise titles that accurately describe your products. Include relevant keywords that shoppers might use to search for your products. 2. Write detailed and informative descriptions that highlight the key features and benefits of your products. Avoid keyword stuffing and focus on providing value to potential customers. Use High-Quality Images: 1. Ensure your product images are high-resolution, well-lit, and clearly show the product. Avoid using placeholders, logos, or promotional text in your images. 2. Provide multiple images to showcase different angles and aspects of your products. Regularly Update Your Product Data: 1. Keep your product data up-to-date by regularly updating your feed with new products, prices, and availability. This helps maintain accuracy and improves the shopping experience for your customers. Step 5: Utilizing Google Merchant Center Features Promotions: 1. In the “Marketing” section, you can create promotions to highlight special offers, discounts, or sales. Promotions can attract more attention to your products and encourage shoppers to make a purchase. Customer Reviews: 1. Enable customer reviews to build trust and credibility. Positive reviews can significantly influence purchasing decisions and improve your product’s visibility on Google.
Surfaces Across Google: 1. Opt-in to “Surfaces across Google” to make your products visible on various Google platforms, including Google Search, Google Images, and Google Shopping. This increases your product’s reach and visibility. Step 6: Tracking and Analyzing Performance Use Google Analytics: 1. Link your Google Merchant Center account to Google Analytics to gain insights into your product performance and customer behavior. This helps you understand which products are performing well and where improvements can be made. Monitor Feed Diagnostics: 1. Regularly check the “Diagnostics” section in your Merchant Center account. This section provides detailed information about any issues or errors with your product feed, helping you quickly identify and fix problems. Review Performance Reports: 1. Utilize the performance reports available in Google Merchant Center to track key metrics such as impressions, clicks, and conversions. Analyzing these reports helps you measure the effectiveness of your product listings and marketing efforts. Step 7: Integrating with Google Ads Link Google Ads Account: 1. To run Shopping ads, link your Google Merchant Center account to your Google Ads account. Go to the “Settings” section and select “Linked accounts.” 2. Follow the prompts to link your Google Ads account. Create Shopping Campaigns: 1. In your Google Ads account, create a new Shopping campaign. Select the products you want to advertise and set your budget, bidding strategy, and targeting options. 2. Shopping campaigns are an effective way to showcase your products to potential customers and drive traffic to your website. Optimize Your Ads: 1. Continuously monitor and optimize your Shopping campaigns to improve performance. Experiment with different bidding strategies, ad formats, and targeting options to find what works best for your business. Step 8: Staying Compliant with Google’s Policies Adhere to Google’s Policies:
1. Familiarize yourself with Google’s advertising policies and ensure that your product listings comply with these guidelines. Non-compliance can result in account suspension or disapproval of your products. Regularly Review Policy Updates: 1. Google frequently updates its policies and guidelines. Stay informed about any changes by regularly reviewing the policy updates and adjusting your product data and listings accordingly. Step 9: Expanding Your Reach Explore International Markets: 1. If you’re interested in expanding your business internationally, Google Merchant Center allows you to target multiple countries and languages. Configure your product feed to include the necessary information for each target market. Utilize Local Inventory Ads: 1. For brick-and-mortar stores, local inventory ads can help drive foot traffic by displaying your products to nearby shoppers. Ensure that your local inventory data is accurate and up-to-date. Take Advantage of Advanced Features: 1. Google Merchant Center offers advanced features such as automated feeds, product ratings, and dynamic remarketing. Explore these features to further enhance your product listings and marketing strategies. Conclusion Setting up and optimizing your Google Merchant Center account is a crucial step in expanding your online presence and reaching more potential customers. By following this step-by-step tutorial, you can effectively manage your product data, run successful Shopping campaigns, and utilize the powerful features of Google Merchant Center to grow your business. Remember to stay informed about Google’s policies and continuously optimize your product listings and marketing efforts to achieve the best results. With dedication and strategic planning, Google Merchant Center can become a valuable tool in your e-commerce arsenal. Contact us 5starprocessing for more information.