Download
1 / 2
20 likes | 42 Views
Are you curious how to shoot ghost mannequins in Photoshop? Well, if you are looking to make a mannequin effect, one of the best places to start is by researching and finding high quality images of mannequins that you like. There are many different mannequin photo effects available on the internet and by doing research, you can find the ones that suit your needs best. The great thing about using these types of images is that you can get free unprocessed photos that you can use for any purpose.

E N D
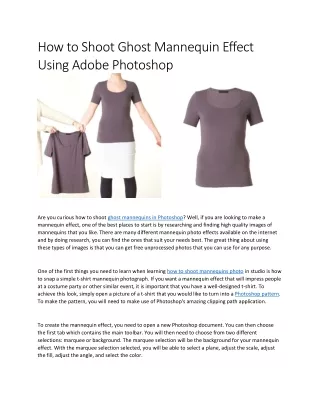
How to Shoot Ghost Mannequin Effect Using Adobe Photoshop Are you curious how to shoot ghost mannequins in Photoshop? Well, if you are looking to make a mannequin effect, one of the best places to start is by researching and finding high quality images of mannequins that you like. There are many different mannequin photo effects available on the internet and by doing research, you can find the ones that suit your needs best. The great thing about using these types of images is that you can get free unprocessed photos that you can use for any purpose. One of the first things you need to learn when learning how to shoot mannequins photo in studio is how to snap a simple t-shirt mannequin photograph. If you want a mannequin effect that will impress people at a costume party or other similar event, it is important that you have a well-designed t-shirt. To achieve this look, simply open a picture of a t-shirt that you would like to turn into a Photoshop pattern. To make the pattern, you will need to make use of Photoshop's amazing clipping path application. To create the mannequin effect, you need to open a new Photoshop document. You can then choose the first tab which contains the main toolbar. You will then need to choose from two different selections: marquee or background. The marquee selection will be the background for your mannequin effect. With the marquee selection selected, you will be able to select a plane, adjust the scale, adjust the fill, adjust the angle, and select the color.
Once you have done these things, you will then click on the 'white balance' tab. Once you have done so, you will then need to go ahead and click on the arrow next to the keyword gray from the selection tools, which is an indicator that tells you which color to use as your white balance. The selection options will vary depending on the type of mannequin you are using. There are many different ways in which to make sure that the mannequins you select in Photoshop will be as accurate as possible. If you are using stock photography for your mannequin illustrations, you should keep in mind that the images are not exactly as they would appear in person. This is because stock photos are not usually retouched or corrected in any way before being used as mannequin illustrations. The Photoshop tools available to you, however, allow you to create some great mannequin effects if you know how to use them. So now that you know how to shoot a ghost mannequin effect, let's move on to some tips and tricks for achieving the best results with your Photoshop mannequin editing. First, you will want to make sure that the Photoshop tool you are using is called the 'blur tool'. This is available from the 'image' menu. When you have this tool selected, you will be able to make use of it by selecting the 'overlay effect' option from the graphic settings. By selecting this option, you will be able to apply an overlay of your chosen color or pattern onto the front part of your product photo. The only issue with this method of how to shoot ghost mannequin is that it may cause some slight alignment issues with your photos, depending on what you have captured. You should test this out on a small area first, such as a logo or tag, to ensure that your photos do not come out mixed up. When you are done tweaking your photographs using the above method, you will then want to make sure you have your mannequins in the correct lighting condition. You should make sure that the light on the mannequins matches the color of your product photos. If they are far apart in terms of lightness, you should compensate accordingly, either by lowering the contrast or increasing the brightness on the background. If you are unsure of how to edit ghost mannequin using Adobe Photoshop, try using the white balance setting, so that you can see how closely your mannequins match the color of the product images you have captured. After you have made sure that your mannequins are properly positioned, you should proceed with the fun part of learning how to shoot ghost mannequin effect. Select all of your product photos that you wish to overlay onto your garment and then choose the Brush Strokes option from the main drawing tool menu. Choose the Size option and move your mouse cursor inside the toolbar. Right click on the eraser tool in the toolbar and choose the 'Freehand' option. With the 'Freehand' option, you can easily create intricate brush strokes which will give you the ghosting effect on your garment.