Download
1 / 50
500 likes | 690 Views
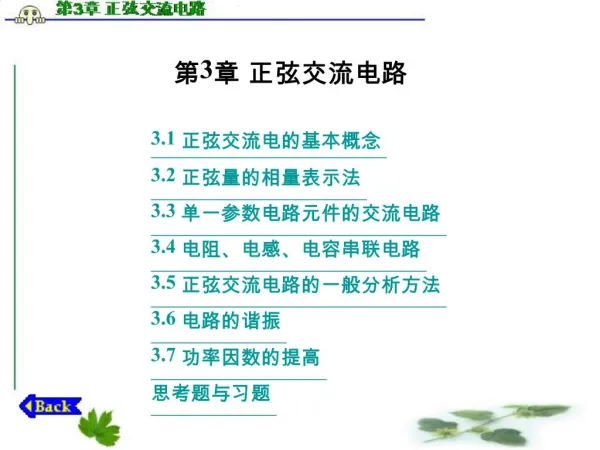
Tutorial 3 - Welcome Application Introduction to Visual Programming. Outline 3.1 Test-Driving the Welcome Application 3.2 Constructing the Welcome Application 3.3 Objects used in the Welcome Application 3.4 Wrap-Up. Objectives. In this tutorial, you will learn to:

E N D
Tutorial 3 - Welcome Application Introduction to Visual Programming Outline3.1 Test-Driving the Welcome Application3.2 Constructing the Welcome Application3.3 Objects used in the Welcome Application3.4 Wrap-Up
Objectives • In this tutorial, you will learn to: • Set the text in the Form’s title bar. • Change the Form’s background color. • Place a Label control on the Form. • Display text in a Label control. • Place a PictureBox control on the Form. • Display an image in a PictureBox control. • Execute an application.
Open Solution command (selected) opens an existing solution 3.1 Test-Driving the Welcome Application Figure 3.1 Opening an existing solution with the File menu’s Open Solution... Command. • SelectFile > Open Solution...to display theOpen Solutiondialog
3.1 Test-Driving the Welcome Application • Look in:ComboBox • Select Welcome directory • Select theWelcomesolution file and click theOpenbutton
Welcome.sln solution file (may display Welcome depending on your settings) Open Solution dialog Look in:ComboBox 3.1 Test-Driving the Welcome Application Figure 3.2 Open Solution dialog displaying the contents of the Welcome solution.
3.1 Test-Driving the Welcome Application • Visual Studio .NET IDE • Presents Welcome.vb in design view
3.1 Test-Driving the Welcome Application Figure 3.3 Welcome application’s Form in design view.
Start command (selected) executes the application 3.1 Test-Driving the Welcome Application Figure 3.4 Executing the Welcome application using the Debug menu’s Start command. • Select Debug > Start • The Startcommand runs (executes) the application.
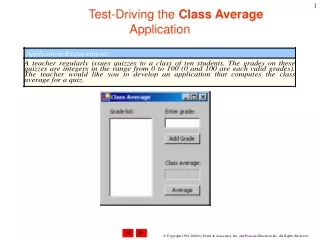
3.1 Test-Driving the Welcome Application • Application during Run mode • Notice the application’s output • Click the application’s close box to • close the executing application
Close box 3.1 Test-Driving the Welcome Application Figure 3.5 Welcome application executing.
3.2 Constructing the Welcome Application • Select File > Open Solution.... • Open theWelcomesolution file (Welcome.sln) • Viewing the IDE in design mode • The empty Form • The Solution Explorer • Toolbar • IDE title bar
Solution Explorerwindow IDE title bar Toolbar Solution name Form title bar Project name Blank Form Formfile name 3.2 Constructing the Welcome Application Figure 3.6 Blank Form.
3.2 Constructing the Welcome Application • Changing the Form’s file name • Locate the SolutionExplorer • Select the file • Change the FileName property
File properties Selected property New property value New file name Selected property description 3.2 Constructing the Welcome Application Figure 3.7 Changing the Form’s file name.
Selected property Property value Selected property description 3.2 Constructing the Welcome Application • Changing the Form’s title display • Locate Solution Explorer • Select the Text property • Change the text Figure 3.8 Setting the Form’s Text property.
Title bar 3.2 Constructing the Welcome Application • Title bar changes to display Form’sTextproperty Figure 3.9 Title bar for the Welcome application.
3.2 Constructing the Welcome Application • Examine the empty Form • Grid layout • Enabled sizing handle • Height and width
Width Disabled sizing handle Mouse pointer over an enabled sizing handle Grid Height Enabled sizing handle 3.2 Constructing the Welcome Application Figure 3.10 Form with sizing handles.
Size property values 3.2 Constructing the Welcome Application • Resizing the Form • Expand the Sizeproperty • Change the Width • Change the Height Figure 3.11 Size property values for the Form.
3.2 Constructing the Welcome Application • Changing the Form’s background color • Locate the BackColor property • System tab (default) • Web tab • Custom tab
Current color Down-arrow Button Tabs Custom palette Custom colors can be added to the white boxes 3.2 Constructing the Welcome Application Figure 3.12 Viewing the Custom palette in the Form’s BackColor property value field.
3.2 Constructing the Welcome Application • Custom tab palette • Define Color dialog • Create your own colors • RGB values
Color preview Red component (255) Green component (237) Blue component (169) Adds a color to Custom palette 3.2 Constructing the Welcome Application Figure 3.13 Adding a color to the Custom palette.
3.2 Constructing the Welcome Application • Result of background color change • New RGB color values
Form background set to new custom color Custom color added to palette 3.2 Constructing the Welcome Application Figure 3.14 Properties window after the new custom color has been added.
WindowsForms tab Label control 3.2 Constructing the Welcome Application • Toolbox • WindowsForms tab Figure 3.15 Clicking the WindowsForms tab in the Toolbox.
Label control Sizing handle (enabled) New background color 3.2 Constructing the Welcome Application • Label added to Form Figure 3.16 Adding a Label to the Form.
Updated Text property value too large for Label 3.2 Constructing the Welcome Application • Adding text to the Label • Label’s content changes to reflect new Text value Figure 3.17 Label after updating its Text property.
Label resized vertically and horizontally 3.2 Constructing the Welcome Application • Resizing the Label • Text re-aligns to fit new Label size Figure 3.18 Label after it has been resized.
Centered Label 3.2 Constructing the Welcome Application • Moving the Label on the Form Figure 3.19 Centered Label.
Ellipsis Button 3.2 Constructing the Welcome Application • Changing the font • Locate Solution Explorer • Select the Label • Select Font property Figure 3.20 Properties window displaying the Label’s properties.
3.2 Constructing the Welcome Application • Fontdialog • Change text by changing values in dialogs
Font dialog Current font Font sample 3.2 Constructing the Welcome Application Figure 3.21 Font dialog for selecting fonts, styles and sizes.
3.2 Constructing the Welcome Application • Text alignment • Access TextAlign property • Select appropriate option
Text alignment options Top-center alignment option 3.2 Constructing the Welcome Application Figure 3.22 Centering the Label’s text.
3.2 Constructing the Welcome Application • Inserting a picture • Select the PictureBox control • Drop control onto Form
Updated Label PictureBox 3.2 Constructing the Welcome Application Figure 3.23 Inserting and aligning the PictureBox.
Image property value (no image selected) Ellipsis Button Image preview box (no image currently displayed) 3.2 Constructing the Welcome Application • Changing PictureBox properties • Locate Solution Explorer • Locate Image property Figure 3.24 Image property of the PictureBox.
3.2 Constructing the Welcome Application • Selecting the picture • Navigate the Open dialog to the picture location • Click Open
bug.png file (may display bug depending on your settings) 3.2 Constructing the Welcome Application Figure 3.25 Open dialog used to browse for a PictureBox image.
PictureBox too small for image 3.2 Constructing the Welcome Application • Resizing the image • Change property SizeMode • StretchImage scales image in PictureBox • Change property Size Figure 3.26 Newly inserted image.
Previewed image 3.2 Constructing the Welcome Application • Previewed image in Image property Figure 3.27 Image previewed in the Image property value field.
3.2 Constructing the Welcome Application • Align the image • Format > Center in Form > Horizontally
Newly inserted image 3.2 Constructing the Welcome Application Figure 3.28 PictureBox displaying an image.
Lock Controls option 3.2 Constructing the Welcome Application • Locking the controls • Disallow accidental resizing and relocation of controls Figure 3.29 Locking controls by using the Format menu.
3.2 Constructing the Welcome Application • Running the application • Title bar indicates the current application mode • Debug > Start • Terminating the application • Click the running application’s close box
IDE title bar displaying [run] Form (with grid) Running application 3.2 Constructing the Welcome Application Figure 3.30 IDE in run mode, with the application running in the foreground.
Welcome application GUI objects 3.2 Constructing the Welcome Application • ComboBox • Located at top of Propertieswindow • Displays the names and class types of Form and control objects Figure 3.31 Component object box expanded to show the Welcome application’s objects.
Class type of object (Form) Name of object (Form1) Namespace (System.Windows.Forms) 3.2 Constructing the Welcome Application • Namespaces • Organizes classes by functionality • Directory-like entities • System.Windows.Forms Figure 3.32 The name and class type of an object are displayed in theProperties window’s component object box.