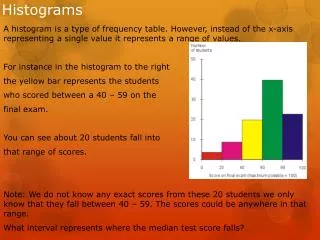
Histograms
Histograms. Part 1: Working with Histograms in-camera. Histograms. While many people are unaware of their histogram, or what it represents, it can be the most vital tool in your toolbox. .


Histograms
E N D
Presentation Transcript
Histograms Part 1: Working with Histograms in-camera
Histograms While many people are unaware of their histogram, or what it represents, it can be the most vital tool in your toolbox. The histogram is basically a graph that looks like a mountain. It represents the maximum range of light values that your camera can capture. There are 256 “levels.” 0 = pure black, 255 = pure white. Grey is in the very middle while the rest of the middle represents mid-range colors such as blue and green. The vertical axis is the relative number of pixels at each of the 256 tonal values. Each prominent color in the image will be represented by it’s own peak on the histogram. The most prominent colors with have higher peaks, while the less prominent will have lower or no peaks.
Dynamic Range Recall for a moment how we used a grey card and our light meter to find Zone V or 18% grey. Our Zone V is ideally a mid-range point between the darkest zone in the image (Zone 0) and the lightest zone in the image (Zone X). However we know that the Zone V is never ideal, it is usually a negotiation with the camera. In the real world, our eyes read about 10 F-stops. The digital chip in your camera only reads about 5 F-stops. Too much light and your image with be all white or blown out. Too little light and your image will be all black.
So if we combine our understanding of the 5 F-stops with the 156 steps of tonality, we can break our histogram down like so. Each F-stop = ~50 steps or levels of tonality. 18% grey falls at approximately 128 (or thereabouts).
Histograms “just are” There is a great deal of opinion as to what an “ideal” histogram looks like. However, there is not necessarily a right or wrong one. A histogram just shows you the way things are. One general rule of thumb is that you would like a nice, even and full mountain with very little “clipping.” A “beautiful” histogram. Notice the clipping on the left and a little bit on the right.
However, there are going to be legitimate moments when the histogram favors one side or the other. The important thing is that you try to prevent the image’s light values from being clipped on the left or right.
RGB Histograms In RGB mode, all colors are derived from varying combinations of the 256 levels of Red, Green and Blue. Pure black is made from 0R+0G+0B while pure white is derived from 255R+255G+255B. Middle grey is 127R+127G+127B. There are three types of in-camera histograms: RGB – shows a composite graph of the tonal values for each color channel Luminance (brightness) – a composite of the three that considers the human eye sensitivity to different colors (first green, then red, then blue) Individual Channel – shows separate histograms for each color Your goal should be to avoid clipping in any of the three channels. There is not much noticeable texture or color in an image when all three color numbers are above 250. There is not much detail or texture in the shadows when all three color numbers are below 20.
Note the similarity between the green and luminosity graphs.
What to do if you are unhappy with your histogram The benefit of using the histogram view when shooting is that you can know immediately if your image is going to be too dark or all blown out and adjust accordingly. There are a variety of ways in which you can adjust the resulting histogram on your image. The best thing to do is to bracket your images. Bracketing = taking multiple exposures of the same thing at different settings to ensure the best outcome. Types of bracketing: Adjusting shutter speed Adjusting aperture Use Programmed Auto Adjusting ISO
More Advanced Bracketing Adjusting white balance On almost all DSLRs, all white balance settings (with the exception of the Preset option) are adjustable from -3 to +3 units on an arbitrary scale by turning the Sub-Command dial (on the front of the hand grip) while pressing the White Balance button. Canon Nikon
More Advanced Bracketing Exposure compensation This is by far the best way to bracket your images. What it does is essentially stop your image up or down. You control exposure compensation by pushing the exposure compensation button and spinning the rear dial. + will make the image higher on the scale (brighter) - will make the image lower on the scale (darker) Canon Nikon