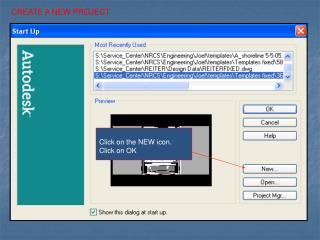
Select New Project from Project menu to create a new project File.
Select New Project from Project menu to create a new project File. Every project created in Build-Quant is assigned with a suitable Project Code. Build-Quant later creates files for various floors by appending floor codes to it . Enter No. of Levels, Default Storey Height and Project Title,


Select New Project from Project menu to create a new project File.
E N D
Presentation Transcript
Select NewProjectfrom Projectmenu to create a new project File.
Every project created in Build-Quant is assigned with a suitable Project Code. Build-Quant later creates files for various floors by appending floor codes to it . Enter No. of Levels, Default Storey Height and Project Title, then click OK.
A line sketch showing the floor levels, floor names and default storey height appears on the screen.
Select Modify Projectfrom Projectmenu to change the storey height for Plinth level.
Select Plinth option fromModify FloorData and click on Modify button
The line sketch with modified height for the plinth floor is displayed.
Open the Architectural plan file, which is already made by Architect.
Different layers shall be provided using Layer Properties Manager
The Architectural drawing should be saved in ‘dxf’ format file to open the same file in Build- Quant.
Hence, the file is saved as Sample-Typ-Arc.dxf
The same file name is appeared on the top of the AutoCAD window. ‘Sample-Typ-Arc.dxf’
Now, in ENSOFT Build-Quant window, select floor option from Floor menu.
Select Typical Floor from the list of floors to enter the plan.
To have a closer view of Typical Architectural Plan, select Zoom window using right click button of the mouse.
Click on Edit menu. ARC Dwg Data is used to specify parameters of Architectural drawing.
ARC Parameters is used to edit control parameters of Architectural drawing.
Select View Drawing option of the Floor menu. View Drawing option is for viewing and generating the single line drawings in Build-Quant.
Select ARC Original option to view original Architectural drawing.
Select ARC Single Line option to generate single line Architectural drawing.
To select Zoom window option, use right click button of the mouse.
View the numbers of the Single line Architectural drawing, using small particular window.
Architectural as well as RCC quantities can be generated by using ‘ View Quantities.’