SQL Notes - Oracle Connect String(1)
Learn how to create and use Oracle connect strings for establishing connections to an Oracle database using SQLNet. Includes step-by-step instructions and examples.

SQL Notes - Oracle Connect String(1)
E N D
Presentation Transcript
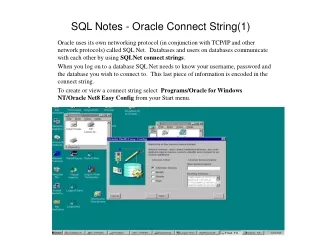
SQL Notes - Oracle Connect String(1) Oracle uses its own networking protocol (in conjunction with TCP/IP and other network protocols) called SQL Net. Databases and users on databases communicate with each other by using SQLNet connect strings. When you log on to a database SQL Net needs to know your username, password and the database you wish to connect to. This last piece of information is encoded in the connect string. To create or view a connect string select Programs/Oracle for Windows NT/Oracle Net8 Easy Config from your Start menu.
SQL Notes - Oracle Connect String(2) In the box entitiled “Choose Action” select “Add New Service”. Enter the name of the new connect string (can be anything) in the box beneath “New Service Name”. Here I have entered “Mercury” since I am trying to connect to the database on that machine.
SQL Notes - Oracle Connect String(3) From the list presented on the next screen select TCP/IP (already highlighted) and move to the next screen. (This is the network protocol that SQL Net will use).
SQL Notes - Oracle Connect String(4) On the next screen enter the name of the computer that contains the database. In this case it is also mercury. I find it easier to use use the machine name for the connect string so that these values are the same. Otherwise if I have a connect string called ‘logos’, I will not know which machine it is pointing to. Leave the Port Number as it is presented.
SQL Notes - Oracle Connect String(5) The next screen will ask you for the SID or System Identifier. This is a 4-character id that uniquely identifies a database on a given machine. In most cases the SID will be ORCL (as it is for Mercury). The SID’s for Williams, however, are different. If you are not sure, just ask me.
SQL Notes - Oracle Connect String(6) The next screen is for testing the connect string. It will ask you for a username and a password. Use the username ‘logos8’ and its password ‘logos8’. Click on the ‘Test’ button. It will return a message telling you if the test was successful. Click on the ‘Done’ button to exit the screen. On the next screen click ‘Next and then on the following one ‘Finish’.
SQL Plus - Logging On To log onto SQL Plus select Programs/Oracle for Windows NT/SQL Plus 8.0 from your Start menu. In the log-on box that appears enter your user name, password and connect string.
SQL Plus - Setting your Working Directory(1) To set your working directory, select File/Save/Replace from the menu bar at the top of the screen.
SQL Plus - Setting your Working Directory(2) On the “Save As” screen that appears, navigate to the folder that you want to be your working folder (the one with your scripts), and then type x.sql in the File name box at the bottom and click on Save. This will save a pointer to the directory you have chosen. NOTE: make sure that you do not inadvertently select the name of file that you want to keep, since this process replaces the contents of the file you choose with the contents of the buffer.
SQL Plus -Executing a Script There are two ways to execute a script (these examples use the script “source.sql”) 1) type the script name preceded by an @ sign SQL>@source.sql 2) type the script name preceded by the word ‘start’ SQL>start source.sql The extension .sql is assumed so it is not necessary to type it in. If your script has a different extension, eg. Source.pls, you must type it.
SQL Plus - Creating/Editing/Viewing a Script To create or edit or view a script from within SQL Plus type SQL>edit newscript.sql where ‘newscript.sql’ is the name of the script you want to edit or create. If SQL Plus finds the script it simply opens it in Notepad. If it cannot find a script with this name it asks you if you want to create a new one. Click on ‘Yes’. It then creates an sql file with this name and opens the blank file in Notepad. Save your changes when you are done by selecting File/Save from the Notepad menu. Selecting File/Exit returns you to the SQL> prompt.
SQL Notes - Basic Format Format commands for output set linesize 400 set pagesize 9999 column word format A60 word_wrapped spool simple1 select word_id, word, head_word, word_count, black_hole_location from word_phrase where word like 'mo%' and company_code = 'LOG' and language_code = '04' and word_count > 1 order by 2; spool off Command for saving output to an external file Select clause (comma separated) From clause Where clause (contains conditions of query) Ordering clause (2 means second column in select clause) ‘like’ operator uses wildcard ‘%’
SQL Notes - Joins If you select from more than one table you will need to make joins between the tables. This is so that Oracle will know how it should align the rows from the tables. The joins are made between columns that are common to the tables, e.g. below the join between Word_Phrase and Morphology is made on the columns “Word_ID” and “Company_Code” set linesize 400 set pagesize 9999 column word format A60 word_wrapped spool wc1pat53 select wp.word, mor.word_class_code, mor.pat_number from word_phrase wp, morphology mor where wp.word like '%' and wp.company_code = 'LOG' and wp.language_code = '04' and wp.word_id = mor.word_id and wp.company_code = mor.company_code and mor.word_class_code = '01' and mor.pat_number = 53 order by 2; spool off Table aliases From clause (comma separated) Join between Word_phrase and Morphology
SQL Notes - Variables Variables defined and set by user input accept wc CHAR Prompt 'Enter Word Class Code:' accept pat CHAR Prompt 'Enter Pat Number:' spool wcpat&wc&pat select wp.word, mor.word_class_code "WC", mor.pat_number "Pat", mor.source_stem_number "Stem", mn.superset_id, mn.set_id, mn.subset_id from word_phrase wp, morphology mor, meaning mn where wp.word like '%' and wp.company_code = 'LOG' and wp.language_code = '02' and wp.word_id = mor.word_id and wp.company_code = mor.company_code and mor.word_class_code = '&wc' and mor.pat_number = '&pat' and mor.usage_id = mn.usage_id and mor.company_code = mn.company_code order by 2,3; spool off “Accept” statement asks for user input Column Aliases From clause (comma separated) Join between Word_phrase and Morphology Variables called in script (preceded by &) Join between Morphology and Meaning
SQL Notes - A word about Null Values If you need to specify in your ‘Where clause’ that a certain column be empty or have what is called NULL value, you must use “IS NULL” instead of “ = NULL” select wp.word, mor.word_class_code "WC", mor.pat_number "Pat", mor.source_stem_number "Stem", mn.superset_id, mn.set_id from word_phrase wp, morphology mor, meaning mn where wp.word like '%' and wp.company_code = 'LOG' and wp.language_code = '02' and wp.word_id = mor.word_id and wp.company_code = mor.company_code and mor.word_class_code = '01' and mor.pat_number in(56, 58, 54) and mor.source_stem_number is NULL and mor.usage_id = mn.usage_id and mor.company_code = mn.company_code; ‘in’ operator takes comma-separated list in parenthesis.
SQL Notes - A word about the NVL function If you are using an “Accept” statement but want to allow for the user to supply no value, and you want this to mean ALL possible values, you must use the NVL function in your ‘Where’ clause. The NVL function takes two values. It uses the first if the first one is not null, otherwise it uses the second. accept wc CHAR DEFAULT '' Prompt 'Enter Word Class Code [ALL]: ' accept pat CHAR DEFAULT '' Prompt 'Enter Pat Number [ALL]:' select wp.word, mor.word_class_code "WC", mor.pat_number "Pat", mor.source_stem_number "Stem", mn.superset_id, mn.set_id from word_phrase wp, morphology mor, meaning mn where wp.word like '%' and wp.company_code = 'LOG' and wp.language_code = '02' and wp.word_id = mor.word_id and wp.company_code = mor.company_code and mor.word_class_code = NVL('&wc', mor.word_class_code) and mor.pat_number = NVL('&pat', mor.pat_number) and mor.source_stem_numberis NULL and mor.usage_id = mn.usage_id and mor.company_code = mn.company_code; Key word ‘DEFAULT’ followed by '' SETS VARIABLE TO NULL But NULL not allowed, as in ‘= NULL’ so we must use the NVL function
SQL Notes - Source-to-Target Here is a SQL that joins all the tables necessary to see a source word (here the word ‘house’) and its targets (here I’ve select German as the target). Target Word_Phrase and Morphology select distinct wp.word "SOURCE", twp.word "TRANSFER", tmor.word_class_code "TWC", tmor.pat_number "TPAT" from word_phrase wp, morphology mor, meaning smn, transfer tr, morphology tmor, word_phrase twp where wp.company_code = 'LOG' and wp.language_code = '02' and wp.word = 'house' and wp.word_id = mor.word_id and wp.company_code = mor.company_code and mor.company_code = smn.company_code and mor.usage_id=smn.usage_id and smn.company_code=tr.company_code and smn.meaning_id=tr.meaning_id and tr.target_language_code = '01' and tmor.usage_id=tr.target_usage_id and tmor.company_code=tr.company_code and tmor.company_code=twp.company_code and tmor.word_id=twp.word_id; Source Word_Phrase and Morphology Join between source Word_phrase and source Morphology Join between source Morphology and Meaning Join between Meaning and Transfer Join between Transfer and Target Morphology Join between Target Morphology and Target Word_Phrase
SQL Notes - Outer Joins(1) • In a simple join of two tables, only those rows from the first table are returned that “match” rows in the second table. • An outer join will return all those rows that match plus all rows from the first table that do not have a corresponding entry in the second table. • A plus sign enclosed in parenthesis is the symbol for an outer join, ie. (+) and it is attached to the table that will return fewer rows. • The following page shows an example that is commonly used in viewing Logos word_in_phrase data.
SQL Notes - Outer Joins (2) Here we want to see all the specified entries in Word_Phrase irrespective of whether they have a non-head inflected word (ie a word_in_phrase entry). This query returns 109 rows. If I take out the (+) symbols, it returns only 27 rows. Select ….. from word_phrase wp, morphology mor, word_phrase owp, morphology omor, word_in_phrase wip where wp.company_code = 'LOG' and wp.language_code = ’04' and wp.word like '%' and wp.word_id = wip.word_id(+) and wp.company_code = wip.company_code(+) and wip.usage_id = omor.usage_id(+) and wip.company_code = omor.company_code(+) and omor.word_id = owp.word_id(+) and omor.company_code = owp.company_code(+) and wp.word_id = mor.word_id and wp.company_code = mor.company_code and mor.word_class_code = ‘05’; “Second copies” using different table alias Outer join begins with join between Word_Phrase and Word_in_Phrase The (+) must be carried to each successive join here between Word_in_Phrase and a “second copy” of the Morphology table and then this “second copy” of Morphology and a “second copy” of Word_Phrase.
SQL Notes - Set Operators Set operators combine the results of two queries into a single result. The two queries must have the same number of columns in their select lists. UNION - Returns all distinct rows selected by either query. MINUS - Returns all distinct rows selected by the first query that are not also selected by the second. INTERSECT - Returns all distinct rows selected by both queries. The query below selects all Spanish phrases and their ID’s that have a word count greater than 1, that are pronouns and which also do not have an entry in word_in_phrase (I.e, they have no non-head inflected words). Outer query so that ‘Word’ can also be selected. (‘Word’ is not a column in Word_in_Phrase) select word_id,word from word_phrase word_id in (select a.word_id from word_phrase a, morphology b where a.language_code = '04' and a.word_count > 1 and a.word like '%' and a.word_id = b.word_id and a.company_code = b.company_code and b.word_class_code = '05' minus select word_id from word_in_phrase); Two selects in the ‘Minus’ set operation
SQL Notes - Viewing the Structure of a Table If you are not sure which columns are in a given table you can view the structure of the table by typing the command ‘desc’ and then the table name at the SQL prompt. Data Types List of Columns Is NULL allowed
SQL Notes - Viewing tables(1) If you would like to know what tables are in the database you can select from the system views: all_tables and all_tab_columns (to see a list of each table’s columns)
SQL Notes - Viewing tables(2) If you do not know what columns are contained in the view, use the ‘desc’ to describe it the same way you would view the structure of a table. SQL>desc all_tab_columns
SQL Notes - Key Users LOGOS8 userid through which Termbuilder accesses the database. Logos8 has full rights against all tables, and Termbuilder handles levels of security. Note: NEVER work as Logos8 when you are in SQL Plus. LOGOS_787 This userid owns all of the dictionary tables and, of course, has full rights against them. NEVER work as Logos_787 either! LOGOS_REF owns all of the Definition/Description tables, showing possible values for the columns in the dictionary tables. LOGOS_SAL owns the tables that establish the SAL hierarchy. LOGOS_PAT owns the tables containing all possible morphological patterns of words LOGOS_SEMTAB owns the semtab_data table
SQL Notes - Creating a Table from another Table One of the easiest ways of creating a table of data for editing purposes is using the create table temp as (select ….from…where….); Statement (where ‘temp’ is an arbitrary name for the new table you are creating). The select statement can be simple or as complex as a full source-to-target query. create table alphadots01 as ( select distinct wp.word, wp.word_id, mor.usage_id, .... tmor.word_class_code "TWC" from word_phrase wp, morphology mor, meaning smn, transfer tr, morphology tmor, word_phrase twp where wp.company_code = 'LOG' and wp.language_code = '01' and wp.word like '_.' .... and smn.superset_id = '01' and smn.subset_id = '900' and smn.company_code=tr.company_code and smn.meaning_id=tr.meaning_id and tmor.usage_id=tr.target_usage_id and tmor.company_code=tr.company_code and tmor.company_code=twp.company_code and tmor.word_id=twp.word_id); Select clause From clause Single-character wildcard ‘_’ Where conditions
SQL Notes - Simple Updates Often a simple update can be issued to change a row to a new value or several rows to a common new value. Simple update syntax: update [table_name] set [column_name] = [new value] where ……; Simple update against a single row Update word_phrase set word_count = 2 where language_code = ‘02’ and word = ‘blue lagoon’; Update morphology set pat_number =535 where language_code = ‘01’ and pat_number = 42; Simple update against many rows
SQL Notes - Complex Updates DECLARE v_wid temp_word_phrase.word_id%TYPE; counter number; Cursor c_1 IS select word_id from temp_word_phrase for update of word_id; BEGIN OPEN c_1; LOOP FETCH c_1 into v_wid; IF c_1%NOTFOUND THEN EXIT; ELSE select word_id.nextval into counter from dual; update temp_morphology set word_id = counter where word_id = v_wid; update temp_word_in_phrase set word_id = counter where word_id = v_wid; update temp_word_phrase set word_id = counter where current of c_1; END IF; END LOOP; commit; CLOSE c_1; END; Variable declaration If you need to change many rows to all different values, you will need to use Oracle’s programming language PL/SQL. Cursor declaration for fetching rows from a select statement and updating them one by one. Placing the contents of the sequencer into the variable ‘counter’ Simple update statements against an individual cursor row
SQL Notes - ODBC(1) If you are connecting to a machine for the first time, you may need to set up an ODBC data source. Select Settings/Control Panel and then ODBC from your Start menu. In the menu that appears select the tab called System DSN. Click on the Add button to add a new Data Source.
SQL Notes - ODBC(2) Click on the Add button to add a new Data Source. Select “Oracle ODBC Driver” and then click on Finish.
SQL Notes - ODBC(3) In the box next to Data Source Name type in what you wish to call the new data source. This can be anything, but I find it helpful to keep it the same as the machine name and/or connect string. In the box next to Service Name, type in the name of the connect string you are using. Click on ‘OK’ and then ‘OK’ again on the next screen to exit the ODBC Administrator.
SQL Notes - Logos Server Properties File In the Logos\bin directory there is a file called ‘server.properties’. The is the file that tells Logos Gateway which database to connect to. There are two lines that need to be changed in order to change which database the gateway connects to. Oracle SID Server name ODBC data source
SQL Loader - For Loading Data from External Flat Files SQL Loader requires 4 components: • an external file containing data. I normally use comma-separated files generated in Excel. • a table into which you will load this data. You will need to pre-create the table. • a control file (see next page) which tells SQL loader how the data in the flat file matches to the columns in the table. • a batch file to run the load command (optional). This can also be run directly by entering the commands at a dos prompt, e.g. sqlldr80 USERID=logos8/logos8 DIRECT=TRUE CONTROL=dmrtemp.ctl LOG=dmrtemp.log DATA=data.csv
SQL Loader - Sample Control File LOAD DATA CHARACTERSET UTF8 READ BUFFERS 20 APPEND INTO TABLE dmrtemp TRAILING NULLCOLS (word_id TERMINATED BY ',', word TERMINATED BY ',' OPTIONALLY ENCLOSED BY '"', usage_id TERMINATED BY ',', word_class_code TERMINATED BY ',', pat_number TERMINATED BY ',', new_pat TERMINATED BY ',', source_stem_number TERMINATED BY ',', new_stem TERMINATED BY ',')
SQL Notes - Creating Tables The following SQL statement will create a table: create table dmrtemp ( word_id number, word varchar2(255), usage_id number, word_class_code char(2), pat_number number, new_pat number, source_stem_number number(38), new_stem number(38));