Mastering Isometric Drawing Techniques
280 likes | 607 Views
Learn the fundamentals of isometric drawing, including perspective, shading, and sketching techniques for creating realistic 3D objects on 2D surfaces. Explore various examples and historical context. Perfect your skills in visualizing objects in multiple views.

Mastering Isometric Drawing Techniques
E N D
Presentation Transcript
Basic Engineering Drawing 1. Freehand Sketch (2D or 3D) talked about already • Pictorial Sketches (3 dimensional) • Isometric – we will learn about this today • Oblique sketch • Perspective • Orthographic Drawing (Multi-view Sketch, Orthographic projection Drawings) (2 dimensional)
Pictorial Drawing • 2D illustration of a 3D object • Provides a realistic view of a 3D object • Shows three faces of an object in one view • Three types of pictorial Perspective Oblique Isometric
Isometric Pictorial Isometric means equal measure. • Three adjacent faces on a cube will share a single point Depth – front to backWidth – left to rightHeight – up and down depth width Top height Front Right
Pros of Isometric Drawing • Isometric drawing look the “most 3D” 2. Isometric are the most widely used type of pictorial in engineering A. They are used as the standard type of pictorial B. They are used in engineering software
Give out Isometric PAPER Find 30, 60, and 120 degree angles on paper and label it
1. Draw a 6 inch cube2. Label a 30, 60 and 120 degree angle3. Labe the front, right and top side4. Label width, depth, and height(together)
On your own A. Draw a 4 unit cube. • Then label front, left, and top view. • Label depth, height and width • Label 120 degree,30 degree, and 60 degree angles B. Draw a 3 unit cube with shading C. Draw a rectangular prism with width 4, height 3, and depth 5 units. Shaded
w 1. 4 unit cube label no shading 60 2. Draw a cube with lengths of 3 units d Top w height d Front Left width depth 3. Draw a rectangular prism with width 4, height 3, and depth 5 units
Different sides, different view of object Top, Front, Right-Side view orientation Top, Left-Side, Front, view orientation
View Selection • Recommendations for how to select the front view • Most natural position or use • Shows best shape and characteristic contours • Longest dimensions • Fewest hidden lines • Most stable and natural position
Front View Selection No hidden edges Best shape Description BEST FRONT VIEW Most natural position Longest Dimension
Proportion and Estimation good sketch Good sketching requires a sense of proportion, and the ability to estimate size, distance, angles, and other spatial relationships. poor sketch
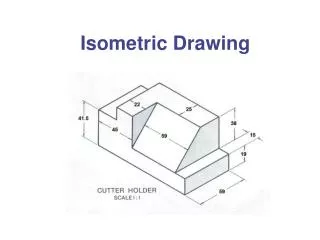
Isometric Sketching The following examples show the steps used to create isometric sketches of simple geometric objects, along with tonal shading techniques.
EXAMPLE 1 Isometric Sketch – beginner
Step 4: Tonal Shading • Decide the light source position, and add tonal shading to two of the three faces. • A shading option is to use parallel lines drawn closely together on a face. • Increase contrast by cross-hatching lines on darkest face.
EXAMPLE 2 Isometric Sketch - intermediate
Step 4: Tonal Shading • Decide the light source position, and add tonal shading to two of the three faces. • A shading option is to use parallel lines drawn closely together on a face. • Increase contrast by cross-hatching lines on darkest face.
EXAMPLE 3 Isometric Sketch Cylinder
Add tonal shading to curved surface by drawing straight lines between the elliptical faces. Varying the distance between the lines will give the illusion of reflected light.
EXAMPLE 4 Isometric Sketch Curved Lines Advanced
Chair Start the chair boxy like below using construction lines Curve the appropriate edges to make it curvy. Darken in object lines. Add detail and shade
Isometric Sketch Historical Example • Earl Silas Tupper (1907–1983) invented an air-tight Tupper Seal in 1947 • Patent drawings of bowl and cover, 1957 (isometric pictorial)