Mastering Wire Sculpture: Constructing Proportional Humanoid Figures
Discover the art of wire sculpture by learning how to construct a humanoid figure using correct proportions and techniques. This guide outlines essential steps, including sketching two views of your figure, ensuring volume in at least two places, and incorporating story elements into your design. Safety is paramount; learn how to use tools effectively and prevent injury. From sketching the head and shoulders to braiding wire for strong connections, this resource will guide you in creating a stable, artistic piece that stands on its own.

Mastering Wire Sculpture: Constructing Proportional Humanoid Figures
E N D
Presentation Transcript
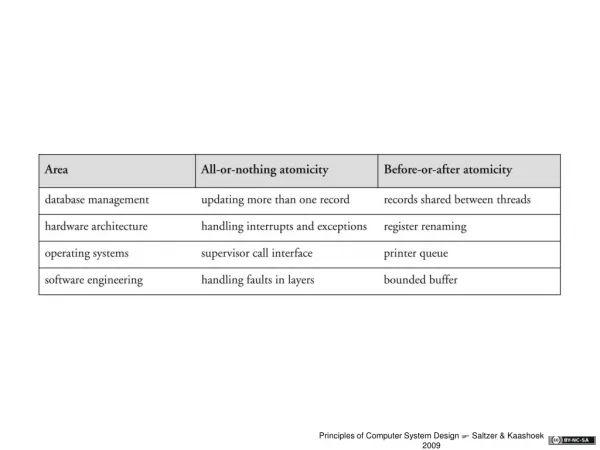
7.5 heads tall • Shoulders are 3 heads wide • Arms: “wingspan” is equal to the height of the figure (7.5 heads) • Torso and neck: 2 heads • Waist & Pelvis: 1 head
Designing your figures is like doing a gesture drawing • The essential elements of a pose • Props can help • Your figure should tell a story
Conductor Bass Player Professional Artist Rudy Kehkla @ rudykehkla.com
Leonardo Da Vinci Picasso Professional Artist Rudy Kehkla @ rudykehkla.com
What is Required of Your Sculpture: • Construct a humanoid figure using correct proportions • At least 2 parts of the figure must enclose volume • You may build your figure using a skeletal structure, contour structure, or any combination • Tell a story with your figure • The figure must be able to stand up on its own
Sketch: • Two views of your proposed sculpture • Demonstrates volume in at least two places • Tells a story • Shows how it will be supported • This is a formative grade. • As soon as your sketch is approved we can start your sculpture!
Starting the Figure Day 2
Steps: • Start with the sketch. • Next, construct the head, spine, and shoulders of the figure – everything else attaches to this. • From there you will work constructing the figure however your logic dictates. • The last step will be to make sure the figure can securely stand on its own.
Safety Concerns: • Be aware of where the end of wire is at all times. • Place a small loop on the end of the wire to prevent harm.
Tool Use: • Needle-nose pliers have two parts: • A cutter, located where the round circle or indent is • Pincers, used to grab and bend the metal • Watch the pliers as you use them, they can pinch or cut
Braiding • The best way to join two pieces of wire is to braid them • It makes a strong connection • It does not make a clump or knot which is unattractive • This is done by twisting or twining two piece of wire together over a length
Crimping • Most of the time the wire can be bent by hand • Crimping is using the pliers to squeeze wire together, to create a smaller space between two ends of the wire • This can be used to create small details, like ribs or fingers
Outline w/twist Stick Figure
Outline w/bones Wrapped Leg