UPCMC (v4.x) INSTALLATION – 1
320 likes | 700 Views
UPCMCv4.0.0.0_Prerelease. UPCMC (v4.x) INSTALLATION – 1. Download the latest UPCMC from the PCC (FT) Website. Double-Click the icon and install the tool to your PC. NB: You will need ‘Administrator’ rights to successfully install the UPCMC. UPCMC (v4.x) INSTALLATION – 2.

UPCMC (v4.x) INSTALLATION – 1
E N D
Presentation Transcript
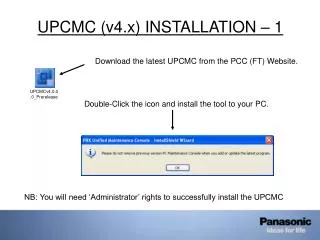
UPCMCv4.0.0.0_Prerelease UPCMC (v4.x) INSTALLATION – 1 Download the latest UPCMC from the PCC (FT) Website. Double-Click the icon and install the tool to your PC. NB: You will need ‘Administrator’ rights to successfully install the UPCMC
UPCMC (v4.x) INSTALLATION – 2 Select the ‘Repair’ option (Pre-selected) and click ‘Next’.
UPCMC (v4.x) INSTALLATION – 3 If you are upgrading the UPCMC, then you will have the option to backup your connection profile information, NB: For a ‘new’ installation, this option will not be presented. Click next to continue
UPCMC (v4.x) INSTALLATION – 4 Click ‘Next’ to continue. Then, accept the license agreement and Click ‘Next’.
UPCMC (v4.x) INSTALLATION – 5 NCP100/500 (v1.0) PCMC component is installed.
UPCMC (v4.x) INSTALLATION – 6 User and Company name can be entered.
UPCMC (v4.x) INSTALLATION – 7 Be sure to select the correct country suffix code for your region. Then select the required PCMC screen language.
UPCMC (v4.x) INSTALLATION – 8 Select the destination folder for the installation.
UPCMC (v4.x) INSTALLATION – 9 A summary of the provided details will be displayed for confirmation. If the details are correct, the installation can begin
UPCMC (v4.x) INSTALLATION – 10 After the installation has completed (it takes several minutes), the option to copy the USB drivers is presented. If necessary, copy the files to the following directory :- C:\WINDOWS\system32\drivers
KX-NCP500/1000 PCMC – 1 Be sure to check the contents of the ‘Information’ page. It contains details of required LPR s/w levels and conversion information.
KX-NCP500/1000 PCMC – 2 Once installed, click the UPCMC Shortcut to launch the application Then enter the password for the desired level (INSTALLER/USER etc) Click ‘OK’ to continue.
KX-NCP500/1000 PCMC – 3 The same options as earlier UPCMC are presented.
KX-NCP500/1000 PCMC – 4 PBX Replacement. Sorry – PBX Replacement for NCP500/1000 is not possible.
KX-NCP500/1000 PCMC – 5 Connect. Connection profiles can be created and managed. KX-NCP500/1000 can be selected.
KX-NCP500/1000 PCMC – 6 Call-Pickup tool is added. After assigning extensions to their correct groups, this tool can be used to make easy call pickup for each user. Using this tool will result in adding *400x to the 1st Speed-Dial location. (x = User Group number) The user can then pick-up a call from an extension in their group by dialing *0
KX-NCP500/1000 PCMC – 7 Slot view is changed to represent NCP Model (NCP1000).
KX-NCP500/1000 PCMC – 8 Virtual Slot view is changed to represent NCP Model (NCP1000).
KX-NCP500/1000 PCMC – 9 CA License status can be viewed via the Activation Key Page. Automatic OUS/INS can be made after adding additional licenses. (Activate License)
KX-NCP500/1000 PCMC – 10 2.9 System Settings – Option 6(CTI) 1st Party CDR Interval Timer is not shown. SLT Ring Default setting is changed from ‘Disable’ to ‘Enable’ (Based on TDE100/200)
KX-NCP500/1000 PCMC – 11 ‘Search’ function is added to Extension List View. It is possible to search by Ext number or name.
KX-NCP500/1000 PCMC – 12 4.1 – Option 8 (Extension Settings) – SLT MW Mode This TAB exists in the PCMC, but has no function. Only SIP MWL is supported, not SLT MWL. NB: This TAB may be removed for final release UPCMC V4.x
KX-NCP500/1000 PCMC – 13 4.1 – Option 9 (Extension Settings) – Built-in Communication Assistant It is possible to specify the type of CA License each extension can use. (Enable = Pro) NB: This tab also appears in the PS Settings Options, but is not supported till v2.x
KX-NCP500/1000 PCMC – 14 5.3.2 DISA Message – FAX Transfer function is added This function is same as TDA15/30 FAX Transfer Function
KX-NCP500/1000 PCMC – 15 V-SIP GATEWAY “RBT to outside caller” added to SHELF Property.
KX-NCP500/1000 PCMC – 16 V-IP GATEWAY Incoming Caller DTMF Default setting is “Outband (H.245)” – TDE Default setting is “Inband”