Connecting to Databases Using JDBC in Java Enterprise Applications
This overview guides you through database access using JDBC in Java applications. It covers important concepts such as establishing connections to databases, understanding JDBC drivers, constructing connection strings, and utilizing the java.sql package. Learn how to load the JDBC driver, create connection objects, execute SQL statements, and process results with ResultSets. The tutorial emphasizes the use of JDBC for dynamic content generation in JSP pages without the need for complex DSN configurations. Step-by-step instructions provide clarity on accessing MySQL databases using JDBC.

Connecting to Databases Using JDBC in Java Enterprise Applications
E N D
Presentation Transcript
Database Access Using JDBC BCIS 3680 Enterprise Programming
Overview • Connecting to databases • JDBC driver • Connection steps • Connection String • Classes used • Methods used • ResultSet • Reading values from ResultSet
Working with Databases • The java.sql package contains many classes for working with databases, e.g., • Connection • Statement • ResultSet • They are designed to be independent of the vendor of the DBMS you connect to. • This abstraction is achieved by adding a driver layer between these classes and the DBMS.
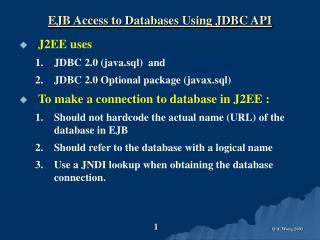
Database Access from JSP • To connect to a database for dynamic contents, you want to establish JDBC connection inside your JSP pages. • Other options are available, e.g., ODBC. But JDBC is straightforward and you don’t have to configure DSNs on the local machine. • JDBC is a technology developed by Sun to allow to access virtually any database system from JSP pages or Java applications.
Using JDBC Driver to Work with MySQL • Download the connector zip from the course website. • The file unzips to the mysql-connector-java-5.1.7 folder, which contains the JDBC connector file called mysql-connector-java-5.1.7.bin.jar. • In the deployment folder for your web application, create a WEB-INF subfolder as usual. Under that subfolder, create a subfolder named lib. • Copy the connector JAR file - mysql-connector-java-5.1.7-bin.jar - into \WEB-INF\lib. • Import classes from the java.sql package. • Do this by using a page directive for importing. <%@ page import="java.sql.*" %>
Steps to Use Database in JSP • Load the JDBC driver • Compose the connection string • Establish the connection • Create the statement object • Execute a query or update • Process the results • Close the connection
Loading the JDBC Driver • The driver acts as the bridge between the JDBC classes and the database. • The driver is a piece of software that knows how to talk to the DBMS. • To load a driver: Class.forName("com.mysql.jdbc.Driver"); • This is just another way to say: com.mysql.jdbc.DriveraDriver = new com.mysql.jdbc.Driver(); • Calling the newInstance()method (such as p. 331 in Metlapalli book) is redundant.
Defining the Connection String • Use the jdbc: protocol followed by specific subprotocal and the name of the database. • For some subprotocals, you may need to specify the database server host name and port number, user name and password, etc. • The connection string is different for different database management systems. • Example: jdbc:mysql://localhost:3306/forta? user=root&password=bcis3680 • It’s a good idea to save this as a String variable.
Parts of Connection String jdbc:mysql://localhost:3306/forta?user=root&password=bcis3680 • Note what characters (:, ?, &, etc.) connect the different parts.
Establishing the Connection • Create a connection to the database server. • To make the actual network connection, you need to pass the connection string to the getConnection() method of the DriverManager class, as follows: Connection cxn = DriverManager.getConnection(cxnString);
Creating the Statement Object • The connection object only establishes a connection to the database. • To actually issue SQL statements to the DBMS, you need a Statement object. • When we are at a DBMS console (e.g., MySQL console), we can interact with it directly by running SQL commands (interactive access). • But JSP code can’t talk to the DBMS console interactively. So we need to set up a way for the code to send SQL commands to the DBMS when needed (programmatic access). • We create a Statement object by calling a method of the connection object. Statement stm = cxn.createStatement();
Executing SQL Statements in Code • A single Command object can be used to run multiple SQL statements. But we need to call the right method, depending on the type of the statement. • For SQL statements that modify the database – executeUpdate() • For creating, deleting, or updating row(s) in table(s). • This method is a value-returning method. • Returns an integer indicating how many rows were affected. • Returns 0 if the update fails. String sql = "CREATE TABLE product " + "(productID char(5), name varchar(15))"; stm.executeUpdate(sql);
Executing SQL Statements in Code • For SQL statements that do not modify the database – executeQuery() • For retrieving data from table(s). • This method also is a value-returning method. • But it returns a ResultSet object containing the selected rows from table(s) in the database. String sql = "SELECT * FROM customers"; ResultSetrs = stm.executeQuery(sql);
The next() Method • The ResultSet class has a next() method. • When a ResultSet is returned, the cursor is parked outside of it. Data in the ResultSet is not read or displayed automatically. • We must call the next() method to move the cursor into the rows in the ResultSet to read data. • Each next() method call moves the cursor forward by one row. • The next() method is a value-returning method. It performs an action (moving into next row) and returns a boolean value. • Returns true if the cursor moved into a readable row. • Returns false if the cursor didn’t move into a readable row (having finished all rows in ResultSet or the ResultSet is empty).
Non-Empty ResultSet • If the ResultSet is not empty (the query found matching data): • Calling next() for the first time moves the cursor into the first row in the data – returns true. We know the ResultSet is not empty. • As long as the last row of data has not been reached, each time next()is called, the cursor moved into a readable row – returns true. • Calling next() when the cursor is at the last row of data moves the cursor out of the last row. Now the cursor is at a place where there is nothing to read – returns false. • So, in the case of a non-empty ResultSet,when false is returned from calling next(), we know we’re done with reading data.
Empty ResultSet • If the ResultSet is empty (the query found no matching data), calling next() for the first time was not able to move the cursor into any readable data – returns false. • So, if false is returned after we called next() for the very first time, we know the ResultSet is empty and contains no data.
FYI – Scrollable ResultSet • ResultSet by default is forward-only. • For some particular reasons, e.g., to check whether a ResultSet is empty before you ever wants to access it, you can change its behavior to scrollable or insensitive to the direction of scrolling. • This is done by creating a different type of Statement object. For example, Statement queryStatement = connection.createStatement( ResultSet.TYPE_SCROLL_INSENSITIVE, ResultSet.CONCUR_READ_ONLY); • Then, you will be able to run the previous() method in addition to next().
Reading Data • While we are at a row in the ResultSet, we can read data stored in that row, one column at a time. • To read data, use a get???() method, where ??? represents a data type that is compatible with the data type of that column (as defined in the table’s schema). • For example, if the column is of a text type (e.g., varchar), then use getString(). • If the column has integer as its data type, then use getInt().
Reading Data • When using get???() methods, an argument needs to be passed to indicate which column in the row we want to read. • We can pass the name of the column in the form of a String. • Alternative, if we know the order of the columns in the ResultSet, we can pass the column’s position in the form of an integer. • Note the counting starts at 1, not 0. So to read the third column the method call will be get???(3).
Reading Data • Often a ResultSet contains multiple rows of data. Since the order and data types of the columns are uniform throughout the rows, the data reading actions are the same for every row. • We therefore want to code the actions as the loop body of a loop and let them be repeated for as many times as there are rows in the ResultSet. • Typically a while loop is used. • To get out of the loop, we use the return value of the next() method as the “sentinel value”. • After the last row is read, calling next() moves the cursor into “nothingness”. • The method call returns false – the loop stops.
When You’re Done • Disconnect from the database connection: • Close ResultSet • Close Statement • Close Connection