Blowers, Motors and Belts
260 likes | 496 Views
Blowers, Motors and Belts. This power point presentation will review Section C2 in the Student Handout Packet. You may also need to refer back to the basic Electric Wiring course information on motors. Blower Motors: Belt Drive.

Blowers, Motors and Belts
E N D
Presentation Transcript
This power point presentation will review Section C2 in the Student Handout Packet. You may also need to refer back to the basic Electric Wiring course information on motors.
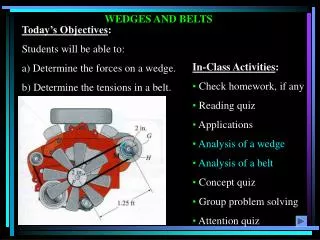
Blower Motors: Belt Drive Motor and blower are two separate devices connected with a belt(s) and pulleys. Most likely 1725 or 1750 RPM 1/3 HP or less HP Split Phase or Capacitor Start Motor Generally an open drive housing using a Centrifugal Switch
Blower Motors: Direct Drive Blower wheel is mounted on the motor shaft. Motor is mounted on blower housing. Shaded Pole, PSC or ECM motor These motors are multispeed Lower HP for shaded pole motor Higher HP for the PSC and ECM
The C2 section material does NOT deal with the ECM motor. The ECM is covered as separate material.
Blower Speed Adjustment The blower speed can be changed either by changing the wire ‘taps’ on the direct drive system, or by changing the size of the drive (motor) pulley on the belt drive system.
Blower Speed Adjustment Why do we need to adjust the blower speed? Heating requires one speed and cooling requires a different speed.
Blower Speed Adjustment The heating speed is determined by the temperature rise. The cooling speed is determined by the temperature drop. The speed of the ECM motor is determined electronically by the manufacturer of the heating equipment. Reference the ECM material.
Temperature Rise The temperature rise procedure is found in your textbook as well as page C2c. Be sure to review it. Pay particular attention to what you do if the rise is too high or too low.
Temperature Rise Formula: Temperature Rise = Supply Air – Return Air
Temperature Rise If the rise is too high or too low, the solution is rather simple. If the rise is too high, RAISE the blower speed. If the rise is too low, LOWER the blower speed. In simple words, do to the blower speed what the rise is. Rise high, speed up blower. Rise low, slow down blower.
Temperature Drop Formula: Temperature Drop = Return Air – Supply Air Remember this formula for this course, but more information will be provided during the air conditioning course, since temperature drop is for air conditioning.
Blower Speed The blower speed can be changed in one of three ways. Wire taps on the motor – direct drive blowers Adjust pulley on the motor – belt drive blowers Follow manufacturer’s directions for the ECM motor/blower arrangement.
Pulleys The pulley on a motor may either be of a fixed or adjustable design. Another name for a pulley is sheave.
Pulleys When an adjustable sheave is open, the belt will ride LOW in the pulley and the blower speed will be slower. When an adjustable sheave is closed, the belt will ride HIGH in the pulley and the blower speed will be faster.
Pulleys The sheave should never be adjusted open so far that the bottom of the ‘V’ groove in the belt is off the slope of the groove. Nor should the sheave be adjusted closed so far that the top of the belt is above the top of the pulley. In either situation, the belt will not be in proper contact and will result in improper belt wear, slippage of the belt and improper pulley groove wear.
Belts Belts are sized in two ways: Manufacturer and part number as identified on the belt. Width at the TOP of the belt and its length (circumference).
Belt Tension Page C2e indicates the belt should deflect ¼” per foot of belt span with 2 – 3 pounds of force. This is great when you have a belt tensioning tool. Unfortunately, most technicians do not have this tool. Most go by ‘experience.’
Belt Tension What does ‘experience’ teach you? The belt deflection should be about ¼” per foot of free span with a slight amount of tension. Remember the 2 – 3 pounds of force? This is what is described as a ‘slight amount of force.’
Belt Tension If the belt tension is too tight it will lead to premature failure of the belt. There will be a greater amount of friction and this will produce heat. The heat will go from the pulley to the motor and fan bearings and shorten their life. If the belt is too loose, friction will be less and there will be a power loss and the fan may not operate at correct speed.
Lab. Time There are several lab. assignments that relate to blowers, motor and belts. It would be important for you to complete the following as soon as you can. In fact, you may need to review the information even after you have completed it one time.
Lab. Time Watch the video: ‘Belt Drive Tips’ Power Point Presentation: ‘ECM-CCAC’ Video: the ECM ‘GE Blower Box’ The three items listed above are critical to you moving forward in the lab. relative to blowers, motors and belts.
Additional Tip It is highly recommended that you return to the material from the Basic Electric Wiring course and review information on motors and capacitors. As part of that process, it would be wise for you to review the Motors and Relays exam from that course.