
Dental Panoramic X-Ray
E N D
Presentation Transcript
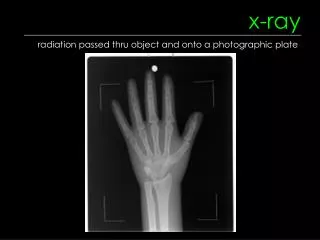
PANORAMIC X-RAY • The panoramic unit is often used to cut down on the amount of radiation the patient is exposed too pared to a CMX. This technique is also utilized to overcome certain limitations of intraoral techniques, such as limited coverage of the lower jaw and facial structures. Other advantages of using the panoramic technique include a quicker procedure, better coverage of the dental arches, and earlier detection of many dental problems. One interesting fact about a panoramic X-ray is it is used for identification of unidentifiable military members remains.
PANORAMIC X-RAY • To produce a panoramic dental X-ray, a narrow X-ray beam (much smaller than the intraoral X-ray beam) is rotated horizontally around the patient’s head. The X-ray tube and film move, although the film moves in an opposite direction of the tube. This is done to ensure the resulting radiograph is proportionally accurate. The dental X-ray system used for this type of radiograph is the panoramic unit.
PANORAMIC X-RAY • Most panoramic units have standard features that allow the patient to step up to the unit and place their chin on a chin rest. The tube is mounted a specified unadjustable distance from the cassette and the only really selectable features are the density of the patient. Once the exposure switch is pressed, the tube head and cassette traverse in a semicircle around the head. Only the area directly in front of the tube on the cassette is exposed, so the cassette not only rotates with the tube movement, but advances the film also.
CALIBRATION OF A DENTAL PANORAMIC X-RAY SYSTEM • Test Equipment • Multimeter • Impulse counter (invasive, common in older units) • Line Voltage • No load • Turn unit on • Check for adequate incoming power • Load • Take exposure • Voltage drops specified amount under controlled load (Example: 2 VAC drop at 98 kVp) • Line strap adjustment • Check incoming voltage • Place line strap for proper operation based on incoming voltage
CALIBRATION OF A DENTAL PANORAMIC X-RAY SYSTEM • Electrical Calibration • mA Preheat Calibration • Verifies voltage for warming up the filaments during preheat cycle • Important for safeguarding the filament coils during exposure • mA Calibration • Verifies tubehead current (mA) • Accomplished by taking an exposure • Dental units have fixed mA • kVP Calibration, load • Verifies output at all kVp settings (dental x-ray equipment is normally in 70-100 kVp range) • Accomplished by taking an exposure
CALIBRATION OF A DENTAL PANORAMIC X-RAY SYSTEM • Exposure time verification • Panoramic exposure time check • Ensures consistent contrast and density • Exposes all teeth in approximately 15-20 seconds • Accomplished with a pulse counter taking exposures in both directions • Cephalometric exposure time check • Exposes temporomandibular joint (TMJ) • Exposure time approximately 3 seconds for most units • Accomplished with a pulse counter taking exposures in both directions • Final kVp Calibration Check • Last electrical calibration accomplished • Verifies kVp output after all other adjustments have been made
CALIBRATION OF A DENTAL PANORAMIC X-RAY SYSTEM • Mechanical Calibration (Alignment of Tubehead and Bite Guide) • Verifies x-ray exposure alignment • Accomplished by using fluorescent screen and taking an exposure • Verify the beam strikes the fluorescent screen properly (i.e. centered, straight angle, horizontal, vertical) • Mechanical adjustment can be made to tubehead if out of tolerance • Verification and Calibration Procedures. • PMCS – explain • Yearly maintenance checklist PM • General considerations • Technical instructions required • Operating instructions • Service manual • Test instruments and adjustment tools • Digital multimeter • Electromechanical Pulse counter