Download
1 / 23
230 likes | 330 Views
Machine Configuration for Live Server. Operating System should be installed in Live Application System should be Windows 2000 Server or Windows 2003 Server . Internet Connection must be there. Port should be open for either of these 8080,8085,1467

E N D
Machine Configuration for Live Server • Operating System should be installed in Live Application System should be Windows 2000 Server or Windows 2003 Server . • Internet Connection must be there. • Port should be open for either of these 8080,8085,1467 • NOTE: If in this system, Oracle 9i is installed , then 8080 port will not work. • Check java version may be installed in C:\ previously (Go to Start >> Settings >> Control Panel >> Add/Remove Program >> check here either J2SE Development Kit or J2SE Runtime Environment If these two are available here, then this has to be removed .
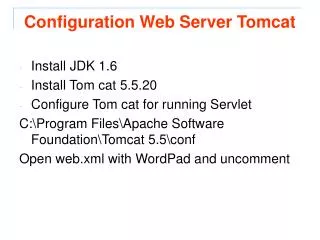
Corporate web installation steps: Steps which you have to follow at live server machine • Create a new folder “capexweb” in c:\ and download corporate.zip from http://www.shilpisoft.com/sunil/Corporate.zip and setup.exe from http://www.shilpisoft.com/sunil/setup.exein c:\ capexweb and extract all the files on the same path . • First run Jdk.exe and then tomcat.exe on desktop. Enter the port 8080 or1467 or 8085 while installing tomcat which ever you have configured. For running JDK , Following steps have to follow :
For Setting the path of J2SE Runtime Environment ; path change To as C:\jre1.5.0_09
To run Tomcat.exe , following steps are to done :(here you have to Untick the Documentation )
When Choose the Installation Location ; Destination folder should be C:\Tomcat 5.5
To Configure the Apache Tomcat ,Give the port no: As mentioned by client which port is configured for live. User Name : adminPassword : 12345
Here it will ask to select the path of J2SE 5.0 JRE which has already installed in the system.So it should come automatically as : C:\jre1.5.0_09 .If this path is showing Click on Install
After Successfully Installation of Jdk & Tomcat , In C:\ >> 3 Folders i.e. jre1.5.0_09, jdk1.5.0_09 And Tomcat 5.5 will be created. • Insert web.xml file in c:\tomcat5.5\conf \ and capexweb.xml file in c:\tomcat5.5\conf\Catalina\localhost. Take from s:\xml File folder • Run setup.exe again which will provided by shilpi support . • Contact at Shilpi for live registering your license. Insert License File in C:\capexweb i.e shilpi_capexweb/lic provided by Shilpi Support • Change some entry in C:\capexweb\capexweb\capexmain_middle.htm. Open this file with notepad >> <input type="hidden" value=“SHILPI" name="dfcode"> <input type="hidden" name="dfparentdb" value="WEBDATA"> <input type="hidden" name="dfparentip" value="111.111.111.100"> Here, in place of dfcode value i.e “SHILPI” give the Comp.Id given in license file . in place of dfparentdb value i.e. “WEBDATA” give the database name which is created as parent type in Database Server . And in place of IP : put IP address of DatabaseServer in which Parent DataBase has been configured.
For change of drive from C:\ to e:\ (Or Any other drive) • Run jdk and tomcat files again and change the path to e:\ • Add a line in c:\capexweb\ capexweb\capexmain_middle.htm • (where same lines appears) • <input type="hidden" name="dfinstalldrive" value="E"> • Run setup in e:\ • To change drive in capexweb.xml , follow E:\Tomcat 5.5\conf\Catalina\localhost\ open capexweb.xml in notepad and change c:\ to e:\ As <Context docBase=“e:/capexweb" path="/capexweb" reloadable="true" workDir=“e:\capexweb\work">
STEPS WHICH YOU HAVE TO FOLLOW ON WEBDATA SERVER MACHINE : • Create a parent database "webdata" import (Blank database) and take license from Shilpi support. • Add the Parent's database entries on main server in A.) Sql.ini in capex10\sql.ini B.) TNSNAMES.ORA in (oracle\ora92\network\admin\tnsnames.ora.) • Make the entries in capex10 >> utilities >> system utilities >> weblivesetup >> database configuration .First time , this page will open as blank , Click on plus(+) button to add the entry. • NOTE: In Application type : Select CAP for Application Capital & F&O. Select FXF for FXFUTURE • In Case of DbType Put as Parent for Parent database And Child For Child Database. Parent Entry must be at first line. • Seq. No should be unique . • After doing entry up to Seq. and Save, It may Give Error as : “invalid identifier” . For that • Import the structure of databasemaster .csv and webusermaster .csv files from s:\web_tables to d:\capex10(from where the package is running) . • connect utilcap10.exe in capex10 folder>> system>>table structure matching>> select table-databasemaster- Import file and give path of file name where file(.csv) is reside and update mismatch column.And then proceed . Same as for webusermaster . After this , In Database Configuration , entry will save sucessfully.
Login each database and Now connect and add parent database from >> system utilities >> web live setup >> database attach (Parent). Here Connect and add • Update License Status in each package folder (From LICCLIENT). Then Login each package. • Create a Branch as “Admin” in Master >> Branch Maintainence. So that in Live >> Admin Login >> all exchange will come , you can run “DBmantainance” or u can give security to Branches . • In the same login(i.e webdata) , update branches in utilities >> system utilities >> weblivesetup >> Auto update common user (For branch ,Sub Branch, client & RM/TL). When update In Parent Database . DBName will automatically come And in Database Selection , put each database sequentially , as in DB Configuration. (Never run in ALL Database at a time) • Start tomcat services and then Live application in corporate. • Run 'DbMaintenance' from admin option available on Bottom of Left Panel. (This option will be highlighted on 'admin' users Only.
Trouble shooting : Index page is not opening: • a.) Check proxy setting may be 8080 port is using for run proxy internet. • b) Check on live application may be oracle9i server is installed , listener is using 8080 port . • c.) check java version may be installed in c:\previously. On admin login in live , error is coming “java.lang.NullPointerException..webusermaster “ • a.) check Parent database should be login . • b.) In capexmain_middle.htm check company id, db name, parent db IP (If all is okay then confirm Comp Id From Sir) • c.) Live Server and Database Server should be on the same network.
HTTP Status 404 - / capexweb/capexweb/ a.) check capexweb.xml file in C:/Tomcat 5.5/conf/catalina/localhost/capexweb.xml
HTTP Status 404 - / capexweb/capexweb/parentvalidatepassword/ a.) check all jar files in C:\capexweb\WEB-INF\lib (Take all jar file from S:\lib)
How To update the version of capexweb in Live Server : • Tell to Client to download setup.exe from http://www.shilpisoft.com/sunil/setup.exe • Stop the Tomcat Service • Delete the work folder from C:/capexweb • Delete 4 jar Files i.e. capexweb.jar , commexonline.jar , fxfuture.jar , dponline.jar from C:\capexweb\WEB-INF\lib • Run the Set up. • In Admin Login run DBMaintainance in all exchange in live .
How to Change the Port : • Go to C:\Tomcat 5.5\conf • Open server.xml file (open with Notepad) • Find the Server Port i.e. <Server port="8005" shutdown="SHUTDOWN"> Give the port as per clients requirement And Save .
How to set the path for Digital Contract Note in Live Server . For Capital : a.) First generate the digital contract note html file in Backoffice . b.) Keep this file in C:\capexweb\digital\ClientCode\Date. (e.g- digital\P8A01\10032005) For Commex : a.) First generate the digital contract note html file in Backoffice . b.) Keep this file in C:\capexweb\digital_com\MCX\ClientCode\Date. (e.g- digital_com\MCX\A55\20052009) For FxFuture : a.) First generate the digital contract note html file in Backoffice . b.) Keep this file in C:\capexweb\digital_fx\ClientCode\Date. (e.g- digital_com\NSE\A55\20052009)
How to Set path for Download And Upload file in Live Server : • For Download : a.) Keep file in C:\capexweb\download\capex\branch\branch_name\Date (for e.g : download\capex\branch\P8\20051024) For Upload : a.) Keep file in C:\capexweb\upload\capex\Branch name\ (for NSDL or CDSL create NSDL Folder in capexweb folder . For Upload Cheque image of Voucher : a.) Keep file in C:\capexweb\cheque\Branch name\ For Any Message if any branch want to give : a.) Keep file in C:\capexweb\message\branch_Name\ (e.g message\COM)