Download
1 / 12
120 likes | 138 Views
Learn how to upload your photos to the 2019 Year of Outback Tourism Flickr Group created by Jacinta Sutton. Follow the instructions to join, upload photos, and add metadata to each image. Get your images up and share your Outback experiences today!

E N D
2019 Year of Outback Tourism Flickr Group How to upload to Flickr Created by Jacinta Sutton Collection Engagement, Queensland Memory
Introduction • You will need a Flickr account to upload photos. Some councils have an existing Flickr account or you may need one created. • After you log in, search ‘2019 Year of Outback Tourism’ and click on Groups to find our Flickr Group. After reading the rules, click ‘I agree’ to join • If you get really stuck, get in touch and we can help you get your photos up!
Uploading your photos Have your .jpg images ready in File Explorer to upload. Click the upload icon (cloud with an arrow) in the top right corner
Choose your photos Click Choose photos and videos to upload and select your pre-curated images from File Explorer
Adding metadata to each photo • Now to fill in the metadata of each individual image. Click on a photo you just uploaded. • Double click the title area to open editing of the description and title. Copy and paste the html text on the next slide into the description field of your photo and fill in each field with the information about your photo/s.
Adding Metadata: The basic HTML text below (with examples) goes into the description field of your photo <strong>Creator:</strong> e.g.Lew Jenkin <strong>Location:</strong> e.g. Julia Creek, Queensland. <strong>Description: </strong> e.g. Four women dressed for a day at the Julia Creek races, around 1965. All of the women are wearing hats and strings of pearls, and all are either carrying or wearing gloves. Styles of hats include a large beret, a tall straw hat tied with a scarf, a close fitting hat covered in artificial flowers and a wide brimmed straw hat. Left to right: Mrs Nancy Hacon, Mrs Magoffin, Mrs Myra Beach and Mrs Nola Harrington. <strong>Information about State Library of Queensland’s collection:</strong> <a href="http://www.slq.qld.gov.au/resources/picture-queensland" rel="nofollow">www.slq.qld.gov.au/resources/picture-queensland</a> Contact e.g. State Library of Queensland if you are seeking permission to use this photo.
Adding Metadata if you took the photo: Copy and paste this text below into the description field of your photo <strong>Creator:</strong> <strong>Location:</strong> <strong>Description: </strong> Contact the creator if you are seeking permission to use this photo.
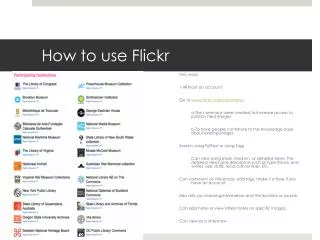
Fill in the metadata for each photo: • Title • Description • Date • Map location • Add to Group • Tags