
BIOS
E N D
Presentation Transcript
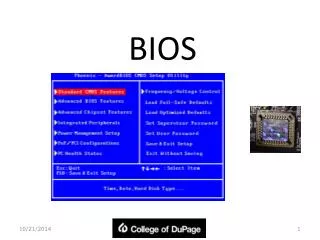
BIOS Configuration the BIOS Now , your new pc should be up and running and you should be starting at the BIOS setup screen. The following procedure will walk you through this install setup. Please bear in mind that this serves as an outline. Your actual setting and names may very different BIOS versions.
1.AUTO DETECT YOUR HARD DRIVE :- • Just about at some what modem BIOS versions are capable of auto detecting the hard drive and using the drive ID command to find and configure it in the BIOS , you should see a menu option for this . Go ahead and do this now. If it does not successful detect the drive, then make sure the drive is properly connected, because it probably isn’t.
2. Now enter the standard setting option. • Configure the following items: i. The date and Time :-The date is in MM/DD/YY format and the Time is in 24 hour format, like “military time”.
ii. Drive IDE setting :- Type: probably set “user”. iii. Translation mode :- Modern drives are set to LBA , the older drives below 500 mb or so are set to Normal , or CHS. iv. Heads / Sectors , etc….:- Leave these set to the values determined by Auto- Detect.
v. Block Mode :- Disable on most system. vi. PIO Mode :- Usually Auto – detected .but most drive should be set to PIO mode 3. vii. Floppy Drive:- Just set the correct type like 1.44 MB , 720 KB etc..
viii. Video Display :- set to VGA. ix. Halt Ob :-All errors, to be sure you see all errors.
3.Now go in to Advanced Features , It’s all the same thing :- • Virus protection / warning :- disable • Inter cache :- Enable if you can’t , then this hardware problem . • External Cache :- enable . • Quick Post :- Disable to make sure all tests are performed on boot – up , but you can enable it , secreting valuable tests, but increasing boot speed .
v. Boot Sequins :- Best left A:, C:, vi. Swap floppy driver :- If your floppies are set in the correct location on the floppy ribbon cable , you will not need to enable this. If your A: , and B: are reversed , though , you can enable this.
vii.Video / System BIOS shadow :- Disable now for minimum problem. 4. Disable power Management features. 5. Go to Integrated peripherals configure these lens. I. Integrated floppy controller :- enable ii. Integrated ID/HDD controller :-enable those you are using . Most likely , you have a hard driver 2, so enable goth.
iii. Integrated serial port :- Both com1 and com2 are usually enable. iv. Integrated parallel port :- enable on most system. v. PS/2 Mouse :- set to “auto” if available, otherwise, enable if using a ps/2 mouse. vi. USB :- Disable on most system but enable if actually using USB.