Kestrel 4500NV Weather Meter: Advanced Training and Operations Guide
The Kestrel 4500NV is a sophisticated weather meter designed for precision in various operations. This guide covers essential elements such as battery installation, calibration, and navigation of measurement modes. It highlights the use of a unique battery shim to avoid magnetic interference, ensuring accurate compass readings. Users can measure wind speed, direction, humidity, and more. Detailed instructions for setting time, adjusting for magnetic or true north, and utilizing real-time data are included for optimal performance in challenging environments.

Kestrel 4500NV Weather Meter: Advanced Training and Operations Guide
E N D
Presentation Transcript
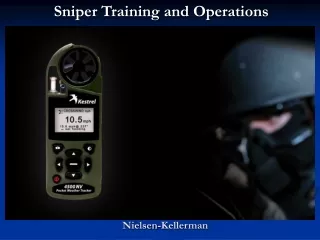
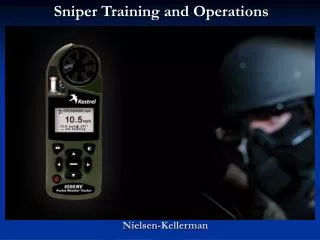
Nielsen-Kellerman Sniper Training and Operations
Two AAA batteries Battery Shim Wrist and Neck Lanyards Small Carrying Pouch What’s in the Box?Kestrel 4500NV
The magnetic signature in AAA batteries can influence compass readings. To prevent this, the Kestrel has a flexible plastic shim that slides in between the batteries. Insert the batteries in as shown on the back door. Insert shim between batteries with the clear tab out and folded over the end of the battery with the positive pole (the “bump”). Press the tab down over the battery with the bump through the hole. Close the door tightly. How to install Batteries and Shim Shim
How to Set Time and Date Initial Set Up Introduction screen appears, followed by date/time setup screen. • Press the and buttons to scroll through the settings. • Press the and buttons to scroll through the setting options. • Now, press the button to exit the date/time Setup. • Press again to exit.
1. Spin Kestrel while on a flat surface 2. Turn while holding Kestrel Vertical Calibrate Your Kestrel *Kestrel must be kept vertical for accurate calibration. Removing the impeller during calibration is recommended.
Y Y Navigating the Screens • Use and to scroll through the following measurements: Chill Direction Temp Humidity Air Density Wind Dew Point Evaporation Rate Cross Wind Relative Air Density Baro Heat Index Absolute Pressure Head Wind Wet Bulb Altitude Density Altitude
Min/Max/Avg Current Navigation: Modes • Use and to navigate through the 3 Modes Chart
Navigation: Charts • To review data, press the button while viewing a chart. • A cursor will appear on the most recent data point. • Press the and buttons to scroll through data points. Press the up or down buttons to review the data for measurements. Press to return to chart mode. Tip: Hold buttons down to quickly scroll through data points
3 user screens can be customized to display 3 current measurements simultaneously Highlight desired User Screen by pressing Press to select your User Screen. Press or to change lines, and or to scroll through available measurements for each highlighted line. Press the button to return. Repeat above process for the other User Screens or press the button to return to the Main Menu. Navigation: User Screens or
Using Direction Function Kestrel must be held vertically to ensure accurate readings. • Hold the Kestrel vertical and point the back of the unit toward the direction you wish to measure. The unit will display the cardinal direction and degrees. Magnetic vs True North: Entering variation • To switch between these modes, press . Then use and to toggle between magnetic and true. To enter variation, press and to highlight “variation” then the and to adjust value.
Headwind and Crosswind Functions • Set “heading” or direction of the runway/target. • You then measure wind pointing the Kestrel into the wind. • The large number displayed will be the effective Crosswind or Headwind for target direction. • To enter runway or target heading, press the while on the crosswind or headwind screen. • Use the up and down buttons to select Auto Set or Manual Set and to enter your selection. Then follow instructions on screen. Auto set allows you to point Kestrel down runway or in target direction. It automatically enters the reference heading. Point and press . Manual set allows you to enter known heading of runway or target. In auto adjust, follow prompts to have Kestrel automatically set heading. Use the and to enter runway or target heading. Press to enter selection.
Min/Max/Avg for Wind Values • Max/Avg for Wind Speed, Direction, Headwind/Tailwind, Crosswind and Wind Chill are measured independently from stored data. This allows users to program the averaging period according to preference. • Averaging on all wind-related values will be started and stopped together. How to Measure Wind • Hold unit to the wind and press the when the screen displays “Average” to begin collecting data for all measurements, and again when the screen displays “Stop” to stop collecting data. Press the to clear the data when screen displays “clear”.
Chart Data • 1400 data points for each measurement. • Displays a graphical representation of stored data. If you have no stored data, the axis will appear but chart will be blank. • Direction chart:display in degrees, with the base line of the chart representing 0 degrees and top of chart representing 360 degrees. • Crosswind and headwind chart: same graph scale as wind speed chart. Chart Value Cursor Date and Time
Memory Settings You can access Memory Options through the Main Set Up Menu. Press to access the Main Setup Menu. Press the button to select the highlighted setting. <Image of K4500NV with arrows pointing to manual memory button> To Clear Log:(Go/Done). All stored data is cleared. This will also clear Min/Max/Avg data. Press or to clear the log. To Reset Min/Max/Avg: (Go/Done). All Min/Max/Avg data is cleared. Chart data will remain intact. Press or to clear the Min/Max/Avg.
Kestrel Night Vision • This unit has a night-vision preserving backlight which helps users to sustain natural night vision. The NV's backlight incorporates an optical filter to reduce overall brightness and minimize blue and green spectrum light to preserve night vision. Additionally, NV backlights are also much dimmer than a standard backlight, making it more difficult to detect with the naked eye in night operations. • This backlight appears soft greyish pink, not red, and is still in the visible spectrum, so is not compatible with night-vision equipment. • It takes 30 to 45 minutes for the average eye to adapt to darkness and maximize night vision. • Even a short burst of white, yellow, green or blue light “bleaches out” the rod cell photoreceptors in the eye and causes night blindness until the entire adaptation process can take place again. • Light in the red spectrum does not cause this “bleaching out”, preventing night blindness and night vision fatigue.
Station Pressure • Set the reference altitude on the BARO screen to “0”. In this case, the Kestrel Meter will not make any adjustment and will display the measured value.
Measuring Barometric Pressure and Altitude • The Kestrel Meter measures station pressure - the actual air pressure in the measurement location – and uses this value to calculate barometric pressure and altitude. • Station pressure changes in response to two things – • changes in altitude • changes in the atmosphere. Barometric pressure is station pressure corrected to sea level. • In order to make the correction, the Kestrel Meter needs an accurate reference altitude. • Altitude is the height above sea level. In order to correctly calculate altitude, the unit needs an accurate barometric pressure reference, also known as an “altimeter setting”. *You only need to know ONE of these values (current barometric pressure or current altitude) in order to set your Kestrel Meter up to show accurate readings. *Because the Kestrel Meter is constantly changing location and altitude, it is important to enter adjustments or “references” when accurate pressure and altitude readings are needed.
Barometric Pressure Starting with a known altitude for your location *You can obtain your altitude from a topographical map or local landmark. (You can use Google Earth www.earth.google.com) • Set this value as your reference altitude on the BARO screen to determine your barometric pressure. • Press to enter the reference setting mode. • Press or to increase or decrease the reference altitude. • You will notice that the barometric pressure will change with changes in the reference altitude. Press to exit the adjustment mode. • Again, allow the Kestrel Meter to stabilize, then enter the value from the BARO screen as your reference pressure on the ALTITUDE screen by following the same procedure. *Both readings are now accurate.
Altitude Starting with the known barometric pressure for your location * You can obtain your current barometric pressure by checking an internet weather site for a nearby location, or contacting a local airport. • Set this value as your reference pressure on the ALTITUDE screen to determine correct altitude. • Press to enter the reference setting mode. • Press or to increase or decrease the reference pressure. • You will notice that the altitude will change with changes in the reference pressure. • Press to exit the adjustment mode. • Set Kestrel Meter on a table and allow altitude reading to stabilize. After obtaining current altitude from ALTITUDE screen, move to BARO screen and enter this value as your reference altitude by following the same procedure. *Both readings will now be accurate.
Air Pressure At high elevations, the air is not very dense at all. The effect of gravity is less than at lower elevations or the surface of the Earth. Because there is very little air above, the air pressure is low. At low elevations, the air is much more dense. The effect of gravity is greater than at higher elevations. Because there is a lot of air above, the air pressure is high. The same phenomenon is more easily understood in terms of water depth. It’s obvious to most people that the deeper you go under water, the greater the water pressure. The same concept is true for air.
Air Pressure and Altitude 1000ft 28.92inHg The pressure measurement at any location is called STATION PRESSURE. You can remember this because it’s the pressure that you measure at a particular place, or station. Another term is unadjusted pressure. There is a very good rule of thumb for estimating the difference in station pressure as you change altitude. - For every 10 feet of altitude, the pressure decreases by 0.01inHg. - For every 100 feet of altitude, the pressure decreases by 0.10inHg. - For every 1000 feet of altitude, the pressure decreases by 1.00inHg. Therefore, if the pressure is measured at sea level to be 29.92inHg, the pressure 1000ft higher would be 28.92inHg. 100ft 29.82inHg 50ft 29.88inHg 40ft 29.89inHg 30ft 29.90inHg 20ft 29.91inHg 10ft 29.92inHg
Weather Fronts Air pressure at a certain location constantly changes depending on the weather. An area described as High pressure has air which has a tendency to push downward toward the Earth. Low pressure areas have air push upwards from the Earth. Pressure trends can be very useful in weather forecasting. A very good rule of thumb is that a quickly decreasing pressure indicates a storm is coming.
54° F Feels like 54° F Cloudy UV Index: 1 Low Wind: From East at 11 mph Humidity: 68% Pressure: 30.21 inHg ↓ Dew Point: 44° F Visibility: 10.0 miles Barometric Pressure Weather stations, weather websites and airports report a current pressure and pressure trend. The example to the left was taken from weather.com for Denver. But Denver is a big area, and there are very different altitudes throughout the region. How can this information be used? Weather reports always publish BAROMETRIC PRESSURE. This is NOT the same as STATION PRESSURE described in the earlier slides. Barometric pressure is the pressure found at sea level rather than at your particular altitude. Let’s assume that the weather information here was taken at the Denver airport, which is located at 5000ft elevation. They would use an instrument at the airport which measures station pressure. The measurement they would get on their instrument is 25.21inHg. This low pressure should make sense because Denver is very high, and we know that pressure decreases as we increase in altitude. They would adjust their station pressure measurement to account for their altitude above sea level. We already learned that 1000ft = 1.00inHg. So they would add 5.00inHg to their measurement in order to calculate the barometric pressure (adjusted to sea level) of 30.21inHg. 5000ft above sea level = 5.00inHg 25.21inHg + 5.00inHg = 30.21inHg
Kestrel: BARO Mode The Kestrel is capable of displaying station pressure as well as barometric pressure. In order to display barometric pressure, the user will be required to input the current altitude. The Kestrel at the Denver airport would look like the display to the left. If the reference altitude is set to 0 ft, the Kestrel will not adjust for an altitude change. This measurement is station pressure. BARO inHg 25.21 Ref 0 ft — set ref If the reference altitude is set to 5000 ft, the display would look like this. This measurement is barometric pressure. The barometric pressure will be correct AS LONG AS THE USER IS IN THIS LOCATION (at the same altitude). If the Kestrel is moved to another location, then the reference altitude will have to be changed accordingly. BARO inHg 30.21 Ref 5000 ft — set ref
L Monitoring Barometric Pressure If the user is staying in one location, such as at their home or office, then the Kestrel can be used to monitor barometric pressure changes. This is very useful for forecasting the weather in a basic way. If the pressure drops quickly, a storm is likely coming. If the pressure is steady or rising, the weather is likely to be good. Pressure changes are relatively slow compared to other environmental conditions. Noticeable pressure changes generally happen over the course of 3+ hours. The barometric pressure readings will always be accurate as long as the reference altitude on the BARO screen is accurate. Station pressure can always be displayed simply be setting the reference altitude to 0.
Kestrel: ALTITUDE Mode The Kestrel will display PRESSURE ALTITUDE, which is an altitude calculated based on a station pressure measurement and a barometric pressure reference setting. The ALTITUDE mode is completely independent of the BARO mode. Making changes to the reference value on one screen has no effect on the other screen. The Kestrel at the Denver airport would look like the display to the left. If the reference barometric pressure is set incorrectly, the calculated altitude will be incorrect. ALTITUDE ft 4710 Ref 29.92 inHg — set ref If the reference pressure is set correctly to 30.21inHg, the display would look like this. What happens if a weather front changes the pressure? The altitude will be wrong. If the barometric pressure ISN’T 30.21inHg any more, then the altitude calculation will be based on bad information. The user would have to update accordingly. ALTITUDE ft 5000 Ref 30.21 inHg — set ref
100ft Tracking Altitude The Kestrel can be used to track altitude changes for climbing and hiking. Before beginning the climb, the reference pressure on the ALTITUDE screen must be updated. The altitude will then be correct for as long as the barometric pressure remains the same. This assumption is generally good for at least 3 hours.
100ft L Altitude and Pressure Changes The worst case scenario is when the Kestrel is changing altitude at the same time that the weather is changing the pressure. Therefore, it is always advisable to verify the measurements as frequently as possible. If a current barometric pressure is available, the reference pressure on the ALTITUDE screen should be updated. If a landmark, chart or GPS altitude is available, the reference altitude on the BARO screen should be changed. Use the new barometric pressure measurement as the reference pressure on the ALTITUDE screen.
Care for Your Kestrel! • Register your Kestrel on kestrelweather.com • Get lithium batteries for extended cold weather performance • Don’t poke impeller or membranes • Don’t take below _ feet of water
FAQ: Why is my Kestrel Meter is not reading wind speed? • Answer: It probably just needs a replacement impeller. Verify this by removing the impeller (press firmly on the sides of the impeller), and turn the unit on to the wind speed screen. Hold the Kestrel Meter near a television, computer monitor or electronic device and it will display a wind speed. • Or, wave a magnet (like a refrigerator magnet) back and forth by the Kestrel Meter. If the Kestrel Meter is working properly, you will register a wind speed reading, even though there is no impeller installed. Simply purchase a new impeller and your Kestrel Meter’s wind speed readings will be restored to factory calibration.
Sniper Accessories TacticalCarry Case PortableVane Mount Small Tripod
Sniper Training and Operations Kestrel 4500: Military Sniper’s Most Wanted List in Equipment • Crosswind strongly influences the accuracy of sharp shooting, becoming the largest error component at long ranges. • Even medium crosswind velocities (~5 m/s) along the flight path of a bullet can cause1-meter deviations at 500 meters. • Kestrel 4500 automatically calculates the crosswind, as well as measures the other environmental factors that play into ballistics performance - temperature, humidity and density altitude. • Simply plug the Kestrel's weather data into any ballistics software to calculate accurate windage adjustments.
Kestrel 4500NV in Action • Whether you are at the range, on perimeter, on patrol or manning an observer/long rifle position, this weather tracker provides information that is critical to your mission or objective. • It takes immense work to get into a good position to take a shot- The Kestrel 4500NV instantly gives you the environmental info to get you set up.
Kestrel 4500NV Measures • Heading (true & magnetic) • Wind Direction • Crosswind • Headwind/tailwind • Altitude • Pressure trend • Barometric Pressure • Wet Bulb Temperature • Relative Humidity in % • Heat Stress Index • Dewpoint • Density Altitude • Wind Chill • Air, water, and snow temperature °F or °C • Current, average, and maximum air velocity • Customizable 1400 Data Point Storage, Data Upload (with optional interface)