Download
1 / 10
100 likes | 232 Views
Slide 1a:. Before you begin creating UAA VPN connection please make sure your computer is connected to the internet through either a wired (preferable) or wireless connection. Note that a V irtual P rivate N etwork or VPN connection is a ‘piggyback’ connection and requires

E N D
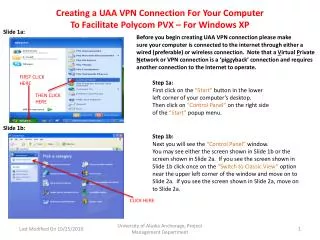
Slide 1a: Before you begin creating UAA VPN connection please make sure your computer is connected to the internet through either a wired (preferable) or wireless connection. Note that a Virtual Private Network or VPN connection is a ‘piggyback’ connection and requires another connection to the Internet to operate. FIRST CLICK HERE Creating a UAA VPN Connection For Your Computer To Facilitate Polycom PVX – For Windows XP Step 1a: First click on the “Start” button in the lower left corner of your computer’s desktop. Then click on “Control Panel” on the right side of the “Start” popup menu. THEN CLICK HERE Slide 1b: Step 1b: Next you will see the “Control Panel” window. You may see either the screen shown in Slide 1b or the screen shown in Slide 2a. If you see the screen shown in Slide 1b click once on the “Switch to Classic View” option near the upper left corner of the window and move on to Slide 2a. If you see the screen shown in Slide 2a, move on to Slide 2a. CLICK HERE University of Alaska Anchorage, Project Management Department
Slide 2a: Step 2a: From this “Control Panel” window double-click on the “Network Connections” icon. DOUBLE-CLICK HERE Slide 2b: Step 2b: Click on the “Create a new connection” option near the Upper left corner of the window. CLICK HERE University of Alaska Anchorage, Project Management Department
Slide 3a: Step 3a: You will now see the “New Connection Wizard” window. Click once on the “Next” button in the lower right corner of this window. CLICK HERE Slide 3b: Step 3b: Next you will see the “Network Connection Type” window. Select the option “Connect to the network at my workplace” by either clicking once on the text or on the open circle field next to the text. Then click on the “Next” button near the lower right corner of the window. Note: Do not be concerned if you are not connecting to the Internet from your personal workplace. The “workplace network” being referred to here is the UAA network. FIRST CLICK HERE THEN CLICK HERE University of Alaska Anchorage, Project Management Department
Slide 4a: Step 4a: Next the “Network Connection” window will appear. In this window select the Virtual Private Network connection” option by either clicking once on the text or on the open circle field next to the text. Then click on the “Next” button near the lower right corner of the window. FIRST CLICK HERE THEN CLICK HERE Slide 4b: Step 4b: Next you will see the “Connection Name” window. In this window you will need to enter UAA VPN Connection in the “Company Name” field. Then click on the “Next” button near the lower right corner of the window. IN THIS FIELD ENTER <UAA VPN Connection> THEN CLICK HERE University of Alaska Anchorage, Project Management Department
Slide 5a: Step 5a: Next you will see the “VPN Server Selection” screen. In the field Titled “Host name or IP address” you will need to enter the IP address: 137.229.131.26 Then click on the “Next” button near the bottom right of the window. IN THIS FIELD ENTER <137.229.131.26> THEN CLICK HERE Slide 5b: Step 5b: Finally the “Completing the New Connection Wizard” window will appear. In this window, simply click on the “Finish” button near the lower right corner of the window. CLICK HERE University of Alaska Anchorage, Project Management Department
Slide 6a: Step 6a: Whenever you connect to the UAA VPN you will be prompted to enter your UAA “User name:” and “Password:” as shown to the left. Enter your UAA user name and password (the same as for your UAA email account). Then click on the “Connect” button at the lower left of the window. If after clicking “Connect”, you get a new window that says “Error Connecting to UAA VPN Connection” you will need to click on the “Cancel” button in the new window and perform the tasks in Step 6b. 1. ENTER YOUR UAA USER NAME HERE 2. ENTER YOUR UAA PASSWORD HERE 3. CLICK HERE WHEN FINISHED Slide 6b: Step 6b: If you were not able to connect successfully to the UAA VPN you will see the window to the left (without the drop-down box). You will need to right-click on the “UAA VPN Connection” icon and then click on “Connect” in the drop-down box. You will then see the window shown in Slide 6a, and you will need to repeat Step 6a. When repeating Step 6a make sure your UAA user name and password are correct. If you still cannot connect to the UAA VPN please call the UAA PM Dept. at 907-786-1924. Note that once you successfully connect to the UAA VPN the window you see will look similar to Slide 6b – but “Connected” will appear under “UAA VPN Connection” – see slide 10a for example. You may now close the “Network Connections” window. RIGHT-CLICK HERE THEN CLICK HERE TO CONNECT University of Alaska Anchorage, Project Management Department
Slide 7a: Step 7a: Now you will need to open Polycom PVX by double clicking on the “Polycom PVX” icon on your computer’s desktop. Once you reach the main Polycom screen as shown to the left, you will need to click on the “Setup” button in the upper left corner of the window – this button has a wrench icon on it. CLICK HERE Slide 7b: Step 7b: Next you will see the Polycom “Setup” window. In this window, click on “Network” from the menu in the left center of the window. CLICK HERE University of Alaska Anchorage, Project Management Department
Slide 8: Step 8: The window that appears on your computer should look like the window to the left. In this window, start by selecting (clicking on) the dot next to “Connected over VPN”. Next select the dot next to “Use virtual network adapter for VPN:” and then select “UAA VPN Connection” from the drop-down box immediately below. Then, near the bottom right of the window click on the “Apply” button and finally, near the bottom center of the window click on the “OK” button. 1. SELECT THIS OPTION 3. SELECT “UAA VPN Connection” FROM THIS DROP DOWN BOX 2. SELECT THIS OPTION 4. CLICK HERE 5. CLICK HERE LAST University of Alaska Anchorage, Project Management Department
Troubleshooting the UAA VPN Connection Step 9a: Each time you connect to Polycom PVX through the UAA VPN Connection, connect in the following order. • Ensure your computer is connected to the Internet – go to more than one website to make sure • Connect to the UAA VPN Connection • Open Polycom PVX and follow the procedures in Steps 7a, 7b, & 8. Below you will find procedures for connecting, disconnecting, and checking the status of the UAA VPN Connection. Slide 9b: Step 9b: First, follow the instructions in Steps 1a, 1b, & 2a until you are able to reach Slide 2b – which is the same as Slide 9b to the left. University of Alaska Anchorage, Project Management Department
Slide 10a: Step 10a: From the “Network Connections” window you will be able to control the connection status of both your computer’s main Internet connection as well as your VPN connection. When you right-click on “UAA VPN Connection” a drop-down window will appear as shown to the left. To disconnect from the VPN click on “Disconnect”in the drop-down window. If you are not using a program that requires the UAA VPN Connection, e.g. Polycom PVX, it is good practice to disconnect from the VPN. RIGHT-CLICK HERE THEN CLICK HERE TO DISCONNECT Slide 10b: Step 10b: Note that from the “Network Connections” window you can immediately check the VPN connection status. If “Disconnected” appears immediately below “UAA VPN Connection” (as shown in Slide 10b) than the VPN connection is not connected. If “Connected” appears immediately below “UAA VPN Connection” (as shown in Slide 10a) than the VPN connection is connected. If your VPN connection is disconnected, right-click on “UAA VPN Connection” and then click on “Connect” in the drop-down window. You will then be prompted to enter your UAA “User name:” and “Password:” as you did in Slide 6a. RIGHT-CLICK HERE THEN CLICK HERE TO CONNECT University of Alaska Anchorage, Project Management Department