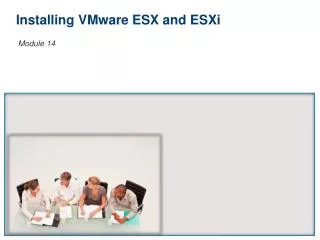
ESX 4.0 Install
340 likes | 362 Views
ESX 4.0 Install. Product Support Engineering. VMware Confidential. Agenda. Module 1 – vSphere Upgrade Module 2– ESX 4.0 Install Module 3 – vSphere 4.0 Licensing Module 4 – vCenter Server 4.0 Module 5 – Remote CLI. Module 1-3 Lessons. Lesson 1 – Overview of ESX

ESX 4.0 Install
E N D
Presentation Transcript
ESX 4.0 Install Product Support Engineering VMware Confidential
Agenda • Module 1 – vSphere Upgrade • Module 2– ESX 4.0 Install • Module 3 – vSphere 4.0 Licensing • Module 4 – vCenter Server 4.0 • Module 5 – Remote CLI VI4 - Mod 1-2 - Slide
Module 1-3 Lessons • Lesson 1 – Overview of ESX • Lesson 2 – Installing ESX 4.0 • Lesson 3 – Post Install considerations • Lesson 4 – Download and Install VI Client • Lesson 5 – Remote and Scripted Installs VI4 - Mod 1-2 - Slide
ESX Hardware Requirements Hardware and System resources for ESX. • 64-bit server • All AMD Opterons support 64-bit. • All Intel Xeon 3000/3200, 3100/3300, 5100/5300, 5200/5400, 7100/7300, 7200/7400 support 64-bit. • All Intel Nehalem (no Xeon brand number assigned yet for UP, DP, or MP processors) support 64-bit. • 2GB RAM minimum. • One or more Ethernet controllers. Supported controllers include: • Broadcom NetXtreme 570x gigabit controllers • Intel PRO/1000 adapters VI4 - Mod 1-2 - Slide
ESX Requirements • For best performance and security, use separate Ethernet controllers for the service console and the virtual machines. • A SCSI adapter, Fibre Channel adapter, or internal RAID controller: • Basic SCSI controllers are Adaptec Ultra-160 and Ultra-320, LSI Logic Fusion-MPT, and most NCR/Symbios SCSI controllers. • Fibre Channel. See the Storage / SAN Compatibility Guide. • RAID adapters supported are HP Smart Array, Dell PercRAID (Adaptec RAID and LSI MegaRAID), and IBM (Adaptec) ServeRAID controllers. VI4 - Mod 1-2 - Slide
ESX Requirements • A SCSI disk, Fibre Channel LUN, or RAID LUN with unpartitioned space. • In a minimum configuration, this disk or RAID is shared between the service console and the virtual machines. • For hardware iSCSI, a disk attached to an iSCSI controller, such as the Qlogic qla405x. • For Serial ATA (SATA), a disk connected through supported SAS controllers or supported on-board SATA controllers. • A VGA capable graphics subsystem. VI4 - Mod 1-2 - Slide
ESX Requirements ESX supports installing and booting from the following storage systems: • ATA disk drives – Installing ESX on an ATA drive or ATA RAID is supported. • Ensure that your specific drive controller is included in the supported hardware. • Storage of virtual machines is currently not supported on ATA drives or RAIDs. • Virtual machines must be stored on VMFS volumes configured on a SCSI or SATA drive, a SCSI RAID, or a SAN. VI4 - Mod 1-2 - Slide
ESX Requirements • SATA disk drives - SATA disk drives connected behind supported SAS controllers or supported on-board SATA controllers. Supported SAS controllers include: • mptscsi_pcie - LSI1068E (LSISAS3442E) • mptscsi_pcix - LSI1068 (SAS 5) • aacraid_esx30 - IBM serveraid 8k SAS controller • Cciss - Smart Array P400/256 controller • megaraid_sas - Dell PERC 5.0.1 controller Supported on-board SATA include: • Intel ICH9 • Nvidia MPC55 • ServerWorks HT1000 VI4 - Mod 1-2 - Slide
ESX Requirements • SCSI disk drives - SCSI disk drives are supported for installing ESX. • Storage area networks (SANs) - Both Fibre Channel and iSCSI, are supported for installing ESX. • Virtual Machines can be stored on VMFS partitions. NOTE: The minimum supported LUN capacity for VMFS3 is 1200MB. Before deploying ESX on a SAN, see the latest version of the ESX SAN Compatibility Guide at www.vmware.com/support/pubs/vi_pubs.html VI4 - Mod 1-2 - Slide
Hardware and Software Compatibility For more information on supported hardware and software, download the ESX Compatibility Guides from www.vmware.com/support/pubs/vi_pubs.html. • Systems compatibility • Lists the standard operating systems and server platforms against which VMware tests. • I/O compatibility • Lists devices that are accessed directly through device drivers in the ESX host. • Storage compatibility • Lists the combinations of HBAs and storage devices currently tested by VMware and its storage partners. • Backup software compatibility • Describes the backup packages tested by VMware. VI4 - Mod 1-2 - Slide
Supported Guest Operating Systems The VMware Guest Operating System Installation Guide includes information on supported guest operating systems. You can download this document at: http://www.vmware.com/support/pubs/vi_pubs.html ESX offers support for a number of 64-bit guest operating systems. • See the Guest Operating System Installation Guide for a complete list. VI4 - Mod 1-2 - Slide
Supported Guest Operating Systems There are specific hardware requirements for 64-bit guest operating system support. • For AMD Opteron based systems, the processors must be Opteron Rev E and later. • For Intel Xeon based systems, the processors must include support for Intel Virtualization Technology (VT). • Many servers that include CPUs with VT support might ship with VT disabled by default, and VT must be enabled manually. • If your CPUs support VT but you do not see this option in the BIOS, contact your vendor to request a BIOS version that lets you enable VT support. To determine whether your server has the necessary support, you can use a CPU Compatibility Tool at http://www.vmware.com/download/vi/drivers_tools.html. VI4 - Mod 1-2 - Slide
Virtual Machine Requirements • Virtual processor • One, two, four or eight processors per virtual machine NOTE If you create a two-processor virtual machine, your ESX machine must have at least two physical processors. For a four-processor virtual machine, your ESX machine must have at least four physical processors. • Virtual chip set - Intel 440BX based motherboard with NS338 SIO chip • Virtual BIOS PhoenixBIOS 4.0 Release 6 VI4 - Mod 1-2 - Slide
Prerequisites for Installing ESX • Before you begin the installation procedure, ensure that you have done the following: • Make sure that the server hardware clock is set to UTC. This setting is in the system BIOS. • Make sure the host has a supported NIC. • The ESX installer needs a live network connection to properly detect certain network settings, such as the machine name under DHCP. • IPv6 is not supported for ESX installation. You do not need to be connected if you are doing a CD-ROM/DVD install. • Download the ESX installation ISO and burn the image onto a DVD. VI4 - Mod 1-2 - Slide
About ESX Partitions • ESX includes physical, virtual, required, and optional partitions. • In ESX 4.0, /boot and vmkcore are physical partitions. The /, swap, and all the optional partitions are stored on a virtual disk called esxconsole.vmdk. The virtual disk is stored in the /vmfs/volumes/<UUID> directory. The default size of esxconsole.vmdk is 8GB. • ESX has the following physical partitions: • /boot – Contains the ESX software and its support files. The disk that you install /boot onto must be the disk the BIOS chooses to boot from. • vmkcore – Required to store core dumps for troubleshooting. VMware does not support ESX host configurations without a vmkcore partition. • /vmfs – Required to store your virtual machines. The /vmfs/volumes/<UUID> partition contains the esxconsole.vmdk, swap, and / - root partitions. VI4 - Mod 1-2 - Slide
About ESX Partitions • The ESX installation includes separate installable components: • ESX boot disk – Requires 360MB of free space. The /boot and vmkcore partitions are included on the ESX boot disk. • /vmfs/volumes – Requires at least 8GB of free space and includes the service console (VMDK disk) plus space for your other virtual machines. • You can install the ESX boot disk and /vmfs/volumes on a single device or on two separate devices. If you install them on a single device, the device must have at least 10.5GB of free space. VI4 - Mod 1-2 - Slide
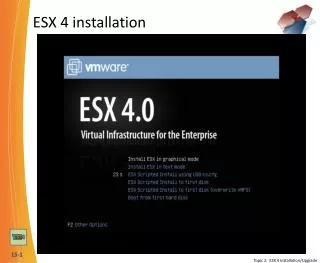
Installing ESX • The following methods are available for installing VMware ESX software: • Graphical interface – This is the recommended installation method. • Text mode – Use this method if your video controller, keyboard, or mouse does not function properly using the graphical installer. • Scripted – An efficient way to deploy multiple hosts. VI4 - Mod 1-2 - Slide
Installing VMware ESX 4.0 Installed Components The VMware ESX 4.0 installation includes the following components: • VMware ESX 4.0 – Software to manage and serve virtual machines. • VMware vSphere Client - Software to allow access to the ESX host. • VMware vSphere Web Access – Software to allow a Web browser access to the ESX host. VI4 - Mod 1-2 - Slide
Installation on SATA Drives When installing ESX on SATA drives, consider the following situations: • Ensure that your SATA drives are connected through supported SAS controllers or supported on-board SATA controllers. • Do not use SATA disks to create VMFS datastores shared across multiple ESX hosts. VI4 - Mod 1-2 - Slide
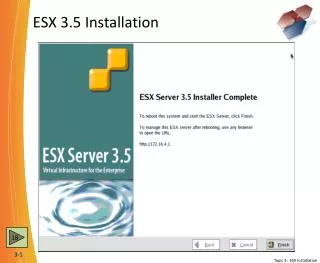
To install ESX • Download the ISO file for ESX 4.0 from the VMware Web Site • Burn the iso file onto DVD media. • Insert the DVD into the DVD drive of a supported server platform. • Power on the machine with the VMware ESX DVD in the CD/DVD drive. • In the BIOS, set the server to boot from the DVD. The ESX begins its boot process until the mode selection page appears. VI4 - Mod 1-2 - Slide
Post install Considerations • Evaluation Period Countdown • The ESX 60-day evaluation period begins to count down immediately after the first time you power on the ESX machine. • Locate the Installation Log • After you install and reboot, log in to the service console to read the installation log at /var/log/weasel.log VI4 - Mod 1-2 - Slide
Lab – Installing ESX 4.0 Lab 3 Part 1 – ESX 4.0 Installation VI4 - Mod 1-2 - Slide
Download the vSphere Client • The vSphere Client is a Windows program that you can use to configure the ESX host and to operate its virtual machines. • You can download vSphere Client from any ESX host. • You must obtain the URL of an ESX host. This is the IP address or machine name. To download the vSphere Client • From a Windows machine, open a Web browser. • Enter the URL for the ESX host.For example, enter http://testserver.vmware.com/The VMware ESX welcome page appears. • Click the Download the VI Client link under Getting Started.A security warning dialog box appears. • Click Yes. • Install the client. VI4 - Mod 1-2 - Slide
Remote and Scripted Installations • After you install ESX on a system, you can quickly deploy more ESX hosts by using scripted installations. • Scripted installations provide an efficient way to deploy multiple hosts. • The ESX scripted installation method is similar to Red Hat’s kickstart installation method. • The script is a kickstart configuration file, which consists of the choices you want to make during the installation of ESX. • The ESX scripted installation is incompatible with Red Hat’s kickstart installation method or files. VI4 - Mod 1-2 - Slide
Remote and Scripted Installations Scripted installations include the following steps: • Create a kickstart file using the commands shown in the ESX and vCenter Server Installation Guide • Edit the kickstart configuration file as needed to change settings that are unique for each server. • Run the scripted install locally from the CD-ROM drive of the new system or remotely over a network using installation files that are hosted on a remote ESX. VI4 - Mod 1-2 - Slide
# root Password rootpw --iscrypted $1$MpéRëÈíÌ$n9sgFQJweS1PeSBpqRRu.. # Authconfig authconfig --enableshadow --enablemd5 # BootLoader ( The user has to use grub by default ) bootloader --location=mbr # Timezone timezone America/Los_Angeles # Install install cdrom # Network install type network --device=MAC_address --bootproto=dhcp # Keyboard keyboard us # Reboot after install ? reboot # Clear partitions clearpart --firstdisk # Partitioning part /boot --fstype=ext3 --size= --onfirstdisk part storage1 --fstype=vmfs3 --size=10000 --grow --onfirstdisk part None --fstype=vmkcore --size=100 --onfirstdisk # Create the vmdk on the cos vmfs partition. virtualdisk cos --size=5000 --onvmfs=storage1 # Partition the virtual disk. part / --fstype=ext3 --size=0 --grow --onvirtualdisk=cos part swap --fstype=swap --size=256 --onvirtualdisk=cos #VMware Specific Commands accepteula serialnum --esx=XXXXX-XXXXX-XXXXX-XXXXX-XXXXX %post Sample Kickstart File VI4 - Mod 1-2 - Slide
Run a Scripted Installation from the Kickstart File • Type one of the following commands: • esx ks=cdrom:/ks.cfg- Kickstart file is located on the CDROM drive attached to the machine. • esx ks=file://<path>/ks.cfg- Kickstart file is at <path> which resides inside the initial RAM disk image. • esx ks=http://<server>/<path>/ks.cfg- Kickstart file is located at the given URL. • esx ks=nfs://<server>/<path>/ks.cfg- Kickstart file is located at <path> on a given server. • esx ks=usbKickstart file is in the root directory of a USB flash drive • esx ks=UUID:<disk-uuid>:/<path>/ks.cfg Kickstart file is located on the partition with the given UUID and path. • Press Enter to start the scripted installation. VI4 - Mod 1-2 - Slide
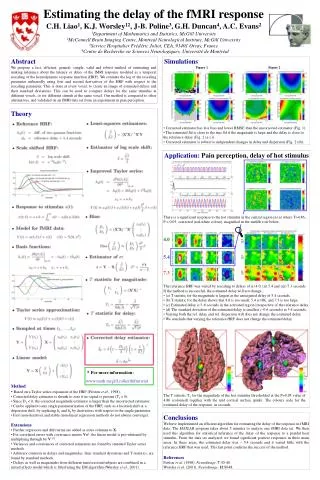
ESX Partitioning Required Partitions • An ESX local boot volume requires three specific partitions for operation. • In addition, a local or remote VMFS partition is required to store your virtual machines, and a vmkcore partition is required to provide core dumps for technical support. • For /var/log, VMware recommends a separate partition to prevent unexpected disk space constraints from compromising ESX operations. Increase this partition by 512MB if you perform a remote or scripted installation from the ESX machine. • In ESX 4.0, the /boot, vmkcore, and /vmfs are physical partitions. • The /, swap, and all the optional partitions are stored on a virtual disk • You cannot define the sizes of the /boot, vmkcore, and /vmfs partitions when you use the GUI or text installation methods • You can define these partition sizes when you do a scripted installation • After installation, the esxconsole-<UUID>.vmdk file is created on the /vmfs partition. The /, swap, and the optional partitions are stored in the esxconsole-<UUID>.vmdk file. VI4 - Mod 1-2 - Slide
ESX Required Partitions VI4 - Mod 1-2 - Slide
ESX Required Partitions VI4 - Mod 1-2 - Slide
ESX Optional Partitions • For /tmp and /home, VMware recommends separate partitions to prevent unexpected disk space constraints from compromising ESX operations. VI4 - Mod 1-2 - Slide
Mini-quiz You can have VMFS volumes installed on a “ATA” drive? (true/false) • False. You can put / & /boot on ATA everything else must be on a SATA drive. What 2 new methods of Kickstart installations can be accomplished (cdrom, nfs, file, http, ______, _______)? • USB (vfat), UUID (ext3) VI4 - Mod 1-2 - Slide
Lesson 1-2 Summary • Learn how to install ESX 4.0 • Download and Install VI Client • Methods of Installation VI4 - Mod 1-2 - Slide
Lab 1 – Installing ESX 4.0 Lab 1 Part 1 – Installing ESX 4.0 VI4 - Mod 1-2 - Slide