Download

1 / 85
860 likes | 1.03k Views
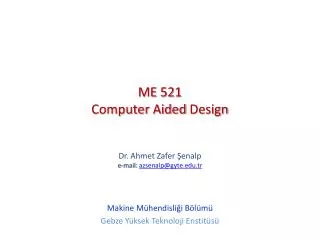
Faculty of Electrical Engineering . Lecture : En. Syahrom Bin Zakaria. BASIC CONCEPTS IN COMPUTER AIDED DESIGN (CAD). Introduction to AutoCAD. Standard toolbar. Object properties toolbar. Pull down menu. Drawing window. Tool bar. Command prompt. Button area. Dialog box for startup .

E N D
EC202 COMPUTER AIDED DESIGN Faculty of Electrical Engineering Lecture : En. Syahrom Bin Zakaria BASIC CONCEPTS IN COMPUTER AIDED DESIGN (CAD)
Introduction to AutoCAD Standard toolbar Object properties toolbar Pull down menu Drawing window Tool bar Command prompt Button area
Always begin your drawing with the above dialog box. Your can set this dialog box via “Option dialog box”. • Select one of the system for your drawing, “metric” or “English”. • You begin your drawing with one this method: • start from scratch • use a template • use a wizard
the keyboard, icons and pull-down menu. Command Entry
AutoCAD's drawing environment is based on the Cartesian coordinate system. In a two-dimensional Cartesian coordinate system, two infinitely long axes are placed at right angles in a single plane. The horizontal axis is called the x-axis and the vertical axis is called the y-axis. AutoCAD Coordinate system
Type of coordinate system • Absolute: x, y Represent the absolute real value of the drawing limits.
Relative: @delta X, delta Y • Represents the relative position of x and y coordinates of the new point compared to the previous point. 100 unit away from X 45 unit away from Y Starting point 100 unit away from X, 0 unit away from Y
Polar: @dist < angle • This system makes use of the distance and the direction angle of the new point away from the previous point. 100 unit away from starting point at an angle of 45o 100 unit away from starting point, at 0o angle Starting point
World Coordinate Systems (WCS) WCS in 3D WCS in 2D
User Coordinate System (UCS) • UCS allows you to shift the construction plane and simplify the location of three-dimensional points. UCS in origin position
UCS shifted from origin to inclined surface X for construction of a hole in 3D.
Limits command help to define the drawing boundaries. The current drawing area has a length of 12 units and a breadth of 9 units, by default for English system. For Metric System (SI), the drawing area has a length of 420 units and the breath of 297 units. Limits Command
The UNITS command governs the display and input formats for coordinates distances, and angles. To execute the Units command, one can either select Units Control from the Settings pull-down menu or type UNITS at the Command prompt. Units Command
This option allows us to specify all the necessary drawing aids that help in drawing design. To select this option, type command “DDRMODES” in command prompt option. Drawing Aids
Allow user to created objects more accurately and consistently maintain the result with far more precision. Object Snap
Tracking • Specifies a point that is relative to the other points using orthogonal or polar displacement. • AutoTrack™ helps you draw objects at specific angles or in specific relationships to other objects. When you turn on AutoTrack, temporary alignment paths help you create objects at precise positions and angles. AutoTrack includes two tracking options: polar tracking and object snap tracking. You can toggle AutoTrack on and off with the Polar and Otrack buttons on the status bar. Object snap tracking works in conjunction with object snaps. You must set an object snap before you can track from an object's snap point.
In the following illustration, the Endpoint object snap is on. You start a line by clicking its start point (1), move the cursor over another line's endpoint (2) to acquire it, and then move the cursor along the horizontal alignment path to locate the endpoint you want for the line you are drawing (3).
Establishes a temporary reference point as a basis for specifying subsequent points. Locates a point offset from a reference point within a command: FROM Snap From
Endpoint • Snap to Endpoint - Snaps to the closest endpoint of an object: ENDP • Example to draw an object (a circle) from endpoint A.
Midpoint • Snap to Midpoint . Snaps to the midpoint of an object: MID • Example to draw an object (a circle) from midpoint A.
Snap to Intersection • Snaps to the intersection of two objects: INT • Example to draw an object (a circle) from intersection point A.
Snaps to the apparent intersection of two objects: APPINT Finds a point that represents the apparent intersection of two objects, such as two non-parallel lines that do not actually cross in 3D space. Apparent Intersect
Center • Finds the center of a circle or an arc. • Draw a line from center A to center B
Quadrant • Snaps to a quadrant point of an arc, circle, ellipse, or elliptical arc: QUA To draw a line from quadrant A to Quadrant B.
Tangent • Locates a point that is tangent to the selected circle or arc from either the last or the next point picked. To a line from circle A tangent to circle B
Perpendicular • Returns a point at the intersection of the object selected and an angle perpendicular to that object from either the last or the next point picked. Draw a line perpendicular from midpoint A to BC
Standard toolbar provides easy access to commands and modifiers of two types The first type consists of commands that used to transfer, share, or import AutoCAD data into or with other Window’s applications The second type of commands includes commands and modifiers that used frequently and might find handy to have available at the top of your drawing area Standard Toolbar
DRAWING COMMANDS line • Start Point, End Point End point Start point
Start Point, Angle, Length • e.g. To draw a line starting from a point (30, 30), inclined at an angle of 45o to the horizontal and has a length of 60 mm.
Figure below shows a rectangular ABCD. Draw the rectangular ABCD. Begin from point A, draw line AG and GH. From point D draw lines DE, EI, IF and FL. From J draw JK. Exercise 1
Exercise 2 • Draw the figure below and complete the given table.
Circle Method of drawing circle in AutoCAD