Download
1 / 19
330 likes | 2.11k Views
Festooning and Stippling Dr. William G. Golden Director of Removable Prosthodontics.

E N D
Festooning and Stippling Dr. William G. Golden Director of Removable Prosthodontics
The wax must be prepared adequately. It must be softened and be kept warm while it is manipulated. This can be done either by softening the wax over a Bunsen burner flame or softening it over a hot water bath.
After it is well-adapted to the contours of the denture, a roach carver is used to trim the wax to the desired contours around the teeth, starting with the canine and proceeding through the rest of the teeth in the arch, from central incisor to second molar . Any wax extending beyond the midline is then removed.
The process is repeated on the other side and a straight edge is used to make sure the height of the wax to the teeth raises uniformly from the canine to the second molar. Any wax on the teeth is removed with a knife blade and the wax is then heated and smoothed with a Hanau torch.
Once it is well-adapted and contoured around the teeth and borders of the flanges, it is festooned, starting with the canine eminence. The larger end of the number seven wax spatula works very well for this procedure.
To highlight the prominence of the canine eminence, the teeth adjacent to and on both sides of the canine are festooned next. The depth of the fossa gingival to the lateral incisor and first pre-molar will help establish the prominence of the canine eminence.
The festooning reflects the size and angulation of the roots of the natural teeth. The wax in the first pre-molar region is scalloped to create a depression similar to the one made in the incisor region. This depression becomes more shallow the further we progress posteriorly.
This forms a buccal groove which improves the seal and allows more space for the cheek. All wax residue created by the festooning process is cleaned from the surfaces of the teeth and wax flanges.
The central incisor is scalloped in the same way as the lateral incisor, except that the labial fossa is shallower and further apically. The wax in the first pre-molar region is scalloped to create a depression similar to the one made in the incisor region. This depression becomes more shallow the further we progress posteriorly.
A Hanau torch is used to lightly flame the surface and will smooth the wax and give it a polished look. Too much heat will make the wax flow into the spaces around the teeth and reduce the contours that have just been established. It can also leave a carbon residue in the wax, so overheating must be avoided. It will help to prevent the melted wax from pooling around the teeth if the wax is heated with the torch held so that the flame is directed apically.
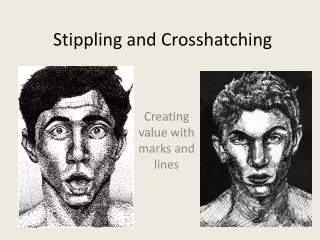
The texture of the labial and buccal surfaces of the denture can be enhanced by a procedure called stippling. A stiff bristle brush, such as a denture brush, is used to tap firmly against the surfaces of the warm wax. This will leave a “pebbled “appearance.
This surface is lightly flamed with a Hanau torch. The more flaming that is done, the less stippling that is left, so care must be taken to not over-flame the surface. The ideals surface should have an “orange peel” look which will serve to break up the amount of light that is reflected back and resembles the reflection of the natural tissues.
After the buccal and labial surfaces are completed, a strip of wax is adapted to the palate. It is cut off at its junction with the strip that was used for the buccal portion and a butt joint is formed.
This area is heated and molded together by finger pressure to provide an even thickness of wax. Keep the wax soft and pliable by heating it with the Hanau torch or it will crack. Excess wax is trimmed and the remainder is adapted closely around the teeth. Festooning of the palatal section is much less prominent than the festooning on the buccal and labial surfaces.
Festooning of the mandibular denture is accomplished in a manner similar to the sequence that was used in the maxillary denture, starting with the canine and carving forward.
As with the maxillary denture, the festooning of the mandibular posterior teeth is done to enhance the canine eminence and provides a buccal concavity which will allow the cheek to engage it and enhance the stability of the lower denture.
The lingual flange of the mandibular denture is festooned also, but the festooning here is less pronounced than that on the buccal and labial surfaces. A major concern on the lingual flange is the concavity of the lingual groove.
Space is created for the tongue, which aids retention by creating a neutral zone in which the teeth lie in a region where the labial and buccal forces balance those of the tongue to provide maximum stability. If these areas are not concave, the mandibular denture is much less stable during function, for the tongue can encounter enough frictional resistance to dislodge the denture.
After the festooning is completed, the surfaces are lightly flamed to smooth out their contours. Care must again be taken to not overheat the wax. A more aesthetic and natural looking result can be achieved if the occluso-gingival height of the teeth decreases uniformly from the canine to the last molar.