Download
1 / 2
20 likes | 24 Views
The Epson printer Error Code W-12 is usually a consequence of unable to recognize the printer device's ink cartridge(s) which is shown on the LCD. Perform the below steps to fix this error code easily.

E N D
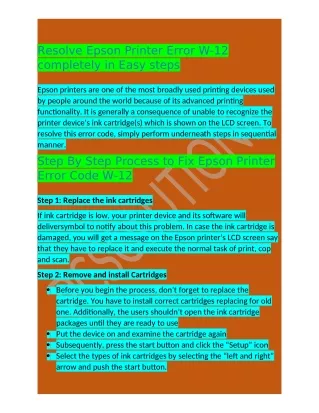
Resolve Epson Printer Error W-12 completely in Easy steps Epson printers are one of the most broadly used printing devices used by people around the world because of its advanced printing functionality. It is generally a consequence of unable to recognize the printer device’s ink cartridge(s) which is shown on the LCD screen. To resolve this error code, simply perform underneath steps in sequential manner. Step By Step Process to Fix Epson Printer Error Code W-12 Step 1: Replace the ink cartridges If ink cartridge is low, your printer device and its software will deliversymbol to notify about this problem. In case the ink cartridge is damaged, you will get a message on the Epson printer’s LCD screen say that they have to replace it and execute the normal task of print, cop and scan. Step 2: Remove and install Cartridges Before you begin the process, don’t forget to replace the cartridge. You have to install correct cartridges replacing for old one. Additionally, the users shouldn’t open the ink cartridge packages until they are ready to use Put the device on and examine the cartridge again Subsequently, press the start button and click the “Setup” icon Select the types of ink cartridges by selecting the “left and right” arrow and push the start button.
Open both the scanner device and the cartridge cover Press ink cartridge for few times then lift in a straight position to remove carefully Shake the ink cartridge minimum five times Now, Remove the ink cartridge from the purchase package Insert a new one from the holder and after that turn it down Once the cartridge is replaced, close its cover and push it down Then put the START button on to fill the ink When you found ink replacement message on the LCD screen, start it again. Contact Us: Company Name:Pcsolutione Website:http://pcsolutione.com/ Toll-free: 1-888-295-0245