Download
1 / 5
50 likes | 168 Views
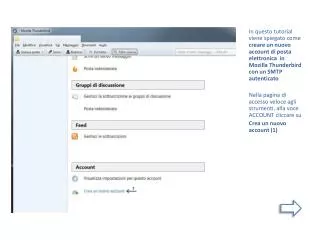
In questo tutorial viene spiegato come creare un nuovo account di posta elettronica in Mozilla Thunderbird con un SMTP autenticato Nella pagina di accesso veloce agli strumenti, alla voce ACCOUNT cliccare su Crea un nuovo account (1). Compilare i campi (1)

E N D
In questo tutorial viene spiegato come creare un nuovo account di posta elettronica in MozillaThunderbird con un SMTP autenticato Nella pagina di accesso veloce agli strumenti, alla voce ACCOUNT cliccare su Crea un nuovo account (1)
Compilare i campi (1) con una parte dei codici ricevuti e cliccare su CONTINUA (2)
Selezionare POP3 (1) ed aggiungere le altre informazioni richieste (2): il nome utente, il POP3 e l’SMTP ricevuti. In questo caso anche per l’SMTP si deve impostare l’autenticazione con password normale. Cliccare su RIESAMINARE (3) e poi su CREA UN ACCOUNT (4)
Dopo aver completato la creazione dell’account è necessario sistemare alcune impostazioni. Cliccare quindi su STRUMENTI (1) e poi su IMPOSTAZIONI ACCOUNT (2)
Nella finestra delle Impostazioni inserire l’email nel campo Indirizzo per risposte (1) E’ anche possibile aggiungere la Ragione sociale e/o modificare il nome che sarà visualizzato da chi riceve i messaggi. Cliccare su OK (2) La procedura è a questo punto completa.