Download

1 / 37
370 likes | 514 Views
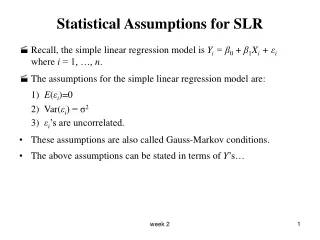
DIGITAL SLR FOR BEGINNERS. REVIEW. WHAT IS A DIGITAL SLR CAMERA LENSES AND LENS FILTERS DIGITAL PHOTOGRAPHY TERMINOLOGY DELETING & FORMATTING FOCUS & DRIVE EXPOSURE MODES USING FLASH. OVERVIEW. Manual exposure Metering Histograms Bracketing / Exposure Compensation White Balance

E N D
DIGITAL SLR FOR BEGINNERS
REVIEW • WHAT IS A DIGITAL SLR CAMERA • LENSES AND LENS FILTERS • DIGITAL PHOTOGRAPHY TERMINOLOGY • DELETING & FORMATTING • FOCUS & DRIVE • EXPOSURE MODES • USING FLASH
OVERVIEW • Manual exposure • Metering • Histograms • Bracketing / Exposure Compensation • White Balance • Composition
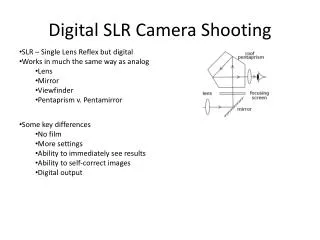
MANUAL EXPOSURE After composition, the two most important aspects of getting a great photograph are zeroing in on the correct exposure and having the image focused properly.
WHAT IS “EXPOSURE” In the simplest terms, exposure is: “is the total amount of light allowed to fall on the photographic medium during the process of taking a photograph” -wikipedia
EXPOSURE TRIANGLE Depth of Field The amount of light the sensor receives controlled by the three components that make up the exposure triangle. Exposure Triangle • Shutter Speed • Aperture • ISO (“film” speed) Image Noise Motion Blur
APERTURE RECAP Your aperture, or your F-stop, controls how much light hits your sensor. A lens’s aperture (F-stop) is basically a hole in your camera lens that can be made bigger or smaller to let in more or less light. Remember that the bigger the F-Stop number (aperture) the smaller the opening while the smaller the F-Stop number (aperture) the bigger the opening. Which aperture (F-stop) is going to let in more light? f4 or f8
SHUTTER SPEED RECAP SHUTTER SPEED RECAP SHUTTER SPEED RECAP Shutter speed is the time that the shutter remains open when taking a photograph. Common Shutter Speeds
ISO RECAP The ISO speed determines how sensitive the camera is to incoming light. The lower the ISO the less grainy your photos will appear but the more light you’ll need to get the proper exposure. The higher the ISO the more grainy your photos will appear but the less light you'll need to get the proper exposure. Common ISO Speeds
UNDERSTANDING EXPOSURE Achieving the correct exposure is a lot like collecting rain in a bucket. While the rate of rainfall is uncontrollable, three factors remain under your control: • The bucket's width (aperture) • The duration you leave it in the rain (shutter speed) • The quality of your bucket, quality of the rain (ISO) You need to ensure you don't collect too little rain ("underexposed"), but that you also don't collect too much ("overexposed").
UNDERSTANDING EXPOSURE The Basics: Sunny 16 rule To achieve proper exposure on a bright sunny day, your ISO and your shutter speed are going to be the same when you’re aperture is set at f16. Example: If your ISO is 200 at f16 your shutter speed will be 1/200th of a second. This will ALWAYS be the same as long as it’s a bright sunny day. Now from here on out buckle up it might get bumpy.
UNDERSTANDING EXPOSURE Let’s say you’re out for a picnic on a bright sunny day. So you think to yourself, “Hey, Scott taught me all about basic daylight exposure! I’m gonna try it out!” So you do the following in manual exposure mode: 1. Set your camera to ISO 125 2. Set your shutter speed to 1/125 second 3. Set your camera to F16 But.... So you do the following: 1. Leave your camera set to ISO 125 2. Leave your shutter speed to 1/125 second 3. Changer your aperture to F4
UNDERSTANDING EXPOSURE You had a correct exposure of the picnic scene when your camera was set to ISO 125 at 1/125th of a second f16. When you changed the F-stop to f4, you allowed in too much light and ended up with an image that was over exposed or “blown out”. So what do we do? Change our shutter speed to let in less light.....but by how much? How do we know how fast our shutter speed should be? By understanding equivalent exposures and controlling exposures.
CONTROLLING EXPOSURE To accommodate the huge variety of brightness levels we see in the real world, we need to be able to control how much light gets to the camera’s sensor. We do this by adjusting one or more of the three points in the exposure triangle
CONTROLLING EXPOSURE • Back to our example.... • Since you started at f16 and went down to f4, how many f-stops did you change your aperture by? Common Shutter Speeds Common Apertures
CONTROLLING EXPOSURE • Back to our example.... • Since you started at f16 and went down to f4, how many stops did you change your aperture by? Answer: Four Stops Common Shutter Speeds Common Apertures
CONTROLLING EXPOSURE • Back to our example.... • Since you started at f16 and went down to f4, how many stops did you change your aperture by? Answer: Four Stops Common Shutter Speeds Common Apertures
Viewfinder Simulator And exposure wheel
FIRST ASSIGNMENT Put your camera into manual mode, and find the controls to adjust each of the three exposure triangle points: ISO, Shutter and Aperture. Through the viewfinder look at your exposure bar.
EXPOSURE Trade-Offs Each method of controlling exposure does so in a different way, and as such, has a different effect on resulting photo. Increasing the shutter speed reduces the light, and freezes motion. Decreasing it allow more light in, but blurs movement. Closing the aperture decreases the light, but increases the depth of field. Opening the aperture lets in more light, but decreases the depth of field Increasing the ISO amplifies the light collected, but increases grain.
CONTROLLING EXPOSURE • Taking a good photo is the result of the conscious choice of the three points on the exposure triangle in order to get a well exposed image which has a character pleasing to the photographer. Adjusting the settings is a balancing act that affords huge creative options to the photographer.
READING THE LIGHT Knowing how your digital camera meters light is critical for achieving consistent and accurate exposures. The light meter is the brains behind how your camera determines the shutter speed and aperture, based on lighting conditions and ISO speed.
INCIDENT vs. REFLECTED LIGHT All in-camera light meters have a fundamental flaw: they can only measure reflected light. This means the best they can do is guess how much light is actually hitting the subject. If all objects reflected the same percentage of incident light, this would work just fine, however real-world subjects vary greatly in their reflectance.
18 % Grey or 12 % Though there is debate to the exact number and one I think only matters in theory. All we need to worry about is what it does. An in-camera light meter can work surprisingly well if object reflectance is diverse throughout the photo. For this reason, in-camera metering is standardized based on the luminance of light which would be reflected from an object appearing as middle gray. If the camera is aimed directly at any object lighter or darker than middle gray, the camera's light meter will incorrectly calculate under or over-exposure, respectively. Unfortunately, some scenes may have a significant imbalance in subject reflectivity, such as a photo of a snowbank, or a photo of a pile of charcoal.
METERING OPTIONS In order to accurately expose a greater range of subject lighting and reflectance combinations, most cameras feature several metering options. Each option works by assigning a weighting to different light regions; those with a higher weighting are considered more reliable, and thus contribute more to the final exposure calculation. The three most common metering options are Evaluative Center-weighted Spot
WHEN TO USE PARTIAL & SPOT METERING Partial and spot metering give the photographer far more control over the exposure than any of the other settings. They are useful when there is a relatively small object within your scene which you either need to be perfectly exposed, or know that it will provide the closest match to middle gray.
EXPOSURE COMPENSATION Any of the previously mentioned metering modes can use a feature called exposure compensation. The metering calculation still works as normal, except the final settings are then compensated. This allows for manual corrections if you observe a metering mode to be consistently under or over-exposing. BRACKETING Exposure bracketing means that you take two or more pictures of the same scene. One slightly under-exposed the second one slightly over-exposed.
WHITE BALANCE White balance (WB) is the process of removing unrealistic color casts, so that objects which appear white in person are rendered white in your photo.
COMPOSITION: RULE OF THIRDS The rule of thirds is a powerful compositional technique for making photos more interesting and dynamic. It's also perhaps one of the most well known. This article uses examples to demonstrate why the rule works, when it's ok to break the rule, and how to make the most of it to improve your photography.
RULE OF THIRDS: OVERVIEW The rule of thirds states than an image is most pleasing when its subjects or regions are composed along imaginary lines which divide the image into thirds — both vertically and horizontally It is actually quite amazing that a rule so seemingly mathematical can be applied to something as varied and subjective as a photograph. But it works, and surprisingly well. The rule of thirds is all about creating the right aesthetic trade-offs. It often creates a sense of balance — without making the image appear too static — and a sense of complexity — without making the image look too busy.
Text goes here. Preferred font is: Arial 18pt. Preferred font color is black text or white is ok too! Use these speech bubbles to hold text Use these speech bubbles to hold text Use these speech bubbles to hold text
Graphics for use in your presentation use the chain as a divider