Download
1 / 3
30 likes | 40 Views
Experience the power of seamless connectivity with Wavlink AC750 setup. Say goodbye to dead zones and hello to lightning-fast internet speeds. Elevate your home network to new heights and enjoy streaming, gaming, and browsing like never before. Get ready to experience the ultimate Wi-Fi revolution with Wavlink AC750 setup!<br>

E N D
Wavlink AC750 setup Are you tired of experiencing weak Wi-Fi signals in certain areas of your home or office? Wavlink AC750 setup is the solution you've been looking for. With its easy setup process and powerful signal amplification capabilities, this extender will ensure that you have a reliable and strong internet connection throughout your space.
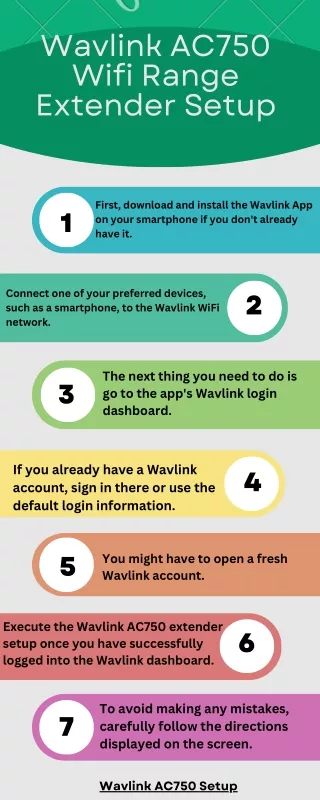
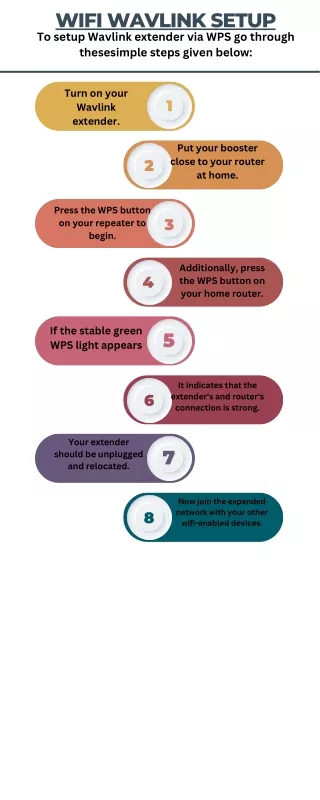
Step-by-step process of setting up your Wavlink AC750 extender Unboxing and Connecting the Extender The first step for Wavlink AC750 setup is unboxing it and connecting it to your existing Wi-Fi network. Begin by locating a suitable spot near your router to place the extender. Ideally, this should be an area where the Wi-Fi signal is still decent. Plug in the extender and wait for the indicator lights to turn green. This indicates that the extender is powered on and ready to be set up. Accessing the Wavlink Extender Setup Page Once the extender is powered on, you will need to access the Wavlink extender setup page to configure it. To do this, open a web browser on your computer or smartphone and enter apsetupwavlink in the address bar. Configuring the Extender Settings On the Wavlink extender setup page, you will be prompted to enter your existing Wi-Fi network's username and password. Consequently, this step is necessary for the extender to connect to your network and amplify the signal."Once you have entered the required information, click on the "Connect" button to establish a connection between the extender and your Wi-Fi network.
Placing the Extender Now that the setup is complete, it's time to find the optimal location to place the extender. The ideal spot should be within the range of your existing Wi-Fi network and in an area where you need a stronger signal. Experiment with different positions to find the best coverage for your space. Keep in mind that obstacles such as walls and furniture can affect the extender's performance, so try to minimize these obstructions. • Enjoy Enhanced Wi-Fi Coverage With the Wavlink AC750 setup and strategically placed, you can now enjoy seamless Wi-Fi coverage throughout your home or office. Whether you're streaming your favourite shows, working remotely, or simply browsing the web, you can be confident in a stable and reliable internet connection.