Functional Bow Hold: String Teaching Flaws & Remedies
Understand the flaws in string instrument instruction, learn how modeling and functional movements are key to effective teaching. Discover the principles of a functional bow hold for violin and viola playing.

Functional Bow Hold: String Teaching Flaws & Remedies
E N D
Presentation Transcript
A Lesson on String Lessons Louis Bergonzi University of Illinois
The Overlapping Hold To assume the right hand hold, bring the club forward in front of you. Lay the grip across the bottom joints of the middle two fingers just below the palm. Take hold of the club with the middle two fingers only in such a way that the index fingers points directly away from you. Now slide the right hand up the grip until the third finger of the right hand meets the forefinger of the left and the lifeline on the right hand fits squarely over the left thumb. To complete the hold, the little finger should wrap around the knuckle of the left forefinger, the right forefinger take hold of the grip, and the right thumb be lowered to the grip just to the left of center.
Confused? • Maybe that version was just too complicated. • Let’s try a set of simpler instructions.
The “Grip” • Place club in the fingers of the left hand, not the palm. • Close the left hand placing the heel and thumb on top of the shaft. • Place the club in the fingers of the right hand, overlap (interlock) the little finger with the left hand. • Close the right hand and cover the left thumb completely. The right thumb is placed on the left side of the shaft. • Front View. Keep the hand close together. The “V” formed by the thumb and forefinger of each hand should be pointing at-- --The Neutral Zone--
SO---- The golf club hold taught to you was accurate. The info was correct. But, there was something missing from the way you were taught, which was by way of verbal explanation?
Ignored the power of the model A Reminder about Learning: Do as I do (DOID). Modeling. musical sound is an aural-cognitive phenomenon that is best heard and not described with words string technique is a physical-visual phenomenon that is best done and seen, not described in words. Instructional modeling shows what string technique looks like and what string instruments sound like. What else is there? Teaching Flaw #1
Confused about the nature of “Knowing” A Reminder about Learning: I know what I do. I do what I know. Doing is a type of knowing because the brain is the conscious mind and a part of the body. Therefore, thinking is a physical act. Verbal information is only one type of “knowing.” What a student knows is not only what a student can say. “Knowing-how” is not the same as “knowing-that.” Teaching Flaw #2
So, the golf teaching was flawed in 2 ways. But, what was wrong about the golf playing technique? Let’s fix the teaching and see if we can find out. Today’s guest golf pro is:_______.
“The Grip” with Teacher Modeling • Place club in the fingers of the left hand, not the palm. • Close the left hand placing the heel and thumb on top of the shaft. • Place the club in the fingers of the right hand, overlap (interlock) the little finger with the left hand. • Close the right hand and cover he left thumb completely. The right thumb is placed on the left side of the shaft. • Front View. Keep the hand close together. The “V” formed by the thumb and forefinger of each hand should be pointing at-- --The Neutral Zone--
??Questions for you?? • Were you holding the club? • Did you feel like you could use the club to hit the golf ball toward the hole? Now, let’s go back to the bow and set up your bow hold.
Holding the Bow To show and tell you is today’s Guest String Pro, _______________.
??Questions?? • Were you holding the bow correctly? • Were you ready to play the instrument? Did it feel like you could move the bow to make a sound given how you were holding the bow?
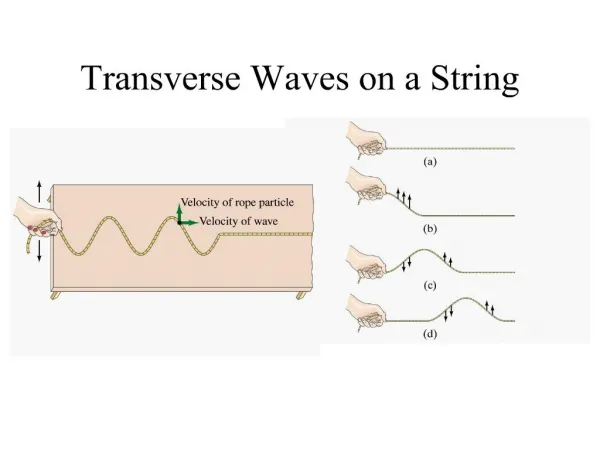
String Playing Flaw • Although, the instruction involved modeling, the instruction developed a static pose that won’t produce a sound without movement. • String instruction should focus on the functional movements. • It’s the movements that produce the sound and guard against physical injury
Functional Movement ≠ Static Pose • So, even when teaching students how to hold the bow, we can attend to the movements necessary. like the movement of the thumb… “Bump De-Bump”
Or • The shoulder motion for string crossing…. “Rock ‘n’ Roll”
Or • The movement of the bow through space “Helicopters”
So— • What’s critical in teaching stringed instruments?
String instruction should be grounded in: • The development of musicianship that is authentic to a particular musical practice, not verbal information about music • the ways people learn to hear music internally • the visual and aural models that are important to learning any musical instrument • the development of the functional body movements that are essential to string playing
Principles of a Functional Bow Hold • Instrument holds up the bow, not bow hold • Bow hand is a series of springs • Bow must become an extension of hand; hand knows how bow feels • Finger Functions: • Thumb is fulcrum • Pinky counterbalances • Middle finger, with assistance from Ring, guides the bow path • Index finger allows for focused weight
So an instructional sequence designed to develop a functional bow hold might include: • 1.two handed hold • 2.bunny, ears, nose • 3.pet frog • 4.picky click • 5.thumb and pinky see saw • 6.thumb rolls • 7.see with your thumb • 8.jigglers • 9.stir the pot • 10.index stretch • 11.bump D. bump
Again, the key ideas in which string instruction should be grounded: • The development of musicianship that is authentic to a practice, not verbal information about music • the ways people learn to hear music internally • the visual and aural models that are important to learning any musical instrument • the development of the functional body movements that are essential to string playing
Get away from an incremental approach to developing string technique. So that-- There is no such thing as discrete, unconnected levels of “beginning” and “advanced” technique All technique, from holding the instrument to shifting, can be thought of as being in one of three stages Review Focus Preparation Benefits of Conceiving String Technique as Sequential
Sit-Com or Soap Opera? • With this ” long-term eye,” are lessons-across-weeks (“weekly episodes”) more like soap operas or situation comedies? • Which and Why?
Semester Story Lines • Teaching in ways people learn • Viewing string technique as sequential • The importance of functional movement in string playing and teaching
What should happen in the next few weeks of class? • Review: Learning Reminders (review familiar and add new) • Focus: lesson planning (within & across lessons) • Prepare: ways to teach functional movements (teaching strategies)