
Pocket Door Frame Installation Instructions and Specifications Guide
This guide provides comprehensive instructions for installing a built-up pocket door frame, focusing on dimensions for rough openings, door sizes, jamb attachment, and adjustment procedures. It details the required measurements for one and two-door setups, with specific information on opening widths ranging from 4’2” to 6’2” and rough opening heights. Additionally, it includes tips for plumb adjustments and installation of door stops, ensuring smooth operation. Follow these instructions for a successful pocket door installation.

Pocket Door Frame Installation Instructions and Specifications Guide
E N D
Presentation Transcript
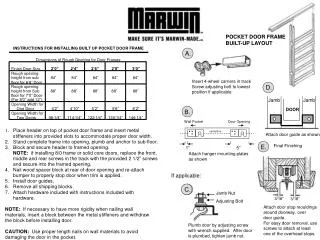
D. Opening Width for One Door 4’2” 4’10” 5’2” 5’6” 6’2” Opening Width for Jamb Jamb Attach door guide as shown Two Doors 98 - 1/4” 114 - 1/4” 122 - 1/4” 130 - 1/4” 146 - 1/ 4” DOOR . . Final Finishing E. Wall Pocket Door Opening . . . . centerline 3. 1” 5” Jamb Nut Adjusting Bolt 3/16” 3/16” Attach door stop mouldings around doorway, over door guide. For easy door removal, use screws to attach at least one of the overhead stops. Plumb door by adjusting screw with wrench supplied. After door is plumbed, tighten jamb nut. POCKET DOOR FRAME BUILT-UP LAYOUT INSTRUCTIONS FOR INSTALLING BUILT UP POCKET DOOR FRAME A. Dimensions of Rough Opening for Door Frames 2’0” 2’4” 2’6” 2’8” 3’0” Finish Door Size Rough opening height from sub 84” 84” 84” 84” 84” Insert 4-wheel carriers in track Screw adjusting bolt to lowest position if applicable. floor for 6’8” Door Rough opening height from Sub 88” 88” 88” 88” 88” floor for 7’0” Door (For 8’0” add 12”) B. Attach hanger mounting plates as shown If applicable: C.