Download

1 / 21
210 likes | 306 Views
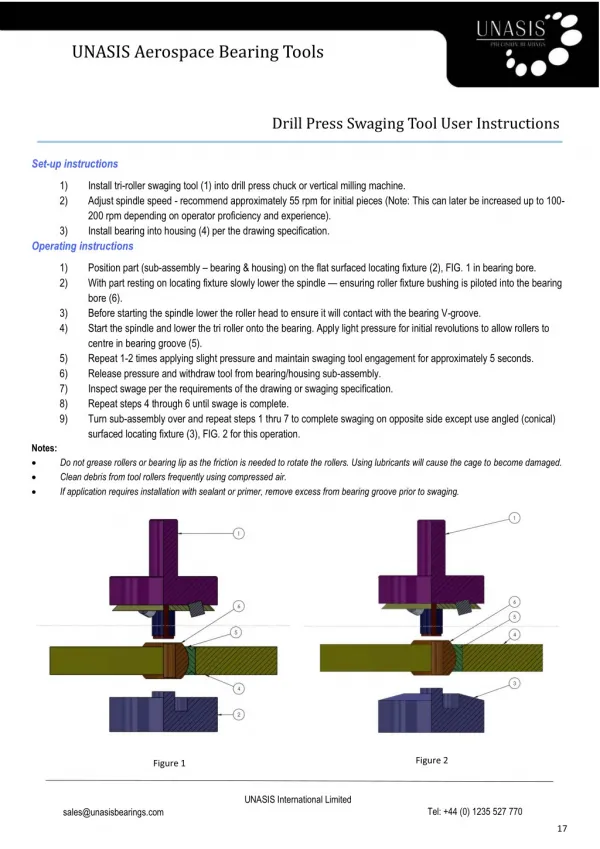
AV Operating Instructions. V 1.0. Turning System On. Touch Crestron screen to “wake it up” Touch “ON” button Wait a few seconds, rack system will boot up. Turn AV computer (under table) on and let boot up, front button on front of tower.

E N D
Turning System On • Touch Crestron screen to “wake it up” • Touch “ON” button • Wait a few seconds, rack system will boot up. • Turn AV computer (under table) on and let boot up, front button on front of tower. • Only if using Console Mix: Turn on mixing board. Small black button on back. • Turn on screens and projectors via Crestron • Turn on Gathering space TV when ready
Tap Creston to ‘wake up’, then press ‘on’. Equipment in rack will boot up. Then boot up AV computer.
Turn projectors on by touching the ‘on’ button for both projectors. Screens will drop down and projectors will go on. Touch ‘Auto Image’ if you need to center the image on the projector screens. Generally not needed. Touch ‘No Show’ to temporarily turn off screens when adjusting powerpoint deck or switching between equipment. Touch ‘No Show’ again to bring back images to screens.
Simple mix volume settings • Make sure ‘source’ and ‘main’ volume settings start at ‘0’. • Adjust separate mic settings via Crestron controls to raise or lower mic volume Leave both settings at 0 to begin with and adjust individual mic’s first. Then increase ‘Source Volume’ or ‘Main’ volume only if more volume is needed. Remember to return back to ‘0’ or volume may be too loud for other sources.
Wireless Microphones • Make sure ‘source’ and ‘main’ volume settings start at ‘0’. • Adjust separate mic settings via Crestron controls to raise or lower mic volume • Pastor Heckendorf – Wireless 2 • Pastor Scharf – Wireless 3
Each mic can be adjusted separately by touching the up or down arrows. Use this method first to adjust Pastor’s volume level. Touch the mute button to turn off any mics when needed. Touching again will turn mic back on.
Starting Slide Deck • Find specific powerpoint file for service located on ‘desktop’. • Double click and put in ‘slide show’ mode • First few slides will ‘loop’ at beginning of service • Advance to rest of presentation by clicking on arrow at bottom right of screen.
Sending output to screens • Select device in which you want to project on screens • Select where you want to send to: • Projector 1 • Projector 2 • Preview Monitor • 50 inch Monitor
1. To send individual devices to screens. First touch source device (AV Room, DVD, VCR or Camera) 2. Then touch the device you want the image to go to (Projector 1 or 2, 50 inch monitor, preview monitor)
Showing Wels Connection Turn on DVD player in Rack Open DVD door Insert Wels connection Press ‘No Show’ while switching to DVD Go to Crestron, select DVD Use Crestron controls to navigate thru Wels menu Use “Captions”, select appropriate month Press play on Crestron and send DVD to Projectors 1 and 2 Press “No Show’ to turn screens back on Adjust volume if necessary. Note: DVD’s can also be played from AV computer if you feel comfortable doing this thru Windows Media Player.
Using the Console Mix • When using Console mix, use sliders to maintain mic levels and overall volume instead of the Crestron panel.
Small white ‘mute’ button can turn device off when pressed. Control overall volume levels using the Main slider controls, should generally stay at ‘0’. Control individual mic and source volume using the black sliders. Each slider labeled for device it controls
Gathering Space TV • Gathering space “50 inch” on Crestron. • How to work it • Turn monitor on in Gathering area, make sure RGB is selected, all buttons bottom of monitor, defaults to RGB • Send signal to it just like you did before on Crestron.
Video Recording • Video Recording • Make sure Video input is on • Find empty track first by pressing ‘next’ • Press record on Crestron, stop when done You control camera with Crestron controls, use presets 1 Press ‘Next’ until empty track is displayed: 00:00:00:00 2
Audio Recording • Audio Recording • 1. Turn unit on (doesn’t come on automatically) • 2. Press ‘Record’ to get ready • 3. When ready to record, press ‘Play’ Only record Sermon on Audio. Press ‘Stop’ immediately at end of Sermon 3 1 1 2 2 3
Gathering space volume Turn knob clockwise to increase volume on Gathering Space speakers. Counter clockwise to decrease.
Turning System Off • Turn screens off first on Crestron and wait for down power-down cycle to finish on projectors • While screens are powering off, close all programs and shut down AV computer properly. Start/Shutdown. • Once screens have finished, turn rest of system off by touching “off” then “shutdown” on Crestron • Turn off mixing board if console mix. Make sure rack is locked • Turn off Gathering space monitor
Tap Off Button’, followed by ‘Shutdown’ to turn off entire AV system.
Touch Shut Down to turn all systems off, make sure you shut down AV computer first.