Download
1 / 3
30 likes | 43 Views
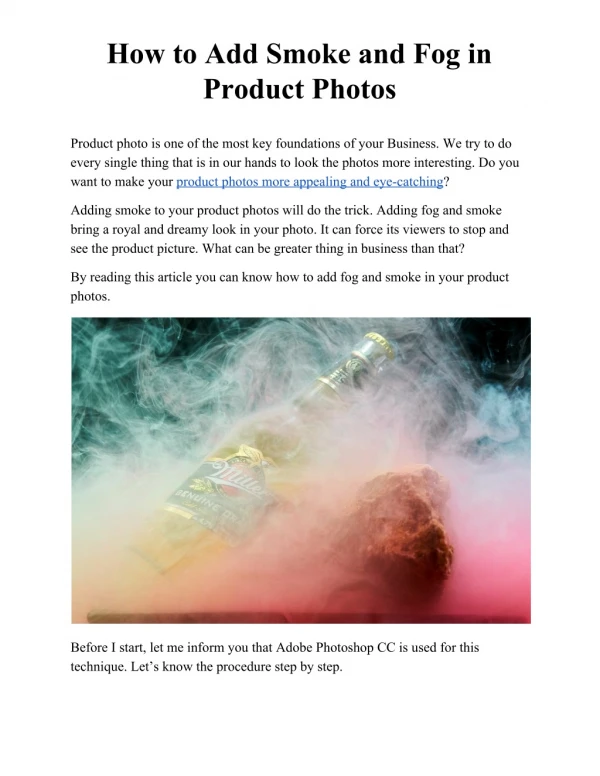
Product photo is one of the most key foundations of your Business. We try to do every single thing that is in our hands to look at the photos more interesting. Do you want to make your product photos more appealing and eye-catching? <br><br>http://bit.ly/photo-retouching-service

E N D
How to Add Smoke and Fog in Product Photos Product photo is one of the most key foundations of your Business. We try to do every single thing that is in our hands to look the photos more interesting. Do you want to make your product photos more appealing and eye-catching? Adding smoke to your product photos will do the trick. Adding fog and smoke bring a royal and dreamy look in your photo. It can force its viewers to stop and see the product picture. What can be greater thing in business than that? By reading this article you can know how to add fog and smoke in your product photos. Before I start, let me inform you that Adobe Photoshop CC is used for this technique. Let’s know the procedure step by step.
Step 1: Adding Glow At first, start by opening the image that need to revise in Photoshop. Then click on the background layer from the layer section and choose Duplicate layer. After this you can rename the coating into Add Glow that will make your job easier. Then go to blur option followed by Gaussian Blur and save the radius to 15%. In the next, you have to modify the layer by changing its blending mode into soft light and decrease the opacity to 65%. Step two: Adding vignette The primary task of adding glow is over. Now you have to add vignette to the photo. Considering this creates a new layer from the below and rename it to add vignette for identify the layer. Next, jump to the fill preference and choose 50% gray. At this stage, it will be noticeable that total photo has become gray. Don’t need to be worry about it. Go to filter option followed by the lens correction. Choose vignette from there and set its value to -100 and choose midpoint number +10. Then you have to set the blending mode of Add Vignette layer into hard light. Step three: Adding the smoke At this stage, it’s time for adding shadow. Create a new layer and rename it as add smoke. Then go to render option followed by Clouds. Go back to the layer and customize it as Converts to smart object. At this point you have to set the color blending mode into screen. Then press CTRL+T to transform freely. After this you have to transform the layer along with scaling it from the top. After this drag and position the smoke into a perfect position according to your object. Then change the blending mode once again from normal to overlay. Final step: Merging layer You are almost at the finish line. Click on the Add Vignette layer and choose duplicate layer. Formerly, drag it up with the Add smoke layer. That is it buddy you have done it. Now, save the picture according to your required file format.
Hope you enjoyed it. Now allow me to give you some bonus tips that will help you to add fog and smoke in more eye-catching way. Let’s jump forward. Thing to Follow: 1. Using deep color background will be the best option. It will highlight your shadow. 2. It’s enhanced to use a steering light in the photo. It will improve the overall look of the photo. 3. If possible start editing with the Raw Picture it will allow you to work with more information. 4. At the final stage, you can increase and decrease the opacity to change the density of the shadow Things not to follow: 1. Try to avoid white background otherwise shadows will not be visible. 2. Don’t keep a constant opacity for all the layers. 3. Don’t overlook to transformation the blending modes of various layers as mentioned in the above.