Download
1 / 51

E N D
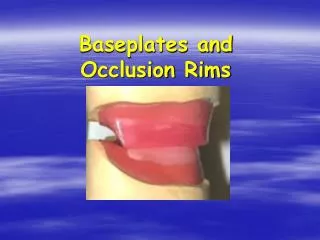
Baseplates are structures which serve as platforms upon which occlusion rims are placed for the purpose of determining the interocclusal jaw relationships of a patient. They provide a base for the teeth to be set in wax so that dentures can be evaluated within the patient’s mouth for accuracy prior to sending them to the lab for processing.
Occlusion rims are wax pillars placed on baseplates which can be adjusted to record the patient’s interocclusal jaw relationship and serve as guides for setting the teeth in proper position and establishing the proper contours of the denture base.
Since the baseplates and occlusion rims are made on the master casts without the patient being present, the wax rims are are adjusted to certain arbitrary dimensions that should require a minimum amount of adjustment in the patient’s mouth.
Procedure • Prepare the cast. • Block out undercuts. • Lubricate the cast. • Make the baseplate. • Place the Triad. • Shape the Triad. • Cure the Triad • Smooth the Triad
Procedure • Make the occlusion rim. • Heat the baseplate wax. • Adapt a sheet of wax to the baseplate. • Attach the wax rim to the baseplate. • Contour the wax rim.
Prepare the Casts • Block out deep undercuts. • Paint the model with tinfoil substitute, VaselineR or with Model Release Agent(TriadR).
Make the Baseplate Adapt TriadR to the master cast. Press it down in the palate first, then with the thumb in the palate, mold the TriadR down into the vestibules. The baseplate should fill the vestibules and is not trimmed back as was done with the tray.
Make the Baseplate When the TriadR is fully adapted to the cast, press it down hard on the edge of the land area to trim off the excess.
Make the Baseplate Use the thumb to press it down into the vestibules, and when it has the correct form, cure it for 3 minutes in the TriadR conditioning unit.
Make the Baseplate After the baseplate is completely cured, it should be easily removed from the cast without damaging either the cast or the baseplate.
Make the Baseplate When the baseplate is placed back on the cast there is always a little bit of distortion manifesting as a slight opening between the cast and the baseplate in the middle of the palate.
Make the Baseplate With the mandibular baseplate, make a cut in the baseplate in the tongue area. Adapt TriadR to the master cast much as was done with the maxillary, but remove a section from the tongue area after the baseplate is adapted to the ridges.
Cure the Triad in the curing oven The baseplate is cured on the cast in a curing unit for three minutes. It is removed from the cast and placed in the curing unit with the intaglio side up for an additional two minutes. A quick look will show where the Triad material extends onto the land area.
Make the Baseplate After the baseplates are completely cured, they are separated from the cast. They should be easily removed from the cast without damaging either the cast or the baseplate and come off clean. Trim the borders of both baseplates smooth so as not to be an irritant to the patient.
Make the Occlusion Rim Form a piece of baseplate wax into a tightly compressed wafer about 10 mm wide and about 6 inches long.
Make the Occlusion Rim Lute this wax to the baseplate and trim the distal ends at about a 45-degree angle and about 6 mm short of the distal border of the baseplate.
Make the Occlusion Rim 2. Contour the facial and lateral surfaces of the occlusion rim with a hot metal spatula to melt the wax. 1. Use a glass eyedropper to apply melted wax to seal the occlusion rim to the baseplate. 3. Flatten the with a hot metal plate so that the occlusal surface is parallel with the ala-tragus and interpupiilary lines.
Maxillary D C A B Mandibular Dimensions of occlusion rims (made in lab) The height of the maxillary occlusion rim is adjusted to equal 18 mm (A) posteriorly, and 22 mm (B) anteriorly. The mandibular rim is adjusted to extend 2/3 of the way up the retromolar pad area postriorly (C), and 18 mm anteriorly (D). Note that these dimensions are totally arbitrary, and the rims must be adjusted in the patients mouth.
Dimensions of occlusion rims (made in lab) • The width of the maxillary occlusion rim is adjusted to equal 10mm posteriorly, and 8 mm anteriorly. • The width of the mandibular occlusion rim is adjusted to equal 10mm posteriorly, and 8 mm anteriorly. • The reason for this is that the final dimensions of the width of the rim is dependant upon the labial and buccal support surfaces which are adjusted in the patient’s mouth.
Make the Occlusion Rim The labial surfaces of both the maxillary and mandibular occlusion rims are adjusted to fit the patient’s mouth and provide the desired support for the lips and cheeks.
After the casts are mounted, the following steps are completed in this sequence: • The anterior of the rims are adjusted to provide proper lip support and face form. • The maxillary rim is adjusted to be parallel to the interpupillary line (in the lab exercise, the upper member of the articulator) at a point where the resting lip is 1-2 mm above the edge of the rim at the midline (1/2 the inter-ridge distance). • The maxillary rim is adjusted to be parallel to the ala-tragus line (in the lab exercise,the upper member of the articulator). • The mandibular rim is adjusted so that it fits precisely against the occlusal surface of the maxillary rim in CR. • The lingual and palatal of the wax rims are reduced so that the rims are 3-5 mm thick in the anterior, 5-7 mm thick in the premolar region, and 8-10 mm thick in the molar region.
E B B C A Once the buccal and labial contours are established in the patient’s mouth, the midline (A), the cuspid line (B), and the high lip line (C) are recorded intraorally on the maxillary occlusion rim to facilitate orientation of the teeth. In the lab exercise the midline is determined by marking the middle of the incisive papilla(E) and marked on the anterior land are of the cast.
For the Lab Exercise The depth of the vestibule is marked in its middle just anterior to the central incisors. This mark is then transferred to the land area on both sides, because when the baseplate is placed on the cast, the center mark will be covered. When the wax rim is made, it is marked to reflect the position of this line.
For the Lab Exercise The wax rim is then trimmed to this line. The same procedure is done on the mandibular cast. These positions will show the maximum anterior placement of teeth in these arches before instability is created.
For the Lab Exercise The inter-ridge distance of the anterior ridges is measured at the incisive papilla. This distance is divided by 2, giving the anterior height of the occlusal plane. This is transferred to a tongue blade and a section is removed to make a tool to adjust the rim to this height.
For the Lab Exercise Using the tongue blade, place it on the anterior ridge and transfer this measurement to the anterior maxillary wax rim by forcing the wax onto the sharp edge of the tongue blade until the pin touches the guide table. Adjust the posterior height so that it is parallel to the upper member of the articulator.
The main difference between what you are doing today in the lab and what is done in clinically on a real patient is that you already have your casts mounted. On an actual patient you have to determine these relationships. In this exercise you are given certain guidelines and measurements to follow, representing the measurements that were made in the patient’s mouth.
For the Lab Exercise Using either a tongue blade or a Boley gauge, measure the anterior height of the wax rim. Record this dimension by placing the tongue blade even with the anterior rim and marking where it is even with the top member of the articulator. The Boley gauge will simplify this measurement. Simply by adjusting the posterior rim height to this length the occlusal plane can be made parallel to the upper member of the articulator. In the lab this will simulate establishing the occlusal plane parallel to the inter-pupillary line and the Ala-Tragus line.
For the Lab Exercise A comparison of these two measurements verifies that the height of the occlusion rim is in the same both anteriorly and posteriorly as related to the upper member of the articulator.
For the Lab Exercise Place a tongue blade on the upper member of the articulator and another on the occlusal plane to verify that the plane of occlusion is parallel to the upper member of the articulator, both medial-laterally (inter-pipillary) and anterio-posteriorly (Ala-Tragus).
For the Lab Exercise Adjust the mandibular occlusion rim so that it fits precisely against the occlusal surface of the maxillary rim on the articulator.
Next, place dots on the highest points of the ridge over the retromolar pad areas, the first premolar areas and the center of the labial frenum. Transfer the locations of these dots to the land area of the casts by using a tongue blade. Connect the two dots on the ridge on each side with a tongue blade independently and mark the points where the tongue blade crosses the land area. Place a tongue blade over the dot in the center of the labial frenum and mark the points where the tongue blade crosses the land area.
Place a tongue blade flat on the mandibular occlusion rim and mark where the midlines of the ridges lie and where the anterior mark is located. Adjust the anterior rim to fit within this point over the frenum, as this is the most anteriorly the teeth can be placed.
The anterior of the rims are adjusted to meet the guideline that the anterior teeth should not be set further forward than a line extending from the depth of the vestibule and perpendicular to the occlusal plane.
Adjusting the Occlusion Rims • With the centerline of the mandibular ridge transferred to the mandibular occlusion rim, adjust the width of both rims to the following dimensions: • 3-5 mm in the anterior region • 5-7 mm in the premolar region • 8-10 mm in the molar region
Guidelines for Adjusting the Occlusion Rims • The line inscribed over the mandibular ridge is in the center of the wax rim from the first premolar to the last molar. • Once the labial and buccal surfaces are adjusted to fit the patient’s contours, no further wax is added or removed from the labial and buccal surfaces of either the maxillary or the mandibular rims. • The maxillary buccal surfaces of the rim overlap the posterior surfaces of the mandibular rim at least 1 mm horizontally.
Adjusting the Occlusion Rims After the mandibular rim is adjusted, adjust the width of the maxillary rim: • Maxillary buccal surface at least 1 mm horizontal overlap over mandibular posterior. • 3-5 mm in the anterior region • 5-7 mm in the premolar region • 8-10 mm in the molar region
The maxillo-mandibular relationship of the casts for the anatomical setup in this course is Angle Class I, therefore, the anterior horizontal overlap will be a few mm. • This will dictate the relationship of the teeth. • The horizontal and vertical overlap must equal the total of the compensating curve + the cusp angle. • The posterior teeth must be set in a cusp/fossa relationship. • The proper amount of overlap of the posterior teeth is established by the cusp/fossa relationship.
A piece of dental floss is stretched from the middle of the forehead, across the nose, and to the middle of the chin to determine the midline of the denture teeth. A piece of floss also is useful in determining the position of the canine teeth by running it straight down from the inside corner of the eye.
The ear pieces of the facebow are inserted in the patient’s ears bilaterally, the thumb screw is tightened to lock it in place, and the patient holds the facebow in the ears. The pointer is positioned so that it points at the ala of the nose and the set screw tightened.
With all adjustments made and all set screws tightened to hold the parts of the facebow in place, the screw fixing the facebow fork to the facebow can now be loosened and the bite fork removed.
The bite fork is removed from the facebow assembly. Mount the Hanau mounting adaptor (marked with an H) on the lower member of the articulator. Place the facebow transfer into the mounting jig and tighten the set screw to fix it in place.
Adjust the maxillary rim first by determining the contours that support the labial and buccal face form. Then determine then anterior height of the rim. This is usually about 1-2 mm below the resting lip, but must be confirmed by having the patient pronounce words that have fricative sounds (Fifty –five, any words with f & v sounds) .
The maxillary rim is adjusted so that it is parallel to the ala-tragus line and the inter-pupillary line and 1-2 mm below the resting lip. A tongue blade running from the ala of the nose to the tragus of the ear verifies that the Fox occlusal plane analyzer is parallel to that line.
The mandibular rim is adjusted so that it fits intimately against the maxillary rim at the proper vertical dimension. This will provide a stable base for the interocclusal relationship of the maxilla to the mandible to be recorded accurately at centric relation.
The mandibular rim is reduced so that there is adequate space for a bite registration material (approximately 2 mm). Both rims then are scored with a sharp knife to make ‘V’-shaped cuts about 2mm. deep that cross in the middle of the cast. This will ensure that the bite registration will be stable in a lateral direction.
This picture shows the interocclusal registration made with Aluwax. It is best to use a rigid material such as Aluwax or compound for the bite registration, as these will not distort as a material such as polyether or polyvinylsiloxane.