Download
1 / 13
130 likes | 363 Views
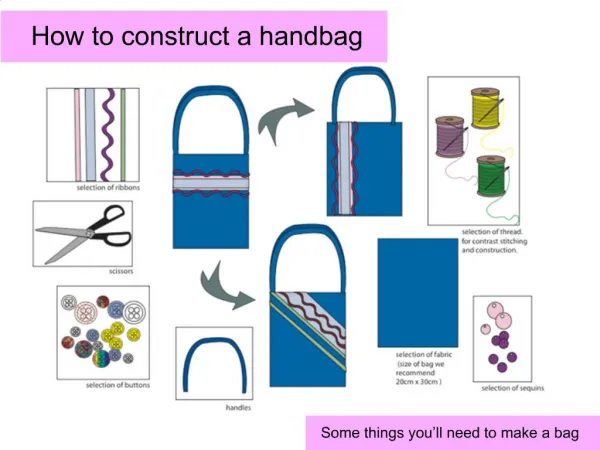
How to construct a handbag. Some things you’ll need to make a bag. Pins (look at how they are placed). Contrasting ribbons. Running stitch to tack down ribbons. STEP 1. Adding decorative features.

E N D
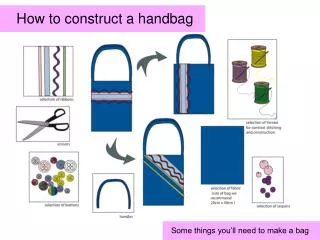
How to construct a handbag Some things you’ll need to make a bag
Pins (look at how they are placed) Contrasting ribbons Running stitch to tack down ribbons STEP 1 Adding decorative features Select the ribbons and trimmings for the bag. Check that the colours blend or contrast etc. 2. Pin the ribbons in place. 3. Tack all the ribbons using tacking or running stitches –why? 4. A running stitch is an easy up and out stitch -
STEP 2 Running stitch to tack down all ribbons Adding tacking stitches Tack all the ribbons and remove the pins. 2. Tacking down the ribbons makes it easier to sew on the machine as the pins don’t get in the way. 3. Tacking should go in and out of the fabric just to fasten the ribbons to the fabric
STEP 3 Adding further decorative features – sewing machine Running stitch to tack down all ribbons 1. Select your decorative stitches it helps to use a guideline to get a straight line – what could you use as a guideline? Sewing machinefoot 2. Continuing adding stitches to the bag until all the ribbons are attached and you have an attractive pattern. 3. Remove all tacking stitches . Zigzag stitch in contrasting colours
STEP 4 Neatening the raw edges Then fold down iron and sew Zig zag stitch the top raw edge. 1. Neaten the raw edges on the top the bag – What stitch could be used? 2. Remember to neaten the top raw edge of the back of the bag. 3. Turn under 3 cms of the neatened top edge of the bag. Tacking stitch taken out.
Straight stitch Pins STEP 5 Neatening the top of the bag.- front Sewing machine foot 1. Iron the top edge. 2. Add pins – which way are the pins heads placed ? 3. Straight stitch along the edge of the fabric – where should the edge of the machine foot be placed ? 4. Remember to neaten front & back sides of the bag. Fold about 3cm over on the wrong side Wrong side of fabric
Sewing machine foot STEP 6 Back section of the bag. pins Back section of the bag You then need a second piece of material. Theexact same size as your first piece. You must then do the same to neaten the top. Zigzag the top Fold 3cm and iron Straight stitch down straight stitch Second piece of fabric FRONT OF BAG – back view.
STEP 6a Neatened edges Zig zag and straight stitch You should then have two pieces of fabric. That look similar to this. One piece with ribbons and decorative stitching. The second piece will be plain. You then have to attach both pieces together to create your bag. Right side of fabric 1 Wrong side of fabric 2 Ribbons and decorative stitches
Placing the right sides together. STEP 7 Putting the bag together The front and the back of the bag need to be held together. To do this seamsare used. A seam is two pieces of fabric stitched together. Pin in place all theway around the bag. 1. Place the front and back sides of the bag together. 2. Pin the front and theback of the bag together–do you remember any rules about how you would place the pins?
Sewing machine foot STEP 7 Constructing the seams - 2 1. Straight stitch the bag in a U shape. 2. Start at the top left hand corner and run down afew stitches and then reverse and then continue to the bottom right STOPPING just before the end – needle in the fabric – why? 3. Lift the foot – 90 degrees and straight stitch across the base – where do you stop? 4. Again STOP – needle in the fabric turn 90 degrees and straight stitch to the top of the bag and reverse a few stitches.
Zig zag stitch A quick recap! STEP 8 Look at the zig-zag stitches why are two of them incorrect ? Neatening the raw edges 1. How can the raw edges of the fabricbe neatened? 2. Set the machine to zig-zag. Start top left– down to the base of the bag.. 3. Needle down into the fabric & turn 90 degrees and along the base. STOP 4. Needle down in the fabric – turn 90 degrees & zig-zag to the top of the bag – reverse stitch.
STEP 8 Neatening the corners Zigzag stitch Once you have sew all the way around and zig zag stitched the edges to neaten them,your next stage is to cut off the corner edges. Cutting off the excess fabric will make the corner neat and flat when you turn it the right way round. Be careful not to cut through the straight stitch or you’ll have a hole in your bag!! Straight stitch Be careful not to cut past her If you are unsure Ask your teacher to help you Cut off corners
Option 1. A long handle Option 2. two short handles Well done you havecompleted your bag. STEP 9 Completing the bag 1.Turn the bag inside out and press with a warm iron. 2. Attach the handle of the bag – your teacher may need to help you with this. 3. Take care when ironing your ribbons as they may melt if they are made from man-made fabrics.