
Creating a database
E N D
Presentation Transcript
Creating a database MYSQL and WAMP On LocalHost
Add the fields • Click on structure and get ready to add these fields. • TID – Integer, make the INDEX PRIMARY, make it autoincrement. • T_LASTNAME—char 15 • T_FIRSTNAME—char 10 • T_Room—char 5 • Set the DB engine to InnoDB
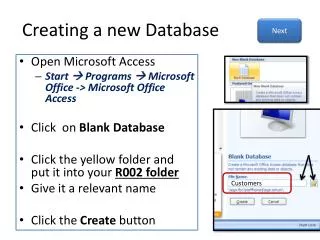
Click on the DATABASE testDBAdd the name student to create that table
Add fields to STUDENT table • SID – Integer, make the INDEX PRIMARY, make it autoincrement. • S_LASTNAME—char 15 • S_FIRSTNAME—char 10 • S_Room—char 5 • S_Advisor—INT, make it indexed. You need this to make the relation. • Be sure you set the engine to InooDB
Add a connection • We are going to create a link between the primary key TID in the teachers table and S_Advisor in the student table. • You need to click on the student table. • And you are going to click on the relation view. • You will see the list of fields for the table. Go to the field S_Advisor. You are connect that field to the entries in the teacher table. You need to select the field teachers.TID and click on save.
The foreign key is in STUDENT. So open the student table structure.
Show the connection worked • Now we are going to add some records to the teachers table. • Then we will add records to the student table. • You will see when we try to enter records for the S_Advisor, we get a drop down list of which has the entries from the teachers table.
Add a few student records. Notice the drop-down arrow for advisor
We will look at how to tie the id numbers to the entries later in the semester. • You can only add advisors from the list provided. • See the results.
List of differences • WAMP uses an Apache server. Your host is localhost. • system uses IIS server. Your host is csc-srv1.lasalle.edu. It is remote.
Privileges • On localhost, you are an administrator. You have all privileges, so you can create users and many databases. • On csc-srv1.lasalle.edu, your privileges are limited. You are a user, so you need to login. • You have a database you can view. It is NORTHWIND. • You have a pre-defined database. The name is your login ID. You can only see your databases.
You can create many different databases on localhost. • You are limited to creating only one on csc-srv1.lasalle.edu. • For either, you can export the database both the structure and the data via SQL.
You can move a lasalle database to your home by exporting it, saving the exported SQL and then inserting it into the localhost. • Try exporting NORTHWIND from lasalle to your home database. You can use this to test the feature. • If you destroy the NORTHWIND at home, you can always rebuild it by reloading the SQL.
LA SALLE MYSQL • To get to the lasalle version of mysql, you need to type the following link into your browser • http://csc-srv1.lasalle.edu:8080/ • You will get a login request. • The ID is your portal ID. • Your password is your student id.
Databases • You have access to 3 databases here • NORTHWIND • One with your login ID • Information_schema
What can I do • From here you can • Browse NORTHWIND or INFORMATION_SCHEMA • Create tables and relations in yournameDB • Add relations and records in yournameDB
Look at the differences • What is easily visible here? • What is the engine used for the tables? • In LOCALHOST • In csc-srv1.lasalle.edu
mysqlworkbench • This tool allows you to see pictures of your tables and connections. • There is a link in the website for you to download the tool. It is free ware. • There is a PDF file that tells you how to connect it to your lasalle mysqldatabase. • Each server database is called an instance. • Try getting the tool to connect.
This tool is useful for showing the relations in your databases. • You can also use the tool to build the database tables and connections. • We will talk about that later this semester.
You should walk through this example and try to create these tables both on your localhost and in your database on the lasalle server. • We will be working much more with this over the next few weeks.