Download
1 / 19
190 likes | 205 Views
According to senior sources, CAP will no longer use WMIRS for photo uploads. CAP Uploader app will be the new method for archiving and displaying photos. Beta test phase will be deployed soon.

E N D
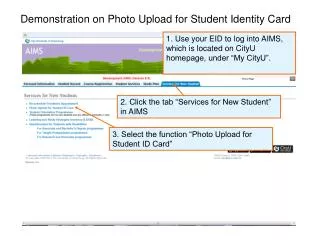
Photo Upload Changes • According to senior sources within CAP NHQ, CAP will no longer use WMIRS to upload & archive photos • New method will be to use CAP Uploader to archive and display photos • CAP Uploader official announcement is TBD • This is advanced information so we can make the appropriate preparations
CAPUploader App & Image Viewer • Beta test phase, will be deployed soon
CAPUploader Notes • CAPUploader was developed with FEMA, and provides an easy method of uploading AFAM photos • Will become standard repository for CAP photos • This program is undergoing development and beta testing • Limited deployment until ready for prime time • Beta: all uploaded photos are shown on a public website. • No sensitive or proprietary photos should be uploaded until further notice. • Photos must be geotagged before upload • CAP Uploader will not save non-tagged photos
CAPUploader App (Beta Version) - 1 • Open CAPUploader app and select the Event dropdown box (Events are created and assigned by CAP NOC. If you have a special event or customer, contact AZWG to get a special event set up for you.) • Currently, the AZWG has been assigned “CAP AZ Wing Training” Event for our use. So for typical CAP photo uploads, select “CAP AZ Wing Training” as the Event. • Normally for “Team”, enter your Mission Number, space, 4 digit Sortie Number with A or G prefix (e.g. “15T5326 A0006”, note: no dashes in mission number). • For “Project” enter a short description of the target or tasking (e.g. “Bridge Damage”, “Aircraft Search”, “Flooding”, etc.). • For multiple assigned targets, suggest a different upload per each target name, same sortie #
CAPUploader App (Beta Version) - 2 • Once you enter a project, the “Browse” button will be active and you can select a folder in your computer where the images are stored. All images in the folder will be uploaded. • Once a folder is selected, clicking “Upload” will start the upload process. • All files will be listed below the Upload button and any upload errors (e.g. no GPS data) will have an alert symbol (yellow triangle with “!”). • After the upload completes, you can retry uploading any errors using “Retry Errors” and “Upload”. • Once it uploads images, it will remember which ones are uploaded based on folder & file name and not try them again.
CAPUploader Image Viewer (Beta) For beta testing, CAP is using a test map site. Once development is complete, images will go to the FEMA GeoPortal. The following beta map site is shown below (green dots represent images) • Click the “Open” drop down list and select “Open in Map viewer.” You will a see US map with green dots representing all images uploaded to date for all CAP wings. Green dots with arrows have image direction also encoded in their metadata (not required). • You can move and expand the map as needed. You can also select a suitable map background by clicking the “Basemap” icon on the upper left. • Clicking on a green dot will open an image caption box. Clicking on the image thumbnail will open a new window with the image, usually downsized to show full. Clicking on that image will show it in its full size & resolution. Beta Viewer: http://fema.maps.arcgis.com/home/item.html?id=60c4ddad2b0e4fd4964c1d7d301689e0
Geotagging & Processing Photos • We will be switching to Nikon ViewNX2 for our photo processing needs • Single app for our needs, includes Nikon Transfer • Requires MS Windows 7, Mac version available • Available for free from Nikon, see:http://nikonimglib.com/nvnx/ • IrfanView and Phyllis still can be used, but we will be focusing future training on ViewNX2 • Ops Room computer will need to be upgraded
Example EXIF Data Viewers Nikon ViewNX2
Post Flight Geotagging Photos • Manual method: • Use ViewNX2, etc. to open selected photo, locate lat/lon on a map then transfer/type in location to the photo • Using “satellite” background map is useful to determine picture direction • Automated method: • Capture GPS track during the flight & import the GPX track file • Use ViewNX2 to synchronize track to photos via GPS / Camera time stamp. • Accurate clock synchronization preferred • Location automatically entered in EXIF data.
ViewNX2 –Geotagging • Open VNX2 Browser with metadata side panel • Select photo(s) • Right click & unprotect if necessary • Select Map Tab
ViewNX2 – Manual Geotagging • Select Add/Edit location icon • Slew map to desired area or search for a place • Also can enter known place or lat/lon coordinates to position map (i.e. roughly center of map) • LL Format: N34 56.7 W112 33.3 • Move crosshairs to desired location & left click • No LL readout of crosshair location for first time location entry, move pin slightly to get LL readout • Confirm location update
ViewNX2 – Auto Geotagging • Select photo or group of photos to geotag • Select Log Matching • Click Add to select desired nmea log file • Click Save and photo(s) will be updated with location • Click icon to view track
ViewNX2 – Add Photo Heading • Select single photo • Select Heading icon • Move heading vector to estimated direction & click OK to save heading • New photo icon will show heading is encoded
Resize Photo • Click “Convert File” • Enter new horizontal pixel dimension • Click “Convert” • New file will be created with -01 name suffix • Can select option to “Change File Names” for easier file name reference to resized image Use this if you want to save a resized photo
ViewNX2 – E-Mail Photo • Click Email Icon to send photo or group of photos • Option to select photo pixel size • Will open photo(s) as an attachment in your email app • Resized photo will not be saved in ViewNX2 • Will need email app loaded on Ops room PC – to be discussed Use this if you just want to send a resized photo
ViewNX2 – “Print to File” w/Label • Select E-Mail • Displays preview of photo with label • Check “Print Information” then select “Settings” • Select Metadata tab & select location, name & date. • Select Footer tab & enter “Civil Air Patrol” in footer plus any text • Select “File Output” to save new jpg w/name • Warning: new jpg has no original metadata