Download
1 / 18
190 likes | 291 Views
TLK10xxx High Speed SerDes Overview. Communications Interface High Performance Analog. Transmit Pre-Emphasis. TLK10xxx uses a 4-tap FIR filter for waveform shaping (pre-emphasis):

E N D
TLK10xxx High Speed SerDes Overview Communications Interface High Performance Analog
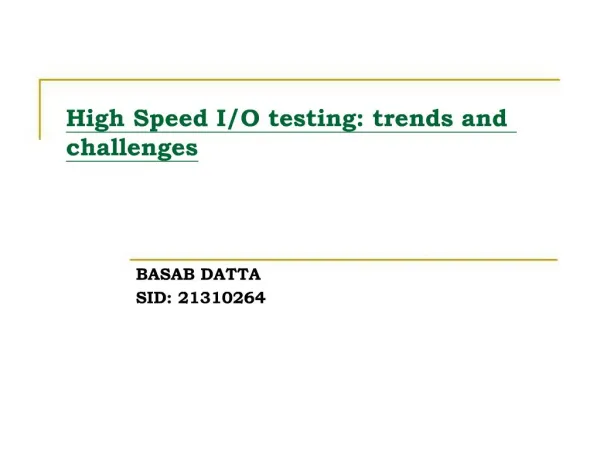
Transmit Pre-Emphasis • TLK10xxx uses a 4-tap FIR filter for waveform shaping (pre-emphasis): • This effectively increases the high-frequency gain relative to the low-frequency gain, compensating for frequency-dependent loss in the transmission media (e.g., PCB traces or cables) • The filter tap coefficients are set by HS_TWPRE, HS_TWCRF, HS_TWPOST1, and HS_TWPOST2
Transmit Pre-Emphasis Implementation (4-Tap FIR) HS_TWPOST2 HS_TWPRE HS_TWCRF HS_TWPOST1
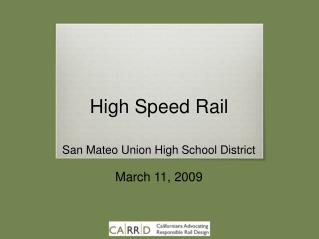
FFE DFE Term Slicer Rx signal Data AGC control ADC ADC T&H T&H CDR Sampling phase RX Block Diagram
Block Diagram Comments • The sampler interface (ADC) and all subsequent digital blocks (FFE and DFE) operate in the recovered clock domain. • This is necessary to be able to track frequency offsets between the local (TX) rate and the received rate. • The input Track and Hold stage (T&H) includes some analog equalization. • The CDR updates the ADC sampling phase by adjusting the phase interpolator output. • There are three control loops acting simultaneously: • AGC: adjusts ADC gain so that the cursor amplitude is fixed at optimal level. Contains course amplitude adjustment via 6-dB attenuator. • DFE: uses amplitudes of previously received bits to cancel out post-cursor ISI effects. • CDR: adjusts sampling phase to find optimal sampling point.
Automatic Gain Control • The automatic gain control (AGC) loop scales the input signal amplitude so that it is in the optimal range for the ADC input. This allows for the full-scale range of the ADC to be used. • The AGC has both fine and course control: • The fine control is done automatically by adjusting the ADC input stage bias point. The fine control will give an AGC value that is between 3 and 508. Larger values are used for larger signal amplitudes and smaller values are used for smaller signal amplitudes. Once the AGC has settled to a value in this range, it will indicate that it is locked. • The course control is done by enabling or disabling a 6-dB attenuator. The attenuator behavior is controlled by the HS_AGCCTRL parameter: • 00 = after AGC first achieves lock, the attenuator state will not change • 01 = the attenuator may toggle if the AGC loses lock (value changing rapidly or at limit of range) • 10 = attenuator forced off regardless of feedback from AGC loop • 11 = attenuator forced on regardless of feedback from AGC loop
RX Equalization • Feed-Forward Equalization (FFE) • FFE is used to compensate for pre-cursor ISI effects. Since it cannot adapt based on data history, it is set manually by the user using the HS_EQPRE parameter: • The setting 000 (1/9 cursor amplitude) corresponds to the greatest amount of equalization, and should be used for long (high-loss) channels. • The setting 110 (13/9 cursor amplitude) corresponds to the least amount of equalization, and should be used for short (low-loss) channels. • Decision Feedback Equalization (DFE) • DFE is used to compensate for post-cursor ISI effects. The algorithm adapts the tap values of a 5-tap (equivalent) FIR filter based on the amplitudes of previously received bits. • HS_EQLIM can be used to limit the amount of adaptation; HS_EQHLD can be used to “freeze” the DFE in its current state. (Most applications will not use these options.)
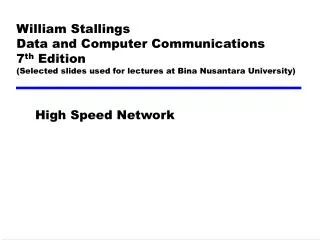
Channel Symbol Response with and without FFE/DFE Magnitude (mV) Time (UI) Pre-cursor amplitude influenced by FFE settings (controlled by HS_EQPRE) Cursor amplitude is regulated by AGC loop Post-cursor amplitudes are influenced by DFE settings (controlled by adaptive algorithm)
Effect of HS_ENTRACK • The HS_ENTRACK bit, when set, can improve the BER for short, low-loss links. • It causes the Track and Hold stage to be fixed in “track mode,” which disables some of the built-in analog equalization in the device’s front end. This causes the amount of intersymbol interference (ISI) sampled by the ADC to be higher. • The CDR algorithm uses ISI to determine if the sampling point is too early or too late, so this increased ISI can actually help the algorithm settle to an optimum sampling point for low-loss channels.
CDR Operation: First Order Mode • The first-order mode is used by setting HS_CDRFMULT to 00. • The CDR voting algorithm will take in 8-UI blocks of samples, then indicate whether the sampling clock phase needs to be advanced or delayed. • The decision is based on how much of an influence is seen on the current bit from the two adjacent bits (“pre” and “post”). • Each time the voting algorithm sends an instruction to advance or delay the phase, the instruction is stored in an accumulator. • Once the number of instructions accumulated for a particular direction (advance or delay) matches the HS_CDRTHR value, the update will take effect. • The magnitude of the update will be 1/48 UI.
HS_CDRTHR: Possible Settings • 00: Four Vote Threshold • Four phase update commands must accumulate before they take effect. This gives the CDR its maximum first-order tracking ability. • 01: Eight Vote Threshold • Eight phase update commands must accumulate before they take effect. • 10: Sixteen Vote Threshold • Sixteen phase update commands must accumulate before they take effect. • 11: Thirty-Two Vote Threshold • Thirty-two phase update commands must accumulate before they take effect. This gives the CDR its minimum first-order tracking ability.
CDR Operation: Second Order Mode • Second order tracking is enabled when HS_CDRFMULT is equal to 01 or 10. This mode is intended to be used in asynchronous applications where there may be a frequency offset between the local and remote reference clock sources. • Second-Order Algorithm: • Each time a phase adjustment is made by the first-order algorithm, it is accumulated as a signed value in a register. The second-order algorithm makes continuous phase adjustments at a rate proportional to the value stored in this register. • When HS_CDRFMULT is 01, the maximum rate of updates is one per 32 UI. When HS_CDRFMULT is 10 (2x mode), this rate is doubled to one per 16 UI. • Making more frequent updates means that the CDR tracking ability is increased.
HS_H1CDRMODE • The CDR determines the optimum sampling position for the serial data by either locking on to the point in the symbol response where the pre-cursor bit, h(-1), is 0 (HS_H1CDRMODE = 0) or to the point where the post-cursor bit, h(+1), is 0 (HS_H1CDRMODE = 1). • HS_H1CDRMODE = 0 • This setting is preferred for a majority of applications • The CDR will adjust the sampling phase so that the sampled pulse response has zero pre-cursor amplitude • This “zero” point (and therefore the CDR sampling position) will vary with different FFE (HS_EQPRE) settings, so it is important for these to be optimized for various links.
HS_H1CDRMODE (cont’d) • HS_H1CDRMODE = 1 • This setting can give better performance for near-lossless links that do not have enough pre-cursor ISI for the CDR to detect • The CDR will adjust the sampling phase so that the sampled pulse response has zero post-cursor amplitude • So that DFE adaptation does not cause instability between the two loops, the DFE tap values are fixed in this mode (i.e., adaptation is disabled). Because of this, HS_H1CDRMODE = 1 should not be used for applications that benefit from post-cursor equalization. • The right choice of HS_H1CDRMODE will depend on the shape of the channel’s pulse response. In a majority of applications, though, the setting HS_H1CDRMODE = 0 is more appropriate.
Auto-Zero Calibration • Process variations can lead to small differential input offsets at the front end of the TLK10xxx receiver. The device provides a calibration routine to compensate for these offsets. • During auto-zero calibration, the differential receiver inputs are isolated from the application PCB and shorted together to produce a known zero voltage. • This known-zero voltage is used to calibrate the compare thresholds of the input sampler. • Once auto-zero calibration completes, the receiver inputs will work normally • The calibration takes about 250,000 UI, and indicates completion by setting the AZDONE field to 1 in the MDIO register map.
Auto-Zero Calibration (cont’d) • By default, the auto-zero calibration is performed at start-up (once the receiver is enabled and PLL is locked). However, control over when calibration is initiated is given by the HS_AZCAL parameter: • 00: Auto-zero calibration initiated when the receiver is enabled (default) • 01: Auto-zero calibration is disabled • 10: Auto-zero calibration is manually forced (triggered by rising edge on bit 1 of HS_AZCAL), and will automatically update whenever receiver is enabled and PLL achieves lock • 11: Auto-zero calibration is manually forced (triggered by rising edge on bit 1 of HS_AZCAL), and will not update automatically • The auto-zero calibration is beneficial to the receiver performance, so in most cases it is best to leave HS_AZCAL at its default value of 00.
Peak Disable • The HS_PEAK_DISABLE control allows the user to make adjustments to the AC response of the receiver’s analog input stage. • When HS_PEAK_DISABLE is set to 0 (default), the transfer function is as shown below. This gives a small amount of equalization and allows for the 3-dB bandwidth roll-off to occur at a higher frequency.
Peak Disable (cont’d) • When HS_PEAK_DISABLE is set to 1, the input stage will have a flat AC response with a lower bandwidth. • In general, it is good to disable peaking for serial input rates below ~6 Gbps and leave it enabled it for higher rates • However, in some cases it may be useful to disable peaking even at higher rates: • This will introduce a bandwidth reduction similar to the HS_ENTRACK control. For a low-loss channel, this may help the CDR determine lock point. • This can also be used if interfacing to transmitters with a fixed de-emphasis level (i.e., some optical modules) if the de-emphasis value is too large for the channel loss.