Download
1 / 16
160 likes | 259 Views
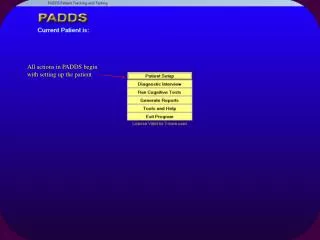
All actions in PADDS begin with setting up the patient. After patient setup the name of the subject you are testing appears here. Then click here to begin the Target Tests. This form is where you run the tests and view the scores from previous tests.

E N D
After patient setup the name of the subject you are testing appears here. Then click here to begin the Target Tests
This form is where you run the tests and view the scores from previous tests Notice the absence of any scores or other info Click here to begin testing At this point the EXIT button is still enabled
Target Recognition begins with you giving a brief instruction to the subject, then starting the orientation to further instruct the subject and verify they understand the process before proceeding
Target Recognition runs for approximately 8 minutes If absolutely necessary, there is a hidden escape spot in the lower left corner of the form as indicated by the red arrow. This is provided in the case that a test cannot be finished. No partial scores are recorded so any test that is escaped before finishing does not count.
It is necessary for you to Click this button in order to save the data and exit this form. This information was used during development and is only included for informational purposes. It is not necessary for you to record any of this. After the Target Recognition test is finished this score sheet will appear
The scores for the tests will only be recorded after all have been run. Click here to continue testing The Score for the first test is shown here At this point the EXIT button is disabled
Target Sequence begins with you giving a brief instruction to the subject, then starting the orientation to further instruct the subject and verify they understand the process before proceeding Click here to begin orientation
After orientation click here to begin test If absolutely necessary, there is a hidden escape spot in the lower left corner of the form as indicated by the red arrow. This is provided in the case that a test cannot be finished. No partial scores are recorded so any test that is escaped before finishing does not count.
Again, this information was used during development and is only included for informational purposes. It is not necessary for you to record any of this. Click here to save data and exit this form. This is the Target Sequence score sheet
The scores for the tests will only be recorded after all have been run. Click here to continue testing The Score for the first 2 tests are now shown At this point the EXIT button is disabled
At this point the top shapes can be moved with the mouse. Before clicking on the Begin button, you may give a brief orientation by moving the shapes from top to bottom, similar to what the orientation will present them later. When ready, click here to begin orientation Target Tracking begins with you giving a brief instruction to the subject, then starting the orientation to further instruct the subject and verify they understand the process before proceeding
You must click here to save score After Target Tracking is finished this score sheet appears
The Scores for all 3 tests are now shown The Update record button is now enabled. You must click here to update record and save the test scores It is very important that you do not exit before taking this step
Then click here to save data and return to testing form This is where you enter the totals for the behavioral observations made during the testing periods as well as indicating medication status at time of testing. You will do this for each testing session
The scores have now been saved and can be used in generating reports At this point the EXIT button is re-enabled