Download
1 / 2

E N D
Setting up a camera Workshop 1
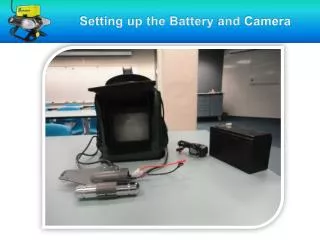
the camera that we are using is called a Black Magic URSA • -first take out the tripod and just the legs to the height that you want your camera to sit by unclipping the plastic clips on each leg and then re clipping them once you have reached the desired height. • then you attach the pan and tilt arm to the right side of the tripod's camera mount. • we then bubble up the tripod meaning we watch the green circle that contains a small bubble and just the camera mount until that circle is directly in the middle, this means that our camera will sit straight and not be filming on a tilted angle making our sequence more successful and professional. • after this you slide the camera onto the camera mount by pressing the button on the left side and tightening it onto the mount with the lever on the right side to make sure that the camera is secure and will not fall and break. • this is when we can attach the battery to the back of the camera and turn it on. • flip out the camera screen on the left side and press the on button, then take off the camera cover and zoom into the thing you are filming and just the focus. • last thing to do is check the exposure and then you’re ready to start filming