Object Base Programming
Learn about object-based programming in JavaScript and how to create and use objects, their properties, and methods. Understand the difference between primitive data and object data storage in variables.

Object Base Programming
E N D
Presentation Transcript
Object-Based Programming • Object-based programming is a slightly scarier way of saying programming using objects. But what are these objects that we will be programming with? Where are they, and how and why would we want to program with them? in this section, we’ll look at the answers to these questions, both in general programming terms and more specifically within JavaScript.
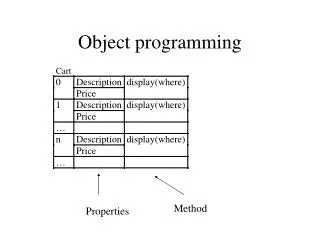
A Brief Introduction to Objects • To start our introduction to objects, let’s think about what is meant by an object in the “real world” outside computing. The world is composed of things, or objects, such as tables, chairs, and cars (to name just a few!). Let’s take a car as an example, so we can explore what an object really is. • How would we define our car? We might say it’s a blue car with four-wheel drive. We might specify the speed at which it’s traveling. When we do this, we are specifying properties of the object. For example, the car has a color property, which in this instance has the value blue. • How do we use our car? We turn the ignition key, press the gas pedal, beep the horn, change the gear (that is, choose between 1, 2, 3, 4, and reverse on a manual car, or drive and reverse on an automatic), and so on. When we do this, we are using methods of the object.
We can think of methods as being a bit like functions. Sometimes, we may need to use some information with the method, or pass it a parameter, to get it to work. For example, when we use the changing gear method, we need to say which gear we want to change to. Other methods may pass information back to the owner For example, the dipstick method will tell the owner how much oil is left in the car. • Sometimes using one or more of the methods may change one or more of the object’s properties. For example, using the accelerator method will probably change the car’s speed property. Other properties can’t be changed; for example, the body shape property of the car (unless you hit a brick wall with the speed property at 100 miles per hour!). • We could say that the car is defined by its collection of methods and properties. in object-based programming, the idea is to model real-world situations by objects, which are defined by their methods and properties.
Objects in JavaScript • In the previous chapters, we have (for the most part) been dealing with primitive data. This is actual data, such as strings and numbers. This type of data is not too complex and is fairly easy for us to deal with. However, not all information is as simple as primitive data. Let’s look at an example to clarify things a little.
Using JavaScript Objects • Each of the JavaScript objects has a collection of related properties and methods that can be used to manipulate a certain kind of data. For example, the Array object consists of methods to manipulate arrays and properties to find out information from them. In most cases, to make use of these methods and properties we need to define our data as one of these objects. in other words, we need to create an object. • in this section, we’ll look at how we go about creating an object and, having done that, how we use its properties and methods.
Creating an Object • We have already seen an example of an Array object being created. To create an Array object, we used the JavaScript statement. • var myArray = new Array () • The first half of the statement is familiar to us. We use the var keyword to define a variable called myArray. This variable is initialized, using the assignment operator (=), to the right-hand side of the statement. • The right-hand side of the statement consists of two parts. First we have the keyword new. This tells JavaScript that we want to create a new object. Next we have Array( ) . This is the constructor for an Array object. it tells JavaScript what type of object we want to create. Most objects have constructors like this. For example, the Date object has the Date() constructor The only exception we see in this book is the Math object, and this will be explained in a later part of the chapter.
Let’s see some more examples, this time using the Date object. The simplest way of creating a Date object is • This will create a Date object containing the date and time that it was created. However, • will create a Date object containing the date 1 January 2000. • How object data is stored in variables differs from how primitive data, such as text and numbers, is stored. (Primitive data is the most basic data possible in JavaScript.) With primitive data, the variable holds the data’s actual value.
var myNurnber = 23; • means that the variable myNumber will hold the data 23. However, variables assigned to objects don’t hold the actual data, but rather a reference to the memory address where the data can be found. This doesn’t mean we can get hold of the memory address—this is something only JavaScript has details of and keeps to itself in the background. All you need to remember is that when we say that a variable references an object, this is what we mean. We show this in the following example:
First we set variable myArrayRef reference to the new array object, and then we set mysecondArrayRef to the same reference—for example, now mysecondArrayRef is set to reference the same array object. So when we set the first element of the array to 100 as shown here: • And display the contents of the first element of the array referenced in mysecondArrayRef as follows:
We’ll see it also magically has changed to 100! However, as we now know, it’s not magic; it’s because both variables referenced the same array object because when it comes to objects, it’s a reference to the object and not the object stored in a variable. When we did the assignment, it didn’t make a copy of the array object, it simply copied the reference. Contrast that with the following:
In this case we’re dealing with a string, which is primitive data type, as are numbers. This time it’s the actual data that’s stored in the variable, so when we do this: • mySecondVariable gets its own separate copy of the data in myvariable. So the alert at the end will still show mysecondvariable as holding “ABC”. • To summarize this section, we create a JavaScript object using the following basic syntax:
Using an Object’s Properties • Accessing the values contained in an object’s properties is very simple. We write the name of the variable containing (or referencing) our object, followed by a dot, and then the name of the object’s property. • For example, if we defined an Array object contained in the variable myArray, we could access its length property using: • This would give us the number of elements contained in the array. • But what can we do with this property now that we have it? We can use this property as we would any other piece of data and store it in a variable.
Or show it to the user • In some cases, we can even change the value of the property, such as: • However, unlike variables, some properties are read-only, we can get information from them, but we can’t change information inside them.
Calling an Object’s Methods • Methods are very much like functions in that they can be used to perform useful tasks, such as getting the hours from a particular date or generating a random number for us. Again like functions, some methods return a value, such as the Date object’s getHours () method, while others perform a task, but return no data, such as the Array object’s sort () method. • Using the methods of an object is very similar to using properties in that you put the object’s variable name first, then a dot, and then the name of the method. For example, to sort the elements of an Array in the variable myArray, you may use the following code:
Just like functions, you can pass parameters to some methods, where the parameters are placed between the parentheses following the method’s name. However, whether or not a method takes parameters, we must still put parentheses after the method’s name, just as we did with functions. As a general rule, anywhere you can use a function, you can use a method of an object.
Primitives and Objects • You should now have a good idea about the difference between primitive data, such as numbers and strings, and object data, such as Dates and Arrays. However, I mentioned earlier that there is also a String object. Where does this fit in? • In fact there are String, Number, and Boolean objects corresponding to the three string, number, and Boolean primitive data types. For example, to create a String object containing the text “I’m a String object,” we can use
The String object has the length property just as the Array object does. This returns the number of characters in the String object. For example • would store the data 19 in the variable lengthofString (remember that spaces are referred to as characters too). • But what if we had declared a primitive string called mySecondString holding the text I ‘m a primitive string like this: • and wanted to know how many characters could be found in this primitive string?
This is where JavaScript helps us out. Recall from previous chapters that JavaScript can handle the conversion of one data type to another automatically. For example, if we tried to add a string primitive to a number primitive • JavaScript would assume that we want to treat the number as a string and concatenate the two together, the number being converted to text automatically. The variable theResult would contain 2323 the concatenation of 23 and 23, and not the sum of 23 + 23, which is 46.
The same applies to objects. if we declare a primitive string and then treat it as an object, such as by trying to access one of its methods or properties, JavaScript would know that the operation we’re trying to do won’t work if it’s a primitive string, it will only work if it’s an object; for example, it would be valid if it were a string object. in this case, JavaScript converts the plain text string into a temporary String object, just for that operation. • So, for our primitive string mySecondString, we can use the length property of the String object to find out the number of characters it contains. For example • would store the data 22 in the variable lengthofSecondString.
The JavaScript Native Objects • We won’t be looking at all of the native JavaScript objects, just some of the more commonly used ones, namely the String object, the Math object, the Array object, and the Date object.
String Objects • Like most objects, String objects need to be created before they can be used. To create a String object, we can write • However, as we have seen, we can also declare a string primitive and use it as if it were a String object, letting JavaScript do the conversion to an object for us behind the scenes. For example
The String object has a vast number of methods and properties of which you can find full details in Appendix B. In this section, we’ll only be looking at some of the less complex and more commonly used methods. However, in Chapter 8, we’ll look at some of the trickier, but very powerful, methods associated with strings and the regular expression object (RegExp). • Regular expressions provide a very powerful means of searching strings for patterns of characters. For example, if we want to find “Paul” where it exists as a whole word in the string “Pauline, Paul, Paula,” we need to use regular expressions. However, they can be a little tricky to use, so we won’t discuss them further in this chapter—we want to save some fun for later!
When using most of the String object’s methods, it helps to remember that a string is just a series of individual characters and that each character has a position, or index, a little like arrays. Just like arrays, the first position, or index, is labeled 0 and not 1. So, for example, the string “Hello World” has the character positions shown in the following table.
The length Property • The length property simply returns the number of characters in the string. For example • will write the length of the string “Paul” (that is, 4) to the page.
The charAt() and charCodeAt() Methods—Selecting a Single Character from a String • If you want to find out information about a single character within a string, you need the charAt() and charCodeAt() methods. These methods can be very useful for checking the validity of user input, something we’ll see more of in Chapter 6 when we look at HTML forms. • The charAt() method takes one parameter: the index position of the character you want in the string, it then returns that character. charAt() treats the positions of the string characters as starting at 0, so the first character is at index 0, the second at index 1, and so on.
For example, to find the last character in a string, we could use the code • in the first line we prompt the user for a string, with the default of “Hello World!” and store this string in the variable myString. • In the next line, we use the charAt () method to retrieve the last character in the string. We use the index position of (myString. length - 1). Why? Let’s take the string “Hello World!” as an example. The length of this string is 12, but the last character position is 11 since the indexing starts at 0. Therefore, we need to subtract one from the length of the string to get the last character position. • in the final line, we write the last character in the string to the page.
The charcodeAt() method is similar in use to the charAt() method, but instead of returning the character itself, it returns a number that represents the decimal character code in the Unicode character set for that character. Recall that computers only understand numbers, to the computer, all our strings are just number data. When we request text rather than numbers, the computer does a conversion based on its internal understanding of each number and provides the respective character. • For example, to find the character code of the first character in a string, we could write • which will get the character code for the character at index position zero in the string given by the user, and write it out to the page.
Character codes go in order so, for example, the letter A has the code 65, B has 66, and so on. Lowercase letters start at 97 (a is 97, b is 98, and so on). Digits go from 48 (for the number 0) to 57 (for the number 9). You can use this information for various purposes, as we’ll see in the next example.
The fromCharCode() Method—Converting Character Codes to a String • The method fromCharCode() can be thought of as the opposite to charcodeAt ( ), in that you pass it a series of comma-separated numbers representing character codes, and it converts them to a single string. • However, the fromCharCode () method is unusual in that it’s a static method—we don’t need to have created a String object to use it with. Instead, we can use the String expression. • For example, the following lines put the string ABC!! into the variable myString.
The fromcharcode () method can be very useful when used with variables. For example, to build up a string consisting of all the uppercase letters of the alphabet, we could use the following code: • We use the for loop to select each character from A to Z in turn and concatenate this to myString. Note that, while this is fine as an example, it is more efficient and less memory-hungry to simply write
The indexOf() and IastlndexOf() Methods—Finding a String Inside Another String • The methods indexof() and lastlndexOf() are used for searching for the occurrence at one string inside another A string contained inside another is usually termed a substring. They are useful when we have a string of information, but only want a small part of it. • Both indexof () and lastlndexOf () take two parameters: • The string you want to find • The character position you want to start searching from (optional)
The return value of indexof() and lastlndexOf() is the character position in the string at which the substring was found. Again, it’s zero-based, so if the substring is found at the start of the string, then 0 is returned, if there is no match, then the value -1 is returned. • For example, to search for the substring Paul!! in the string “Hello paul. How are you Paul”, we may use the code
This code should result in a message box containing the number 24, which is the character position of “Paul” . This is due to case sensitivity again, if you type Indexof () instead of indexof (),JavaScript will complain. Similarly, “paul” is not the same as “Paul”. Mistakes with case are so easy to make, even for experts, that it’s best to be very aware of case when programming. • How does lastlndexof () differ from indexOf () in action? • indexof () starts searching from the beginning of the string, or the position you specified in the second parameter, and works towards the end, • lastlndexof () starts at the end of the string, or the position you specified, and works towards the beginning of the string.
In the example we first search using indexof ( ) , which finds the first Paul!! (changed to the correct case from the last example). The alert box displays this result, which is character position 6. Then we search using lastlndexOf () . This starts searching at the end of the string, and so the first Paul it comes to is the last one in the string at character position 24. Therefore, the second alert box displays the result 24.
The substr() and substring() Methods—Copying Part of a String • if we wanted to cut out part of a string and assign that cut out part to another variable or use it in an expression, we would use the substr () and substring () methods. Both methods provide the same end result, that is, a part of a string, but they differ in the parameters they require. • The method substring () takes two parameters: the character start position and the character end position of the part of the string we want. The second parameter is optional; if you don’t include it, all characters from the start position to the end of the string are included.
For example, if our string is Javascript” and we want just the text Java!!, we could call the method like so: • As with all the methods of the string object so far, the character positions start at zero. However, you might be wondering why we specified the end character as 4. This method is a little confusing because the end character is the end marker; it’s not included in the substring that is cut out. it helps to think of the parameters as specifying the length of the string being returned: the parameters 0 and 4 will return (4 - 0) characters starting at and including the character at position 0. Depicted graphically it looks like this:
D • Like substring ( ), the method substr () again takes two parameters, the first being the start position of the first character you want included in your substring. However, this time the second parameter specifies the length of the string of characters that you want to cut out of the longer string. For example, we could rewrite the preceding code as • As with the substring () method, the second parameter is optional. If you don’t include it, all the characters from the start position onward will be included.
Array Objects • We saw how to create and use arrays in Chapter 2, and earlier in this chapter 1 admitted to you that they are actually objects. • As well as storing data, Array objects also provide a number of useful properties and methods we can use to manipulate the data in the array and find out information such as the size of the array. • Again, this is not an exhaustive look at every property and method of Array objects, but rather just some of the more useful ones. You’ll find details of the rest in Appendix B.
The length Property—Finding Out How Many Elements Are in an Array • The length property gives us the number of elements within an array. • The length property can be used to find the index of the last element in the array. This is illustrated in the following example. • Note that we have inserted data in the elements with index positions 0, 1, and 11. The array index starts at 0, so the last element is at index length - 1, which is 11, rather than the value of the length property, which is 12.
The concat() Method—Joining Arrays Together • If we want to take two separate arrays and join them together into one big array, we can use the Array object’s concat () method. The concat() method returns a new array, which is the combination of the two arrays: the elements of the first array, then the elements of the second array.
For example, say we have two arrays, names and ages, and separately they look like this: • if we combine them using names . concat (ages) , we will get an array like this:
in the following code, this is exactly what we are doing. • it’s also possible to combine two arrays into one, but assign the new array to the name of the existing first array, using • names = names.concat (ages). • if we were to use ages. concat (names) ,what would be the difference? Well, as you can see in the following table, the difference is that now the ages array elements are first, and the elements from the names array are concatenated on the end.
The slice() Method—Copying Part of an Array • When we just want to copy a portion of an array, we can use the slice() method. Using the slice () method, we can slice out a portion of the array and assign that to a new variable name. The slice() method has two parameters: • The index of the first element you want to be copied • The index of the element marking the end of the portion you are slicing out (optional) • If you don’t include the second parameter, all elements from the start index onward are copied.
Suppose we have the array names shown in the following table. • if we want to create a new array with elements 1, Sarah, and 2, Louise, we would specify a start index of 1 and an end index of 3. The code would look something like this: • the slicedArray looks like this:
The join() Method—Converting an Array into a Single String • The join () method concatenates all the elements in an array and returns them as a string, it also allows you to specify any characters you want to insert between each element as they are joined together. The method has only one parameter, and that’s the string we want between each element. • Things will be clearer if we look at an example. Let’s imagine i have my weekly shopping list stored in an array, which looks something like this:
Now I want to write out my shopping list to the page using document write (). I want each item to be on a different line, so this means I need to use the <br> tag between each element. First, I need to declare my array. • Now, let’s convert the array into one string with the join () method. • Now the variable myshoppingList will hold the following text: • “Eggs<br>Milk<br>Potatoes<br>Cereal<br>Banana” • which we can write out to the page with document.write().
Now the shopping list will appear in the page with each item on a new line as shown.
The sort() Method—Putting Your Array in Order • If you have an array that contains similar data, such as a list of names or a list of ages, you may want to put them in alphabetical or numerical order This is something that the sort () method makes very easy. in the following code, we define our array and then put it in ascending alphabetical order using names. sort () . Finally, we output it so that we can see that it’s in order. • Don’t forget that the sorting is case sensitive, so Paul will come before paul.