Download
1 / 25
250 likes | 403 Views
Microsoft Excel Spreadsheet Guide. Microsoft Excel is one of the software packages in the Microsoft Office Suite that allows a user to create, modify and print a spreadsheet. This slide show is intended as a general introduction to what is a complex software package.

E N D
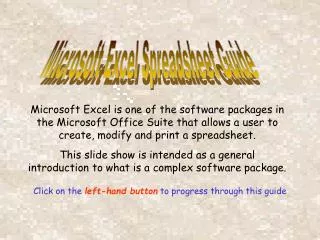
Microsoft Excel Spreadsheet Guide Microsoft Excel is one of the software packages in the Microsoft Office Suite that allows a user to create, modify and print a spreadsheet. This slide show is intended as a general introduction to what is a complex software package. Click on theleft-hand buttonto progress through this guide
The Main Features of the Excel Screen Menu Bar Standard ToolBar Formatting Toolbar Input/Editting Area Active Cell The main working area for the spreadsheet Sheet Tabs Tab Buttons Scroll Bars Message Area
Useful Buttons in Excel Functions Charts Auto Sum Text Enhancement Bold/ Italics/ Underline Sorting Number Format Buttons Currency Increase/Decrease Decimal Points Percent Comma Cut/Copy/Paste Justification Buttons Left Centre Right Borders/Fill/Text Colour
Basic Spreadsheet Principles Columns • This is a section of a spreadsheet showing • Columns across the top and • Rows down the side and • Cells where a Column and a Row meet. • A Cell is identified by its Column letter and its Row number . • e.g. A1, B5, D9 Rows A group of Cells is known as a Range and is referenced by the first Cell and the last Cell in the Range separated by a colon. e.g. A2:D2 A4:A8 C4:E7
Basic Spreadsheet Principles cont.. A Cell can contain : Text e.g. B3, C3, A9, A1 Numbers, e.g. B5, C7,D6 Formula e.g. E5, B9, D9 A Formula will cause an automatic calculation to be made with the result being placed in the Cell containing the Formula. A Formula can contain references to other Cells, numbers or special functions. A Formula begins with an equal sign and the following are some examples :- =B5+B6+B7+B8 =C9*10 =D3/E4 =(D3+E3)/24 =SUM(B7:F7) =AVERAGE(D9:D12)
Creating a New Spreadsheet SelectFilefrom the Menu Bar then the New option Select Workbook option from the General Tab and a blank spreadsheet will be presented ready for processing
Opening an Existing Spreadsheet SelectFilefrom the Menu Bar then the Open option Select the correct Drive and Folder in the Look In box to display all existing spreadsheets then select the relevant file and Open button or double click
Saving a Spreadsheet (for the first time) SelectFilefrom the Menu Bar then the Save As option Select the correct Drive and Folder in the Save As box and enter the name of the spreadsheet to be save, in the File Name box then press the Save button
Saving a Spreadsheet (after it has been opened) After a spreadsheet has been opened and then modified it is only necessary to click the Disk Icon on the Standard Toolbar to save on the Drive and Folder from which it was opened. If you want to save the spreadsheet under a new name follow the procedure for saving a spreadsheet for the first time (Save As)
Preparing to Print a Spreadsheet Print Preview Before you print a worksheet, click the Print Preview button to see how the sheet will look when you print it. The status bar at the bottom of the screen shows the current page number and the total number of pages in the selected sheet. Page Setup The layout of the page to be printed can be setup by selecting File/Page Setup from the Menu Bar to display the Page Setup dialogue box. Selecting the relevant Tab and completing the associated dialog box can change features of the sheet.
Printing the Spreadsheet Click on File then Print from the Menu Bar when the sheet is ready to be printed. The Print dialogue box should be displayed: The correct printer should be displayed in the Name box. Other printing features may be selected form the dialog box, e.g. Number of Copies Click on OK to start the printing process.
Printing a Larger Spreadsheet Some spreadsheets that you create will be too big to fit on a single sheet of A4 paper. Excel will automatically divide the sheet into pages unless you modify the profile of the spreadsheet. Depending on the size of the sheet and your needs, there are several ways to print a sheet which appears to be too large to fit on a single page. All of these changes can be selected from the Page Setup dialog box Some examples of the changes that you can make are as follows: Change the orientation of the paper from Portrait to Landscape. Tell Excel to scale the sheet so that it fits on a specified number of pages
Entering Text or Numbers Select the required cell and use the Input Area to enter your text or number. Text can be entered into a cell and will be aligned to the left of the cell. Should the text be larger than the cell can hold it will overflow into the cell to its right if there is nothing in that cell. Numbers can be entered into a cell and will be aligned to the right of the cell
Entering Formulae • Select the cell where you want the formula to be placed. Enter the formula which must begin with an = sign. e.g. =C5 * (C6 + C7). Remember the normal mathematical rules (BODMAS) apply when constructing a formula. • The basic operators that can be used are: • * Multiply • / Divide • + Add • - Subtract • If the formula is to make use of one of the built-in Excel Functions you can use the relevant button to partly automate the process :- • AutoSum :- If a range of cells is to be added together point to the cell to contain the Sum function, select the range of cells to be summed, then press the AutoSum Button. • Function Wizard :- After pressing the Function Wizard button a dialogue box appears showing the various functions available. Select the required function and then press the Next button to reveal the second dialogue box where the Arguments can be entered. Press the Finish button to complete the process.
Basic Formatting • Selection of a single Cell or Range of Cells • Use the mouse to point to: • a single cell and press the left hand button. • the first cell in the range, press and hold down the left button and move the mouse to the last cell in the range • the selected cell(s) will be highlighted. Changing the Format of the contents of a cell Select the cell or cells to be changed and point to the Icon on the toolbar that represents the change that is required and click the Icon:- Bold Underline Italics Currency Percentage Comma Style Decimal Places (+ or -) Borders Colour Justification
Inserting or Deleting Columns or Rows • Inserting Columns or Rows • Click on the Column letter or Row number where the new Column or Row is to be inserted • Press the right button and a dialogue box will appear • Click on the insert option • A Column or Row will be inserted • Deleting Columns or Rows • Click on the Column letter or Row number of the Column or Row to be deleted • Press the right button and a dialogue box will appear • Click on the delete option • The Column or Row will be deleted
Adjusting Column Width and Row Height • The Width or Height of a single Column or Row or a group of Columns or Rows, can be adjusted as follows: • To adjust the Width or Height of a single Column or Row move the cursor to the line: to the right of a Column letter or below the Row to be adjusted. • To adjust the Width or Height of a group of Columns or Rows firstly select all the Columns or Rows to be adjusted. • In each of the above situations move the cursor • over the line to the right of the first Column • or • the line below the first Row • and the cursor should change from a white cross to a black cross. By holding down the left button drag the cursor to the required Width or Height for the Column(s) or Row(s).
Other Formatting Facilities Cell Alignment - Right Centre Left Select the cell or cells to be aligned and then click the Icon representing the required alignment. Cell Formatting The format of an individual or group of cells can be changed by firstly selecting the cell(s) and then selecting the Format/Cells option from the Menu Bar and selecting the required format from the dialogue box, clicking OK when your selection is complete
Copying Formulae Relative Cell Referencing If a formula is copied from one cell to another Excel automatically adjusts the column or row references so that the same relationship is maintained between the cell containing the formula and the cells to which it refers. Absolute Cell Referencing To specify that a cell reference should not change when it is copied the cell reference must be made absolute. This is achieved by placing a dollar sign ($) before both column and row references. This can be achieved by pressing the F4 function key after entering the cell reference. Note: When the $ is before only one part of the cell reference, e.g. C$5 or C5$, then the reference is mixed
Conditional Formulae - IF….THEN….ELSE There are occasions when it is necessary to ask what the contents of a cell are and to carry out different actions depending on the answer. The use of the IF…THEN..ELSE formula enables conditions to be tested and actions to be chosen. When =IF( is entered into a cell the IF dialogue box appears What should happen if the condition is true is entered here What should happen if the condition is false is entered here The condition to be tested is entered in the Logical_test box
…. Cont Conditional Formulae - IF….THEN….ELSE - Examples The result of the condition test is to place a literal in the cell The result of the condition test is to chose one of two calculations
Using the Function Wizard Excel provides a number of preset Functions that enable common formulae to be selected from the available set of functions. Clicking on the Function button will display the dialogue box from which the required option can be selected. Choose the required category of Functions, e.g. Statistical On the right-hand side of the dialogue box will appear the set of functions available for the category, e.g. Average Excel will then present a series of dialogue boxes that assist in creating the required Function formula.
Sorting Data • You can rearrange the rows or columns of a list based on the values in the list by sorting. When you sort, Excel rearranges rows, columns, or individual cells by using the sort order that you specify. • Lists can be sorted in • ascending (1 to 9, A to Z) • or descending (9 to 1, Z to A) order, • and sorted based on the contents of one or more columns. • Sort rows in order based on the contents of one column • Click a cell in the column you would like to sort • Click Sort Ascending or Descending button • Sort rows based on the contents of two or more columns • (For best results, the list you sort should have column labels.) • Click a cell in the list you want to sort • On the Data option on the Menu Bar, select Sort. • In the Sort by and Then by boxes, select the columns you want to sort. • Select any other sort options you want, and then click OK.
Example of a Spreadsheet With the results, not Formulae, displayed With Formulae displayed To display formulae: Select Tools/Options from the Menu Bar then tick the Formula box on the View tab
That’s All Folks Now it’s time to create your own spreadsheet