Steps for Symantec PGP Standalone install with Email
300 likes | 560 Views
Steps for Symantec PGP Standalone install with Email. Please use the following steps and screenshots to step your way through a standalone install of PGP Desktop with Email.

Steps for Symantec PGP Standalone install with Email
E N D
Presentation Transcript
Steps for Symantec PGP Standalone install with Email • Please use the following steps and screenshots to step your way through a standalone install of PGP Desktop with Email. • Please ensure that the computer does not have any legacy PGP products installed. If you are encrypted you will need to decrypt before using theses steps. • If you have to remove a legacy install please delete all PGP files from the file system and reboot before install.
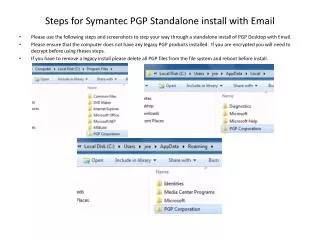
Export your package from Universal Server and copy to the Standalone client
Double click the setup and begin the install and follow the prompts.
After the reboot you should be presented with this prompt. Follow the prompts.
Ensure that a check mark appears next to “PGP Messaging” If it does not, you do not have the proper license number for Messaging.
Launch Outlook and you should be presented with the following. Select “Yes, secure this email account. “
Click the PGP Tray icon in the Windows System tray. Click Options. The PGP Options are displayed. Select the Messaging tab then place a checkmark next to Enable PGP encrypt and sign buttons in Outlook. Click OK. The Sign and Encrypt buttons are an additional feature where you have control over which email needs to be encrypted and/or signed. The buttons are not a replacement for the email proxying used in PGP Desktop.
Launch Outlook and Click New Message Address the message click sign and or encrypt.