Download
1 / 14
140 likes | 251 Views
This guide explains how to automatically generate purchase orders (POs) from multiple sales orders (SOs) using specific line codes: Normal (N), Emergency (E), Special (S), and Direct (D). By establishing direct links between POs and SOs, users can ensure timely deliveries through EDI. The setup process involves configuring settings in the Sales Order Menu that allow for automatic linking, backordering, and shipping updates. Furthermore, it covers daily operations for reviewing and adjusting orders to enhance operational efficiency and accuracy in order management.

E N D
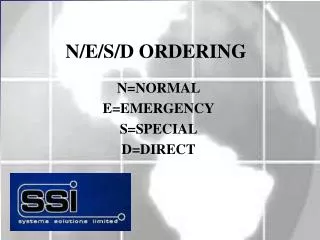
N/E/S/D ORDERING N=NORMAL E=EMERGENCY S=SPECIAL D=DIRECT
Overview: • Auto generate a purchase order from multiple sales • orders, based on SO line codes. • Create direct links between PO’s & SO’s. - Transfer PO using EDI to wholesaler for next day delivery. • Automatically ship lines on SO’s from PO receiving. • Costs and pricing automatically updated on SO from PO.
Required Setup: 1) From within the Sales Order Menu: - type .SSIP - select Table # 4 - set ‘Force N/E/S/D Codes at S/O’s if Qty Ship < Qty Ord’ to “1” (This will force the clerk to enter the appropriate line code if the shipped qty is less than the ordered qty.)
2) Select Table # 3 - set ‘Are Sales Orders Linked to Purchase Orders’ to “1” (This will allow you to copy sales order lines into a PO, a direct link will be created between the two orders.)
3) Select Table # 5 - set ‘Backorder Flag at S/O Line Entry’ to “0” or “1” (This will allow the clerks to backorder lines on sales orders.)
Operation: 1) Enter sales orders as normal throughout the day, assign “E”mergency, “S”pecial or “D”irect codes to the items as required with the corresponding vendor number, or leave them with a “N”ormal order code by entering an asterisk (*).
There are 3 methods of ordering: a) If items are flagged as “E”, “S” or “D” and the “shipped” quantity is less than the “ordered” quantity, they may be ordered through the “auto-generate” purchase order function. The purchase order quantity will be equal to the sales order “ordered” quantity less “shipped” quantity. This method will provide a direct link between the purchase order and the sales order. b) If items are flagged as “N”, “E”, “S” or “D”, regardless of the shipped quantity, they may be retrieved specifically into a purchase order by selecting the sales order number at the purchase order line entry. The purchaser can select the quantity to equal the sales order “ordered” quantity or “ordered” quantity less “shipped” quantity. This method also provides a direct link between the purchase order and the sales order. c) Regardless if items are flagged as “N”, “E”, “S” or “D”, they may be ordered manually by entering the specific items on a purchase order. This method does not offer any direct link to a sales order and should only be used for simple stock orders not having anything to do with sales orders.
When you are ready to make your daily order, print the Open Order Report as follows to review which items will get picked up in the auto generation of purchase orders. Select: Sales Order Menu 3. Reporting 20. Open Order Report Enter “L” to load the specific reports as required: “NOPO” for items that have not been ordered yet on a purchase order. or “YESPO” for items that have been already ordered on a purchase order.
3) To auto generate purchase orders: Select: Purchase Order Menu 1. Daily Work 21. Auto Generate Purchase Orders Select: - Base Order Quantities On: “3”Sales Order E/S/D - Enter appropriate “code” to generate orders for: 1(Emergency) 2(Special) 3(Direct) - Enter the expected date
The Auto Generate PO function will create PO’s for each vendor if the sales order line meets the following criteria: - it is flagged with an “E”, “S” or “D” - it has a shipped qty less than the ordered qty - it does not already have a purchase order # assigned to it A printout will indicate the purchase order numbers generated. • To make changes to the purchase orders that were generated: • Select: Purchase Order Menu • 1. Daily Work • 20. Purchase Order Entry/Edit • Recall each purchase order and select “L”ines, make your changes • accordingly.
5) When you “E”nd the PO, in either PO Entry or PO Receiving, the system will prompt you to “View lines created from Sales Orders”. Options are: a) 0 = No (you just want to end the PO & not view any SO lines) b) 1 = All (you want to view all SO lines created) c) 2 = Qty Recv’d (you only want to view lines with received qty’s)
Whether you select “1” for All or “2” for Qty Recv’d, the system displays all the sales orders linked to this PO, the customer’s name, the item # with description & the qty received. If you select “2” for Qty Recv’d, you will have a further option to “U”pdate Rec on SO. This will automatically “ship” the lines on the sales orders and a report will be generated detailing the SO’s that were updated. Note: If you delete a purchase order line that is linked to a sales order, the system will delete this PO # from the sales order line and allow you to reorder if required.
6) On a daily basis, if a sales order is recalled, the system will display the line with the N/E/S/D code, the vendor number, the PO number it was ordered on, and the qty received. If you need to edit this information, select “9” to edit order, then “P”urchase to edit the purchasing information, such as the N/E/S/D code, the vendor number, the PO # or the received qty. IMPORTANT: Make sure any editing of this purchasing information is valid, since the system has no way of verifying it’s accuracy.
If your pricing structure is “markup from cost”, you can have the system automatically update the SO price from the PO’s received cost if • there is a direct link between the SO & PO. • Select: - Purchase Order Menu • -type .SSIP • - select table #8 • - set ‘Update SO Price from PO if M/U from Cost’ to “1”