Download
1 / 17
170 likes | 288 Views
Security Cooperation Information Portal (SCIP). Ad Hoc Query Instructions To Produce Monthly FMS/SSA Country Ledger Report. Advantages of SCIP Ad Hoc Report. Timely No production / mail / distribution delays Data is current – daily downloads Easy to use

E N D
Security Cooperation Information Portal (SCIP) Ad Hoc Query Instructions To Produce Monthly FMS/SSA Country Ledger Report
Advantages of SCIP Ad Hoc Report • Timely • No production / mail / distribution delays • Data is current – daily downloads • Easy to use • Just change report timeframes once query is established and saved • Flexible • Country-unique data requirements and qualifiers • Data saved to EXCEL • Easy to sort, count/total, search, select and tailor data • Easy to distribute to required users • Efficient
CISIL Report versus SCIP Data Element Names CISILSCIP Ctry Country Code (not needed since country limited to it’s own data) Case Case Designator Code Total Requisition Authorized Net Case Value Requisition Authority Programmed Case Value Expended Percentage Expended Not available – EXCEL calculation suggested if needed Requisition Authority Unprogrammed Case Value Remaining Requisition Expiration Date Not Available (and no longer applicable)
Initial Welcome Screen Left-Click on “Ad-Hoc”
Select Type of Ad-Hoc Data Accept Default “Case Level Ad-hoc” by Left-clicking on “Continue”
Select Data Elements for Report 1. Highlight Data Element to be Included by positioning cursor over data element and left-clicking mouse. 2. Use “-> Arrow” to move data element to “Selected Fields” • Change order of selected • data elements by highlighting • data element and left-clicking on • “Up Arrow” or “Down Arrow.” • Alternatively, determine order of • data elements by the order of • which they are selected for report. 4. Left-click on “Detailed Report”
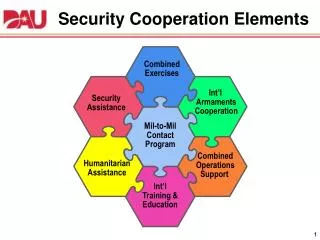
Additional Potential Data Elements • Case Description • Useful information, will often identify purpose of case or weapon system that case supports • Customer Service Type ID • Identifies In-country Service or Customer, or who can use case for requisitioning purposes • Implementing Agency ID • Create “Defense Department” level report versus “Army” report
“Selected Fields” Display withAdditional Recommended Data Elements
Record Selection Criteria 1. Left-click on “Add Filter Criteria.” Must wait for print to turn from Light Grey to Black to use. 2. Left-click on “Down Arrow” to display list of potential data elements for which qualification is possible. 3. Click on “Down Arrow” to display possible qualifiers for selected filter. Left-click on applicable filter. 4. Accept default of Army. You can also use the Screen Positioning Bar on bottom of screen to display and left-click on “Down Arrow” to display list of possible values. Left-click on value of desired filter. 5. Repeat Steps 1-4 as necessary, changing “And/Or” logic statement at left as applicable for each additional criteria. 6. Once done, left-click on “Continue” to proceed.
Determine Sequence of Report Left-click on “down arrow” of data element to be sorted. Left-click on “Ascending” or “Descending’ as applicable. Repeat as necessary. Left-click on “Confirm”
Confirmation of Report’s Design Provides info on Data Elements to appear, Report Sequence, and Selection Criteria used for report. Left-click “View Report” or “Back” as applicable.
Saving Ad-hoc Query Key in name of query to be saved (limited to 25 characters) Left-click on “OK”
Accessing Saved Queries Left-click on Down arrow to display all saved queries. Select desired query and Left-click on “Continue.”
Modifying Saved Queries Since no changes are required to the qualifiers, left-click on “Continue”