Download
1 / 34
340 likes | 452 Views
This guide by Dr. C.S. Dunkley outlines the essential steps and best practices for constructing and managing a poultry mortality compost bin. Composting is not only eco-friendly but also a cost-effective solution for disposing of poultry carcasses. The document covers necessary materials, construction tips, and the critical carbon-to-nitrogen ratio for optimal composting. It emphasizes the importance of monitoring temperature and moisture levels to ensure an efficient composting process, ultimately leading to reduced environmental impact and effective pathogen destruction.

E N D
Dr. C.S. Dunkley Extension Poultry Scientist Department of Poultry Science The University of Georgia Composting 101 How to Effectively Operate a Poultry Mortality Compost Bin
How do we get fromHERE ToHERE? Photo by WSU
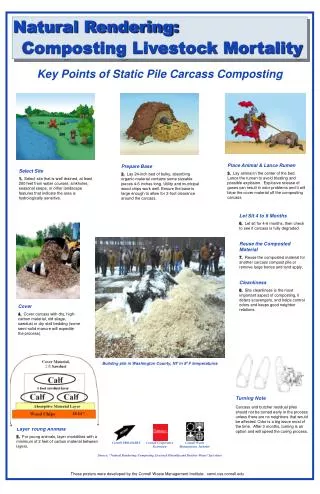
Introduction • Composting is an ancient technology that has Roman and Biblical references and can be adapted as a means of daily mortality disposal. • Carcass composting offers several benefits: • Reduced environmental pollution • Generation of a valuable end-product • Destruction of many pathogens • Free from unpleasant odors • Easy to handle • Can be stored for a long time • Relatively inexpensive
Introduction • Composting daily mortality can be a useful, cost-effective management tool when practiced correctly. However, it can be environmentally harmful if it is not managed and monitored properly. • This material is designed to present basic step-by-step directions on how to construct a mortality compost pile and manage it on a day-by-day basis. • Composting is a natural biological decomposition process that takes place under aerobic (requiring oxygen) and thermophilic (high temperature) conditions. • The composting process is achieved by providing the right mixture of carbon, nitrogen, water and air to encourage microbial growth. • A carbon:nitrogen ratio of 25:1 to 40:1 is necessary to maintain an efficient compost pile. Moisture content of 40% to 60% should be maintained.
Getting Started New construction • First you will need a designated area for your compost bins. • This can be a new construction or it can be an addition to your storage shed or even a renovation of an existing structure. Renovating an existing structure Photo by WSU Primary and secondary bins added to an existing storage unit
Getting Started • Whatever you use as your structure, you should ensure that it has the following characteristics: • Concrete floor • Primary bins enclosed on three sides • Front wide enough to allow for a front-end loader • Roof • Space for secondary composting and material storage Photo by WSU
Getting Started • You will need a front-end loader or skid loader. These are usually already on the farm. • Long-stemmed thermometers are necessary to check bin temperature. • A shovel, hay fork and wheel barrow can also be useful. • A water hose is needed to add water to the pile if necessary. 36 inch long stem Photo by WSU
Getting Started • Now that we have our facilities and equipment in place, we turn our attention to the materials that will be placed in the bins. • A carbon-based material is needed in the mix. This can be supplied by the addition of poultry litter. • We will also need the dead birds.
Layering the Primary Bin 1. Place an initial layer of 8 to12 inches of fresh litter on the concrete floor. 2. The litter should be pre-heated by adding water and allowing time to pass so that the litter will be actively composting when it is added to the compost pile.
Layering the Primary Bin • You can add a thin layer of bulking material such as straw, peanut hulls or coarse shavings, but it is not necessary. 4. Add bird carcasses in a single layer. Place them side-by-side and touching each other but not on top of one another. Carcasses are to be placed 6 to 10 inches from the wall. If the carcasses are placed on top each other, the deterioration process will slow down. If birds are placed too close to the walls, they will encourage pest infestation and cause a lack of carbon coverage.
Layering the Primary Bin 5. A small amount of water may be needed after each carcass layer; typically, thoroughly wetting the carcasses will be sufficient. 6. Add a layer of litter 6 to 8 inches thick.
Layering the Primary Bin 7. Repeat steps 2 through 6 until the pile reaches a height of 5 to 6 feet. 8. The last layer will be a cap of 8 to 10 inches of litter. This will help to eliminate odors and prevent flies and scavengers from invading your compost pile.
The Primary Bin • When you have completed one primary bin you can move on to the bin next down the line. The number of bins required depends on the size of the farm. The dimensions of the bins depends on the size of the equipment available on the farm.
The Primary Phase One day after compiling compost • Temperature should rise to ~ 140ºF within 5 days and remain there for at least 7 to 21 days. • The temperature will drop gradually after the first temperature spike. • When the temperature falls below 130ºF you will need to turn the pile for a second heating phase.
Secondary Phase • The secondary bin is essentially used for additional carcass decomposition. • This secondary phase is also referred to as the maturation or curing phase.
Secondary Phase • Transfer the pile from the primary bin to the secondary bin. • Add water to allow the pile to undergo a second heating phase to complete the decomposition of any un-decomposed material that might remain.
Secondary Phase • The temperature will quickly elevate again to 140ºF or more, after which it will begin a gradual downward trend. One day after turning the pile
Monitoring Your Bins • In order to have an efficient compost bin, it must be monitored frequently, especially during the primary phase of the process. • Temperature, moisture content and time are all essential when managing and monitoring your compost bin.
Temperature • Temperature isVery Critical, especially in the primary phase. • The decomposition process at thermophilic temperatures of 105 to 160ºF is faster than at mesophilic temperatures of 50 to 105ºF. • If the temperature exceeds 149ºF for more than two days, the pile should be turned to prevent thermal inactivation of important microbes. Note: High temperatures are beneficial for rapid decomposition, but temperatures that are too high can inactivate beneficial microbes!
Temperature Extreme temperatures (more than 160ºF) lasting for more than two days have been shown to spontaneously combust and result in firesin litter piles.
Moisture • Excess moisture in the pile will result in a compost pile that does not heat up, reduction in the oxygen content of the pile and retardation of growth and activities of some of the beneficial microbes. • Excess moisture will also result in the pile becoming anaerobic and giving off unpleasant odors. • Too little moisture will also prevent the pile from heating up and will delay the decomposition process.
Moisture • When squeezed into a ball, compost with the appropriate moisture content will not drip water and will loosely hold its shape when released.
Time • The time that is required to complete the composting process depends on several factors: • Temperature profile achieved • Compost formulation • Size and weight of carcasses • Warm climate versus cold climate • Mixing and aeration • Pre-heating the litter • Murphy and Carr (1991) reported that “composting broiler carcasses required two consecutive seven-day periods to reduce carcasses to bony residues.” Again, this is dependent on the previously mentioned factors.
Time • The end of the secondary phase is marked by: • Internal temperature of 77 to 86ºF • Reduction in bulk density of about 25% • Product color is dark brown to black • Lack of unpleasant odor at turning Photo by WSU
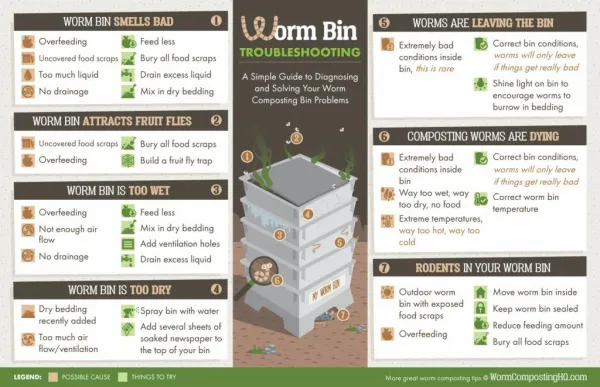
Troubleshooting • When operating a composter it is always good to be aware of the problems that one can encounter and the possible suggestions that can help to alleviate these problems. • On the following slides we will address some of the most common problems, their causes and solutions.
Probable Cause Too dry. Too wet. Improper mixing of ingredients. Improper C:N ratio. Suggestions Add water. Add bulking material and turn the pile. Layer ingredients appropriately. Evaluate bulking material and adjust as necessary. 1. Improper Temperature
Probable Cause Improper C:N ratio. Carcasses layered too thickly. Carcasses on outside edges of the pile. Suggestions Evaluate bulking materials and adjust as necessary. Single layer the carcasses. Maintain 6 to 10 inches between carcasses and the edges of the pile. 2. Failure to Decompose
Probable Cause Too wet. Improper C:N ratio. Inadequate cover over carcasses. Suggestions Add bulking material and turn. Evaluate bulking materials and adjust as necessary. Cover (cap off) with 8 to 10 inches of bulking material. 3. Odor
Probable Cause Inadequate cover over carcasses. Too wet (leaching). Failure to reach proper temperature. Suggestions Cover (cap off) with 10 to 12 inches of bulking material. Turn pile and add bulking material. Assess C:N ratio and layering. 4. Flies
Probable Cause Inadequate cover over carcasses. Suggestions Cover (cap off) with 8 to 10 inches of bulking material. Avoid initial entry with a fence or barrier. 5. Scavenging Animals
Some Common Management Errors Observed in Compost Piles A B Too much moisture will lead to flies. Low temperatures result in failure to decompose. C D Carcasses on the outside edges will result in failure to decompose. Leaching from the pile can cause odors and flies.
References • D. Adams, C. Flegal and S. Noll. Composting Poultry Carcasses. NCR-530. Purdue University. • S. Mukhtar, A. Kalbasi, and A. Ahmed. Carcass Disposal: A comprehensive review. 2004. Chapter 3: Composting. National Agricultural Biosecurity Center. Kansas State University. • National Resources Conservation Service: Technical Guide Section IV, Georgia 1997. • C.W. Ritz and J.W. Worley. Poultry Mortality Composting Management Guide. 2005. University of Georgia Extension Bulletin 1266. • USDA – United States Department of Agriculture • WSU – Washington State University * Unmarked photographs provided by author.
Additional information on composting poultry mortality can be obtained at: www.poultry.uga.edu/extension
The University of Georgia and Ft. Valley State University, the U.S. Department of Agriculture and counties of the state cooperating. Cooperative Extension, the University of Georgia College of Agricultural and Environmental Sciences, offers educational programs, assistance and materials to all people without regard to race, color, national origin, age, gender or disability. An Equal Opportunity Employer/Affirmative Action Organization Committed to a Diverse Work Force EB 103 February 2009