Download

1 / 32
620 likes | 2.31k Views
4. PERIPHERALLY INSERTED CENTRAL CATHETER - PICC. Scope of Tutorial. What is a PICC? What are indications for a PICC? What types of PICCs are commonly used in Gippsland? How do you measure the external length of a PICC? What are the recommendations for flushing PICC lines?

E N D
Scope of Tutorial • What is a PICC? • What are indications for a PICC? • What types of PICCs are commonly used in Gippsland? • How do you measure the external length of a PICC? • What are the recommendations for flushing PICC lines? • What is the minimum size syringe when accessing a PICC? • List the key things to be documented immediately following insertion of a PICC • List the key things to be included in routine documentation of care • Describe three complications of PICC care and how to troubleshoot them
Peripherally Inserted Central Catheter (PICC) • A PICC is a catheter inserted into the basilic or cephalic vein in the cubital fossa or the upper arm, with the tip residing in the Superior Vena Cava (SVC) • PICCs are approximately 55cm in length • They may be single or multi lumen • They can be indwelling for up to 12 months or longer Catheter hub Catheter insertion site Positive Pressure Bung Arrow PICC Anchoring Device
Indications • Intermediate or long term therapies– ie. drugs, infusions or chemotherapy • Continuous infusions • Poor venous access • Administration of drugs or fluids that may be irritable to peripheral veins • Total Parenteral Nutrition
“Arrow” brand most commonly used and is identifiable by its white coloured catheter “Groshong” brand identifiable by its blue coloured catheter Types of PICCS Two main types of PICCs used in Gippsland are: Note: A PICC can be single or multi lumen
Advantages • A PICC is relatively easy to insert • Insertion can be done at the bedside by a nurse or radiologist trained in the procedure • Pain free once inserted • Suitable for continuous or intermittent therapies • Suitable for home therapy • Avoids repeated peripheral cannulation • Blood can be taken from PICC 4 French gauge or larger • Suitable for delivery of high risk drugs
Disadvantages • Abnormal venous anatomy may prevent insertion of PICC • High maintenance- eg. requires dressings and flushing • Not suitable for rapid infusions of large volumes • Altered body image • May not suit active people • May not be submerged in water
Newly inserted PICCs • After insertion there is a tendency to bleed from the insertion site due to the introducer being larger than the catheter. • Restrict arm movement for the first 2 hours to minimise bleeding • Apply a pressure bandage directly on the occlusive dressing to avoid redressing the insertion site frequently in the first 24 hours • A newly inserted PICC should be redressed after 24 hours and then weekly unless there is obvious ooze
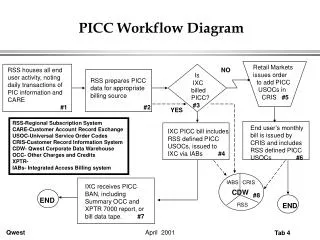
Confirmation of placement • Every time the PICC is accessed, the nurse is responsible for confirming correct placement by: • Aspiration of blood from PICC line • Ability to easily infuse solutions • Normal appearance of PICC site and patient’s arm • Measurement of PICC length from insertion site to catheter hub • Written x-ray report confirming correct placement of PICC available in patient record • If unable to confirm correct placement of PICC refer to troubleshooting section of PICC management in the GONG guidelines (see Resources)
External Measurement • Measure from insertion site of PICC to catheter hub • Measure and record the exposed catheter length at each dressing change to ensure migration has not occurred • If migration has occurred refer to PICC Management Guidelines (GONG Cancer Care Guidelines) Figure 1: External Measurement
Cap / Bung Description Non Positive Pressure Bung • The positive pressure bung maintains a positive pressure in the line to prevent back flow of blood into the end of the catheter and possible subsequent blockage of the PICC • A positive pressure bung should be used with all “Arrow” PICCs • A non-positive pressure bung should be used with a “Groshong” PICC, as it has a non-reflux valve built into the catheter Positive Pressure Bung Note: Above is a sample of one type of bung currently available
PICC Clamps • Leave clamps open when a positive pressure bung is in use • Leave clamps closed if a non-positive pressure bung is in use • If there are no clamps and a non-positive pressure bung is in situ, change to a positive pressure bung Note: A Groshong Catheter has its own inbuilt positive pressure valve, so clamps are never used on a Groshong catheter
Changing a Cap / Bung • Aseptic technique required, using a sterile tray and sterile gloves • Cap/bung must be changed at least every 7 days • Where practical, dressing change should be done at the same time
Changing a Dressing • Always use an aseptic technique • Initial dressing should be changed 24 hours post insertion of PICC • Dressing should be changed every 7 days and as required if dressing is not dry and intact • Where practical, cap/bung change should be done at the same time
Changing an IV Line • A clean technique* is required when the system is closed (cap/bung is in situ) • Continuous IV infusion line is changed every 72 hours • For intermittent IV infusion, change line with each infusion • Change IV TPN/Lipid line every 24 hours • Blood product infusion sets should be changed to standard IV infusion set on completion of the blood product infusion * Recommended clean technique: clean gloves and clean with 3 alcohol swabs and allow to air dry before proceeding to access a closed system
Accessing a PICC • A clean technique* is required for accessing a closed system through a cap/bung. * Recommended clean technique: clean gloves and clean with 3 alcohol swabs and allow to air dry before proceeding to access a closed system
Syringe Size • Always use a 10ml syringe or larger • Smaller syringes increase pressure in the catheter wall and increase the risk of rupture of the catheter
Flushing • Always flush in a pulsatile (stop/start) manner to create turbulence in the lumen of the catheter, remove debris and avoid blockage of the catheter • On accessing the PICC, flush with Normal Saline 10ml when determining patency • Flush before and after drug administration with 10ml normal saline • After blood sampling flush with 20ml of Normal Saline • Flush weekly when not in use
Heparin Lock • Heparin Lock (Heparinization) is not required • For a “Groshong” PICC • For an “Arrow” PICC when using a positive pressure bung • Weak Heparin Lock is required (50u/s in 5ml) • ONLY when a non-positive pressure bung is in use with an “Arrow” PICC • After each use and weekly * Remember, never use a syringe smaller than 10mls
Blood Return • Check for blood return
Taking Blood • Perform initial flush to determine patency (except for blood cultures) • Discard the first 5ml of blood withdrawn before collecting sample (except for blood cultures) • When taking blood cultures, do not perform initial flush to determine patency, do not discard a sample. Retain initial sample for blood culture • Flush PICC with 20ml of Normal Saline after blood sampling, continue with treatment as ordered and / or heparinization if required due to lack of positive pressure bung
PICC Removal • Aseptic technique required • Should be removed by an experienced practitioner • Do not apply undue force as this may fracture the catheter • Remove the PICC slowly to minimise venospasm • Application of heat may assist to minimise venospasm • Measure and examine the PICC to ensure it is intact • Collect catheter tip for pathology if ordered
Documentation - After Insertion • Ensure PICC Worksheet is completed on insertion • Brand of PICC, product number, lot number • Size of PICC, number of lumen • Location of PICC • Internal and external catheter length • If the catheter has been shortened prior to insertion • Upper arm circumference • Type of cap or bung used • Name of person who verified placement X-ray • Name & signature of person inserting PICC • Medications and flushes administered • Strength of heparinization (if required) • Any troubleshooting required
Documentation - Ongoing Clear, consistent documentation is essential after each treatment or shift. This should include: • External length of PICC from insertion site to catheter hub (see Figure 1) • Ability to confirm placement • Cap/bung change and type of bung/cap used • Medications and flushes administered • Dressing change • Signs and symptoms of infection or thrombosis (if any) • Any troubleshooting required
Complications • Migration of PICC • Thrombosis • Blockage • Infection
1. Migration • If PICC migrates more than 2cm in or out, consult with physician • X-ray confirmation of placement may be required before re-access • Documentation of placement is required
2. Thrombosis • Redness, tenderness, swelling and heat may be signs and symptoms of thrombosis around the PICC • Do not access PICC. Consult with physician for further orders. Document physician’s orders
3. Blockage Difficulty flushing and/or aspirating blood • Change cap or bung • Ensure any clamps are open • Change position of patient • Refer to PICC MANAGEMENT GUIDELINES (GONG Cancer Care Guidelines) for further information
4. Infection • Redness, discharge, tenderness, swelling, heat, patient temperature and generally feeling unwell may be signs and symptoms of infection associated with the PICC • The infection may be at the insertion site, or in the vein • Do not access PICC until discussed with physician and remember to document instructions • If proceeding with accessing the device be aware of a possible septic shower* from the rapid circulation of toxins when flushing the PICC * Septic shower may occur immediately after flushing due to infection in the line. There may be an absence of obvious infection at entry. However, the patient will experience rigors and generally feel unwell. Consult physician.
Resources • GONG Cancer Care Guidelines have been accepted to guide the management of all patients with a CVAD in Gippsland and are available at each Gippsland Health Service. • Also available on-line at http://www.gha.net.au/grics are: • PICC Worksheet • PICC Patient Information brochure
GONG Products www.gha.net.au/grics