Download
1 / 2
20 likes | 20 Views
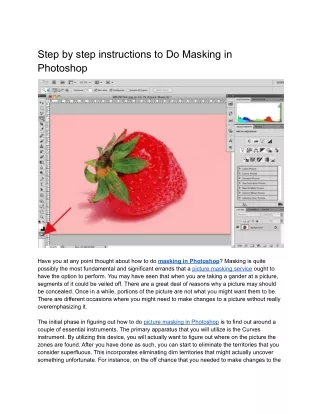
Have you at any point thought about how to do masking in Photoshop? Masking is quite possibly the most fundamental and significant errands that a picture masking service ought to have the option to perform. You may have seen that when you are taking a gander at a picture, segments of it could be veiled off. There are a great deal of reasons why a picture may should be concealed. Once in a while, portions of the picture are not what you might want them to be. There are different occasions where you might need to make changes to a picture without really overemphasizing it.<br><br>

E N D
Step by step instructions to Do Masking in Photoshop Have you at any point thought about how to do masking in Photoshop? Masking is quite possibly the most fundamental and significant errands that a picture masking service ought to have the option to perform. You may have seen that when you are taking a gander at a picture, segments of it could be veiled off. There are a great deal of reasons why a picture may should be concealed. Once in a while, portions of the picture are not what you might want them to be. There are different occasions where you might need to make changes to a picture without really overemphasizing it. The initial phase in figuring out how to do picture masking in Photoshop is to find out around a couple of essential instruments. The primary apparatus that you will utilize is the Curves instrument. By utilizing this device, you will actually want to figure out where on the picture the zones are found. After you have done as such, you can start to eliminate the territories that you consider superfluous. This incorporates eliminating dim territories that might actually uncover something unfortunate. For instance, on the off chance that you needed to make changes to the
space that has a great deal of red in it, you could essentially eliminate the red utilizing the instrument. The following thing that you need to realize how to do in Photoshop is the way to do masking in Photoshop. To do this, you need to make another layer. To make a layer, select the Layer drop down menu and snap on New. Enter a name for your new layer and select a tone for your recently made layer. Whenever you have done as such, click on the layer and pick Remove from Layers. At the point when you need to do picture masking in Photoshop, there are a couple of various techniques that you can use to shroud a picture. One way that you can achieve this is by choosing an anchor point on the picture that you need to be concealed. You can likewise utilize the Clipping Mask choice to get similar outcomes also. In the event that you need to be more exact with the picture that you are masking, you can determine a width and a stature for the anchor. You can likewise determine a rehashing design for the cover to rehash across the picture. The subsequent stage is to choose the foundation of the picture that you need to cover. Ordinarily, you will choose the foundation with the cursor, however on the off chance that you are utilizing the Free Transform alternative, it will be simpler to move the cursor around. Whenever you have chosen a territory, you would then be able to cover up the picture to get the impact that you need. On the off chance that you would prefer not to cover up the picture, you can just move the cursor around. As well as painting over a picture to get the impacts that you need, you ought to likewise eliminate undesirable pieces of the picture. At the point when you cover a picture, you ought to consistently pick the territories that you need to eliminate from the image. To do this, you will utilize the Move apparatus. Utilizing the Move apparatus, you can move the cursor over a picture to dispose of the pieces of the picture that you would prefer not to be veiled. This can be significant if a portion of the spaces are not helpful to eliminate. After you have chosen the entirety of the undesirable pieces of the picture, you will need to fix the masking. To fix the masking, you will utilize the Undo order of Photoshop. Notwithstanding, before you do this, you should ensure that you don't change any of the properties of the picture. To fix the masking, you should tap on the Select catch. On the off chance that you don't see the Select catch, you should press Ctrl (PC) + O. After the masking cycle is finished, you should save the picture. You should save the picture in a spot that is protected. You should name the picture and afterward click on the Save button. The last advance is to distribute the picture. At the point when you are finished distributing the picture, you should watch that the cover picture is noticeable on the screen. You ought to likewise verify whether the picture is smooth on your PC screen.