Lesson01 แมวเหมียว
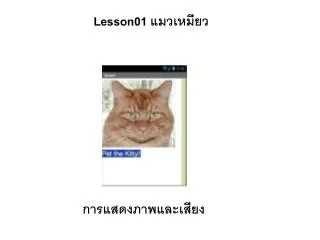
Lesson01 แมวเหมียว. การแสดงภาพและเสียง. 1 . คลิก New Project. 2. ป้อนชื่อ Project name (ในที่นี่ตั้งชื่อว่า meow ) แล้วคลิก OK. 3. ลากปุ่ม Button มาวางบน Screen1. 4 . คลิกช่อง Images ของ properties เพื่อนำภาพแมวเข้ามา . 5. คลิก Upload File. 7. คลิกไฟล์ Kitty และปุ่ม Open.

Lesson01 แมวเหมียว
E N D
Presentation Transcript
Lesson01 แมวเหมียว การแสดงภาพและเสียง
2. ป้อนชื่อ Project name (ในที่นี่ตั้งชื่อว่า meow ) แล้วคลิก OK
3. ลากปุ่ม Button มาวางบน Screen1 4. คลิกช่อง Images ของ properties เพื่อนำภาพแมวเข้ามา
5. คลิก Upload File 7. คลิกไฟล์ Kitty และปุ่ม Open 6. คลิก เลือกไฟล์ 8. คลิก OK
9. ลบข้อความในช่อง text ของ Properties
10. เพิ่มข้อความ โดยลากปุ่ม Label มาวางบน Screen1 11. เลือกสีพื้น Background Color 12. ปรับขนาด Font size เป็น 30 13. เปลี่ยนข้อความเป็น Pet The Kitty! 14. เปลี่ยนสีข้อความ Textcolor
15. คลิก Media แล้วลาก Sound มาวางบน Screen1 16. คลิก Upload File และเลือกไฟล์เสียง meow แล้ว Open และ OK 4 1 7 5 2 6 3
17. คลิก Source แล้วเลือก meow.wav แล้วคลิกปุ่ม OK
18. คลิกปุ่ม Blocks เพื่อเปิดหน้าต่าง กำหนดการทำงาน
19. คลิกปุ่ม Button1 แล้วลาก When button click มาวางพื้นที่ด้านขวา 2 3 1
20. คลิกปุ่ม Sound1 แล้วลาก call1 sound1 play มาวางต่อกับ when button1 click ให้สนิทพอดี 2 3 1 กรณีที่ลากมาผิดอัน ให้ลากลงถังยะ หรือคลิกขวา Delete เพื่อลบได้
21. คลิกปุ่ม Designer เมื่อต้องการกลับมาหน้า Screen1 และคลิกปุ่ม Blocks เพื่อเปิดหน้าต่าง กำหนดการทำงาน สลับกันไปมาได้
22. ติดต่อเครื่อง tablet จำลอง คลิกเมนู connect > Emulator
23. รอจนหน้าต่าง Connect หายไป แล้วคลิกไอคอน Tablet
24. Tablet จำลอง 25. คลิกที่รูปแมวเพื่อทดสอบ
26. นำออกไฟล์มาเก็บที่เครื่อง คลิกที่ My Project
27. คลิกที่หน้าชื่อ Project ในที่นี้คือ meow แล้วคลิก Project > Export selected project (aia) to my computer 2 1 3
28. ไฟล์ meow.aiaที่ส่งออกมายังเครื่องคอมพิวเตอร์ของเรา
29. การนำไฟล์เข้ามาใช้งาน 1 2 3
30. เลือกไฟล์เข้ามาใช้งาน 5 4 7 6
31. การลบโปรเจค 1.คลิกเลือกโปรเจค 2. Delete Project 3.ตกลง 2 1 3