Understanding Multi-Master I2C Peripheral Integration in NCHUEE 720A Lab
This lecture presents an in-depth introduction to the multi-master I2C (Inter-Integrated Circuit) peripheral, focusing on its role as an interface between a CPU and I2C devices. It covers key features such as compliance with Philips I2C specifications, various data transfer modes, unique device addressing, and the ability to operate as master or slave. The integration of multiple I2C modules for serial data transfer is discussed, along with clock management, data validity, and the execution of START and STOP conditions in master mode, illuminating the operational dynamics of the I2C bus.


Understanding Multi-Master I2C Peripheral Integration in NCHUEE 720A Lab
E N D
Presentation Transcript
Lecture 9 I2C NCHUEE 720A Lab Prof. Jichiang Tsai
Introduction • The multi-master I2C peripheral provides an interface between a CPU and any I2C-bus-compatible device • Connects via the I2C serial bus • External components can serially transmit/receive up to 8-bit data to/from the CPU device through the two-wire I2C interface • The I2C bus is a multi-master bus • The I2C controller does support the multi-master mode • Allows more than one device capable of controlling the bus • Each I2C device is recognized by a unique address • Can operate as either transmitter or receiver • A device can also be considered as master or slave • A master device initiates a data transfer on the bus and generates the clock signals to permit that transfer • Any device addressed by this master is considered a slave NCHUEE 720A Lab Prof. Jichiang Tsai
I2C Features • The general features of the I2C controller are • Compliant with Philips I2C specification version 2.1 • Supports OmniVision Serial Camera Control Bus Protocol • Supports standard mode (up to 100K bits/s) and fast mode (up to 400K bits/s) • Multimaster transmitter/slave receiver mode • Multimaster receiver/slave transmitter mode • Combined master transmit/receive and receive/transmit modes • 7-bit and 10-bit device addressing modes • Built-in 32-byte FIFO for buffered read or • Programmable clock generation • Two DMA channels, one interrupt line NCHUEE 720A Lab Prof. Jichiang Tsai
Integration • Includes three instantiations of the I2C module • Implements the multi-master I2C bus • Allows serial transfer of 8-bit data to/from other I2C master/slave devices through a two-wire interface. • Called I2C0, I2C1, and I2C2 • The I2C0 module is located in the Wake-up power domain NCHUEE 720A Lab Prof. Jichiang Tsai
I2C Connectivity Attributes • I2C0 • I2C(1-2) NCHUEE 720A Lab Prof. Jichiang Tsai
Clock and Reset Management & Pin List • Separate bus interface and functional clocks • During power-down mode, the I2Cx_SCL and I2Cx_SDA are configured as inputs NCHUEE 720A Lab Prof. Jichiang Tsai
Functional Block • The I2C consists of the following primary blocks • A serial interface • One data pin (I2C_SDA) and one clock pin (I2C_SCL) • Data registers • Temporarily hold receive data and transmit data traveling between the I2C_SDA pin and the CPU or the DMA controller • Control and status registers • A peripheral data bus interface • Enable CPU and DMA controller to access the peripheral registers • A clock synchronizer • Synchronize the I2C input clock (from the processor clock generator) and the clock on the I2C_SCL pin, • Synchronize data transfers with masters of different clock speeds NCHUEE 720A Lab Prof. Jichiang Tsai
Functional Block (cont.) • A prescaler • Divide down the input clock that is driven to the I2C peripheral • A noise filter on each of the two pins, I2C_SDA and I2C_SCL • An arbitrator • Handle arbitration between the I2C peripheral (when it is a master) and another master • Interrupt generation logic • An interrupt can be sent to the CPU • DMA event generation logic • Send an interrupt to the CPU upon reception and data transmission of data NCHUEE 720A Lab Prof. Jichiang Tsai
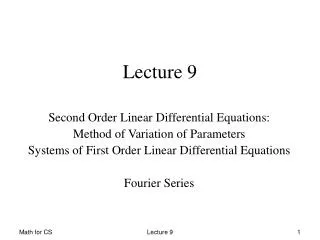
I2C Functional Block Diagram NCHUEE 720A Lab Prof. Jichiang Tsai
I2C Master/Slave Controller Signals • The serial data line (SDA) and the serial clock line (SCL) • Can carry information between a device and others • Both SDA and SCL are bi-directional pins • Must be connected to a positive supply voltage via a pull-up resistor • When the bus is free, both pins are high • The driver of these two pins has an open drain • To perform the required wired-AND function NCHUEE 720A Lab Prof. Jichiang Tsai
I2C Reset • The I2C module can be reset in the following three ways • A system reset (PIRSTNA = 0) • A device reset causes the system reset • All registers are reset to power up reset values • A software reset by setting the SRST bit in register I2C_SYSC • Exactly the same action on the module logic as the system bus reset • The I2C_EN bit in the I2C_CON register • Can be used to hold the I2C module in reset • When the system bus reset is removed (PIRSTNA = 1), I2C_EN = 0 keeps the functional part of I2C module in reset state • All configuration registers can be accessed • I2C_EN = 0 does not reset the registers to power up reset values • The serial data line (SDA) and the serial clock line (SCL) are in high impedance NCHUEE 720A Lab Prof. Jichiang Tsai
Data Validity • The data on the SDA line must be stable during the high period of the clock • The high and low states of the data line can only change when the clock signal on the SCL line is LOW NCHUEE 720A Lab Prof. Jichiang Tsai
START & STOP Conditions • The I2C module generates START and STOP conditions when it is configured as a master • START condition is a high-to-low transition on the SDA line while SCL is high • STOP condition is a low-to-high transition on the SDA line while SCL is high • The bus is considered to be busy after the START condition (BB = 1) and free after the STOP condition (BB = 0) NCHUEE 720A Lab Prof. Jichiang Tsai
Serial Data Formats • The I2C controller operates in 8-bit word data format • Byte write access supported • Each byte put on the SDA line is 8 bits long • The number of bytes that can be transmitted or received is restricted by the value programmed in the DCOUNT register • The data is transferred with the most significant bit (MSB) first • Each byte is followed by an acknowledge bit from the I2C module if it is in receiver mode NCHUEE 720A Lab Prof. Jichiang Tsai
Serial Data Formats (cont.) • The I2C module supports two data formats • 7-bit/10-bit addressing format • 7-bit/10-bit addressing format with repeated start condition • The first byte after a start condition consists of 8 bits • In the acknowledge mode • An extra bit dedicated for acknowledgment is inserted after each byte • In the addressing formats with 7-bit addresses • The byte is composed of 7 MSB slave address bits and 1 LSB R/nW bit • In the addressing formats with 10-bit addresses • The byte is composed of 7 MSB bits, such as 11110XX • XX is the two MSB of the 10-bit addresses • 1 LSB R/nW bit • Indicates the direction of transmission of the following data bytes NCHUEE 720A Lab Prof. Jichiang Tsai
Serial Data Formats (cont.) • If R/nW is 0, the master writes data into the selected slave • If it is 1, the master reads data out of the slave NCHUEE 720A Lab Prof. Jichiang Tsai
Master Transmitter/Receiver • In the master transmitter mode • Data assembled is shifted out on the serial data line SDA • In synch with the self-generated clock pulses on the SCL line • The clock pulses are inhibited and SCL held low • When the intervention of the processor is required (XUDF) • The master receiver mode can only be entered from the master transmitter mode • The master receiver is entered after the slave address byte and bit R/nW has been transmitted, if R/nW is high • Serial data bits received on bus line SDA are shifted • The clock pulses are inhibited and SCL held low • When the intervention of the processor is required (ROVR) • At the end of a transfer, it generates the stop condition NCHUEE 720A Lab Prof. Jichiang Tsai
Slave Transmitter/Receiver • The slave transmitter can only be entered from the slave receiver mode, if R/nW is high • The slave transmitter is entered if the slave address byte is the same as its own address and bit R/nW has been transmitted • The slave transmitter shifts the serial data out on the SDA line • In synch with the clock pulses generated by the master device • Slave does not generate the clock but it can hold clock line SCL low • While intervention of the CPU is required (XUDF) • In the slave receiver mode • Serial data bits received on the bus line SDA are shifted in • It does not generate the clock but it can hold SCL low • While intervention of the CPU is required (ROVR) following the reception of a byte NCHUEE 720A Lab Prof. Jichiang Tsai
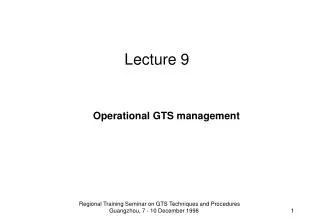
Arbitration • If two or more master transmitters start a transmission on the same bus almost simultaneously • An arbitration procedure is invoked • The arbitration procedure uses the data presented on the serial bus by the competing transmitters • When a transmitter senses that a high signal it has presented on the bus has been overruled by a low signal • It switches to the slave receiver mode, sets the arbitration lost (AL) flag, and generates the arbitration lost interrupt • The arbitration procedure gives priority to the device that transmits the serial data stream with the lowest binary value • Should two or more devices send identical first bytes, arbitration continues on the subsequent bytes NCHUEE 720A Lab Prof. Jichiang Tsai
Arbitration Procedure Between Two Master Transmitters NCHUEE 720A Lab Prof. Jichiang Tsai
I2C Clock Generation and I2C Clock Synchronization • Under normal conditions, only one master device generates the clock signal, SCL • During the arbitration procedure, there are two or more master devices and the clock must be synchronized • The data output can be compared • By the wired-AND property of the clock line • A device that first generates a low period of the clock line overrules other • At this high/low transition, the clock generators of the other devices are forced to start generation of their own low period • The clock line is then held low by the device with the longest low period • The other devices that finish their low periods must wait for the clock line to be released before starting their high periods • A synchronized signal on the clock line is thus obtained • The slowest device determines the length of the low period and the fastest the length of the high period NCHUEE 720A Lab Prof. Jichiang Tsai
I2C Clock Generation and I2C Clock Synchronization (cont.) • If a device pulls down the clock line for a longer time • All clock generators must enter the WAIT-state • A slave can slow down a fast master • The slow device can create enough time to store a received byte or to prepare a byte to be transmitted (Clock Stretching) NCHUEE 720A Lab Prof. Jichiang Tsai
Prescaler (SCLK/ICLK) • I2C is operated with a functional clock (SCLK) frequency • Can be in a range of 12-100 MHz, according to I2C mode used • An internal ~24 MHz clock (ICLK) is recommended in case of F/S (Fast/Standard) operation mode • The frequency of the functional clock influences directly the I2C bus performance and timings • The internal clock is generated via the prescaler block • The prescaler consists of a 4-bit register - I2C _PSC • Used to divide the system clock (SCLK) to obtain the internal required clock (ICLK) • The noise filter is used to suppress noise with one ICLK • The noise filter is always one ICLK cycle, regardless of the bus speed NCHUEE 720A Lab Prof. Jichiang Tsai
I2C Interrupts • The I2C module generates 12 types of interrupt • Accompanied with 12 interrupt masks and flags • In the I2C_IRQENABLE_SET and I2C_IRQSTATUS_RAW registers • All these are sharing the same hardware interrupt line • Addressed As Slave interrupt (AAS) • Generated to inform the Local Host that an external master addressed the module as a slave • The CPU can check the I2C_ACTOA status register to check which of the 4 own addresses was used by the external master • Bus Free interrupt (BF) • Generated to inform the Local Host that the I2C bus became free • When a Stop Condition is detected on the bus • The module can initiate his own I2C transaction NCHUEE 720A Lab Prof. Jichiang Tsai
I2C Interrupts (cont.) • Start Condition interrupt (STC) • Generated after the module being in idle mode have detected a possible Start Condition on the bus (signalized with WakeUp) • Access Error interrupt (AERR) • Generated if a Data read access is performed while RX FIFO is empty • Or a Data write access is performed while TX FIFO is full • Arbitration lost interrupt (AL) • Generated when the I2C arbitration procedure is lost • No-acknowledge interrupt (NACK) • Generated when the master I2C does not receive acknowledge from the receiver • General call interrupt (GC) • Generated when the device detects the address of all zeros (8 bits) NCHUEE 720A Lab Prof. Jichiang Tsai
I2C Interrupts (cont.) • Registers-ready-for-access interrupt (ARDY) • Generated when the previously programmed address, data, and command have been performed and the status bits have been updated • Used to let the CPU know that the I2C registers are ready for access • Receive interrupt/status (RRDY) • Generated when there is received data ready to be read by the CPU from the I2C_DATA register • The CPU can alternatively poll this bit to read the received data • Transmit interrupt/status (XRDY) • Generated when the CPU needs to put more data in the I2C_DATA register after the transmitted data has been shifted out on SDA pin • The CPU can alternatively poll this bit to write the next transmitted data • Receive draining interrupt (RDR) • Generated when the transfer length is not a multiple of threshold value NCHUEE 720A Lab Prof. Jichiang Tsai
I2C Interrupts (cont.) • To inform the CPU that it can read the amount of data left to be transferred and to enable the draining mechanism • Transmit draining interrupt (XDR) • Generated when the transfer length is not a multiple of threshold • To inform the CPU that it can read the amount of data left to be written and to enable the draining mechanism • When the interrupt signal is activated • The Local Host must read the I2C_IRQSTATUS_RAW register • To define the type of the interrupt, process the request • Then write into these registers the correct value to clear the interrupt flag NCHUEE 720A Lab Prof. Jichiang Tsai
DMA Events • The I2C module can generate two DMA requests events • Read (I2C_DMA_RX) and write (I2C_DMA_TX) • Can be used by the DMA controller to synchronously read received data from the I2C_DATA • Or write transmitted data to the I2C_DATA register • The DMA read and write requests are generated in a similar manner as RRDY and XRDY, respectively • The I2C DMA request signals are activated according to the FIFO Management NCHUEE 720A Lab Prof. Jichiang Tsai
FIFO Management • The I2C module implements two internal 32-bytes FIFOs with dual clock for RX and TX modes • The depth of the FIFOs can be configured at integration • Via a generic parameter which will also be reflected in I2C_IRQSTATUS_RAW.FIFODEPTH register • FIFO Interrupt Mode Operation • Relevant interrupts enabled via I2C_IRQENABLE_SET register • The processor is informed of the status of the receiver and transmitter by an interrupt signal • These interrupts are raised when receive/transmit FIFO threshold (defined by I2C_BUF.TXTRSH or I2C_BUF.RXTRSH) are reached • The signals instruct the Local Host to transfer data to the destination • From the I2C module in receive mode and/or from any source to the I2C FIFO in transmit mode NCHUEE 720A Lab Prof. Jichiang Tsai
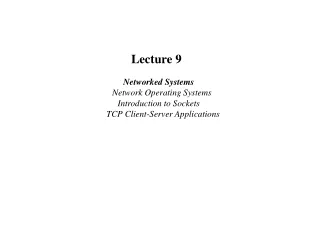
FIFO Management (cont.) • The RRDY Condition illustrates that the condition for generating a RRDY interrupt is achieved • The interrupt request is generated when this signal is active • It can be cleared only by writing a 1 in the corresponding interrupt flag • If the condition is still present after clearing the previous interrupt, another interrupt request will be generated • In receive mode, RRDY interrupt is not generated until the FIFO reaches its receive threshold • Once low, the interrupt can only be de-asserted when the Local Host has handled enough bytes to make the FIFO level below threshold. • For each interrupt, the Local Host can be configured to read an amount of bytes equal with the value of the RX FIFO threshold + 1 • The XRDY Condition illustrates that the condition for generating a XRDY interrupt is achieved. • The interrupt request is generated when this condition is achieved NCHUEE 720A Lab Prof. Jichiang Tsai
Receive FIFO Interrupt Request Generation NCHUEE 720A Lab Prof. Jichiang Tsai
FIFO Management (cont.) • When TX FIFO is empty, or the TX FIFO threshold is not reached • There are still data bytes to be transferred in the TX FIFO • It can be cleared only by writing a 1 in the corresponding interrupt flag after transmitting the configured number of bytes • If the condition is still present after clearing the previous interrupt, another interrupt request will be generated • The module offers two options to handle the interrupts • When detecting an interrupt request (XRDY or RRDY type), the CPU can write/read one data byte to/from the FIFO to clear the interrupt • The module will not reassert the interrupt until the condition is not met • When detecting an interrupt request, the CPU can be programmed to write/read the amount of data bytes specified by the corresponding FIFO threshold (I2C_BUF.TXTRSH + 1 or I2C_BUF.RXTRSH + 1) • The interrupt condition will be cleared • The next interrupt will be asserted again when the XRDY or RRDY condition will be again met NCHUEE 720A Lab Prof. Jichiang Tsai
Transmit FIFO Interrupt Request Generation NCHUEE 720A Lab Prof. Jichiang Tsai
FIFO Management (cont.) • If the second interrupt serving approach is used, the draining feature is implemented • When the transfer length is not a multiple of FIFO threshold • In slave TX mode, the draining feature cannot be used • Since the transfer length is not known at the configuration time • The external master can end the transfer at any point by not acknowledging one data byte • FIFO Polling Mode Operation • The status of the module (receiver or transmitter) can be checked by polling the XRDY and RRDY status registers I2C_IRQSTATUS_RAW • XRDY_IE and RRDY_IE disabled and DMA disabled • RDR and XDR can also be polled if draining feature must be used NCHUEE 720A Lab Prof. Jichiang Tsai
FIFO Management (cont.) • The XRDY and RRDY flags are accurately reflecting the interrupt conditions mentioned in Interrupt Mode • This mode is an alternative to the FIFO interrupt mode of operation • FIFO DMA Mode Operation • In receive mode, a DMA request is generated as soon as the receive FIFO exceeds its threshold level • Defined in the threshold level register (I2C_BUF.RXTRSH +1) • This request should be de-asserted when the number of bytes defined by the threshold level has been read by the DMA • By setting I2C_DMARXENABLE_CLR.DMARX_ENABLE_CLEAR field • In transmit mode, a DMA request is automatically asserted when the transmit FIFO is empty • De-asserted when the number of bytes defined by the number in the threshold register (I2C_BUF.TXTHRS+1) has been written in FIFO NCHUEE 720A Lab Prof. Jichiang Tsai
FIFO Management (cont.) • By setting I2C_DMATXENABLE_CLR. DMATX_ENABLE_CLEAR field • If an insufficient number of characters are written, then the DMA request will remain active • Receive FIFO DMA Request Generation NCHUEE 720A Lab Prof. Jichiang Tsai
FIFO Management (cont.) • Transmit FIFO DMA Request Generation NCHUEE 720A Lab Prof. Jichiang Tsai
FIFO Management (cont.) • According to the desired operation mode, the programmer must set the FIFO thresholds • Must be set consistent with the DMA channel length • In I2C Slave RX Mode, the Local Host can program the RX threshold with the desired value • Use the FIFO draining feature at the end of the transfer to extract from the FIFO the remaining bytes if the threshold is not reached • In Slave TX Mode, the TX FIFO threshold should be set to 1 • I2C_BUF.TXTRSH=0, default value • The length of the transfer may not be known at configuration time • The interrupt (or accordingly, DMA) requests will be generated for each byte requested by the remote I2C master • Prevent the I2C core to request additional data from the CPU or from the DMA controller (using IRQ or DMA NCHUEE 720A Lab Prof. Jichiang Tsai
FIFO Management (cont.) • The I2C module offers to clear the RX or TX FIFO • Achieved through I2C_BUF.RXFIFO_CLR and I2C_BUF.TXFIFO_CLR registers • Act like software reset for the FIFOs • In DMA mode, these bits will also reset the DMA state machines • The FIFO clearing feature can be used when • The module is configured as a transmitter • The external receiver responds with a NACK during the transfer • There is still data in TX FIFO waiting to be transferred • On the Functional (I2C) domain, the thresholds can always be considered equal to 1 • The I2C Core can start transferring data on the I2C bus whenever it has data in the FIFOs (FIFO is not empty) NCHUEE 720A Lab Prof. Jichiang Tsai
Draining Feature • Implemented for handling the end of the transfers whose length is not a multiple of FIFO threshold value • Offers the possibility to transfer the remaining amount of bytes • Since the threshold is not reached • Prevents the CPU or the DMA controller to attempt more FIFO accesses than necessary • For example, to generate at the end of a transfer a DMA RX request having in the FIFO less bytes than the configured DMA transfer length • Otherwise, an Access Error interrupt will be generated • Generate an interrupt at the end of the transfer • I2C_IRQSTATUS_RAW.RDR or I2C_IRQSTATUS_RAW.XDR • Informing the CPU to check the amount of data left to be transferred • I2C_BUFSTAT.TXSTAT or RXSTAT • To enable the Draining Feature if DMA mode is enabled NCHUEE 720A Lab Prof. Jichiang Tsai
Draining Feature (cont.) • By re-configuring the DMA transfer length according to this value • Or perform only the required number of data accesses • If DMA mode is disabled • In receiving mode, if the RX FIFO threshold is not reached but the transfer was ended and there is still data left in the FIFO • The receive draining interrupt (I2C_IRQSTATUS_RAW.RDR) will be asserted to inform the local host to read the amount of data in FIFO • The CPU will perform a number of data read accesses equal with RXSTAT value (if interrupt or polling mode) or re-configure the DMA controller with the required value to drain the FIFO • In transmit mode, if the threshold is not reached but the amount of data remaining to be written is less than TXTRSH • The transmit draining interrupt (I2C_IRQSTATUS_RAW.XDR) will be asserted to inform the local host to read the amount of data remaining to be written in the TX FIFO NCHUEE 720A Lab Prof. Jichiang Tsai
Draining Feature (cont.) • The CPU will need to write the required number of data bytes (specified by TXSTAT value) or re-configure the DMA controller with the required value in order to transfer the last bytes to the FIFO • In master mode, the CPU can alternatively skip the checking of TXSTAT and RXSTAT values • Since it can obtain internally this information • By computing DATACOUNT modulo TX/RXTHRSH • The draining feature is disabled by default • It can be enabled using I2C_IRQENABLE_SET.XDR_IE or I2C_IRQENABLE_SET.RDR_IE registers (default disabled) • Only for the transfers with length not equal with the threshold value NCHUEE 720A Lab Prof. Jichiang Tsai
How to Program I2C • Module Configuration Before Enabling the Module • Program prescalerto obtain an approximately 12-MHz clock • I2C_PSC = x; this value is to be calculated and is dependent on the System clock frequency • Program the I2C clock to obtain 100 Kbps or 400 Kbps • SCLL = x and SCLH = x; these values are to be calculated and are dependent on the System clock frequency • Configure its own address • I2C_OA = x - only in case of I2C F/S mode • Take the I2C module out of reset • I2C_CON:I2C_EN = 1 • Initialization Procedure • Configure the I2C mode register (I2C_CON) bits NCHUEE 720A Lab Prof. Jichiang Tsai
How to Program I2C (cont.) • Enable interrupt masks (I2C_IRQENABLE_SET) • If using interrupt for transmit/receive data • Enable the DMA (I2C_BUF & I2C_DMA/RX/TX/ENABLE_SET) and program the DMA controller • Only if using DMA for transmit/receive data • Configure Slave Address and DATA Counter Registers • In master mode, configure the slave address (I2C_SA = x) and the number of byte during the transfer (I2C_CNT = x) • Initiate a Transfer • Poll the bus busy (BB) bit in the I2C status register (I2C_IRQSTATUS_RAW) • If it is cleared to 0 (bus not busy), configure START/STOP (I2C_CON: STT / I2C_CON: STP) condition to initiate a transfer NCHUEE 720A Lab Prof. Jichiang Tsai
How to Program I2C (cont.) • Receive Data • Poll the receive data ready interrupt flag bit (RRDY) in the I2C status register (I2C_IRQSTATUS_RAW) • Read the received data in the data receive register (I2C_DATA) • Use the RRDY interrupt (I2C_IRQENABLE_SET.RRDY_IE set) • Or use the DMA RX (I2C_BUF.RDMA_EN set together with I2C_DMARXENABLE_SET) • Use draining feature if the transfer length is not equal with FIFO threshold • I2C_IRQSTATUS_RAW.RDR enabled by I2C_IRQENABLE_SET.RDR_IE • Transmit Data • Poll the transmit data ready interrupt flag bit (XRDY) NCHUEE 720A Lab Prof. Jichiang Tsai
How to Program I2C (cont.) • Write data into the data transmit register (I2C_DATA) • Use the XRDY interrupt (I2C_IRQENABLE_SET.XRDY_IE set) • Or use the DMA TX (I2C_BUF.XDMA_EN set together with I2C_DMATXENABLE_SET) • Use draining feature if the transfer length is not equal with FIFO threshold • I2C_IRQSTATUS_RAW.XDR enabled by I2C_IRQENABLE_SET.XDR_IE NCHUEE 720A Lab Prof. Jichiang Tsai