Download
1 / 15
170 likes | 207 Views
An online guide introducing Agresso Self-Service, covering topics like navigation, data entry, raising requisitions, and approvals. Learn how to efficiently manage tasks in the Agresso system.

E N D
Introduction to Agresso Self Service Online guide Left click to progress
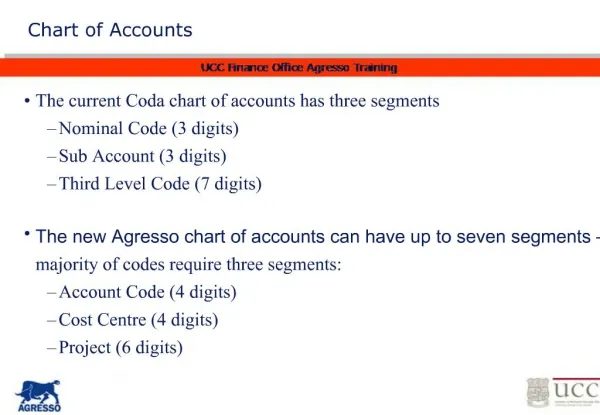
Introduction What is AGRESSO? • An information system designed to coordinate all the resources, information and activities of the entire organisation
ContentsPlease choose a topic • Accessing Agresso Self Service • Basic Navigating • Data entry and using ‘Field Help’ • Raising a Requisition • Approving a Requisition
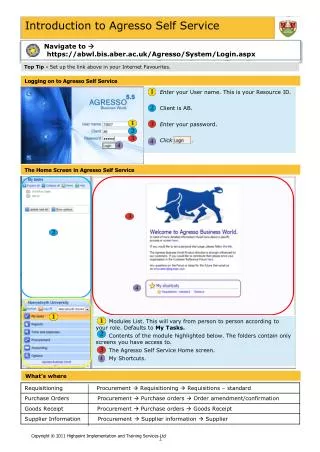
Accessing AGRESSO Self Service • Access your Internet favourites and click the link Click here anytime to get back to contents list Back to contents
Basic Navigating Back to contents
This is the Modules list consisting of ALL areas that you have access to. This will be unique to you This is the Main Pane. Once you click on a screen, it will appear here This is the Folder and Screens list. Also unique to you Shortcuts that you create will sit here. Back to contents
By default, Agresso always shows the My tasks module If you have any tasks to action they will show here Back to contents
The screen will appear here By clicking a module here. The Screens list appears here. By expanding the list and clicking the screen you require Back to contents
Data entry and using ‘Field Help’ Back to contents
Enter your search criteria and click Search In entry fields, data can simply be typed in. Press TAB to confirm The data will appear in the field. Press TAB to confirm However, if you are unsure you can use Field Help by clicking here Fields with a red asterisk are mandatory Double-click on the data line Back to contents
Raising a Requisition Back to contents
The Requisition entry screen will appear here Expand the list and click Requisitions - standard Click Procurement The Procurement Screens list appears here. Back to contents
Enter the Supplier ID Ensure the Delivery address is correct Ensure the GL coding is correct. This completes by default Change the Description if the default isn’ t appropriate Enter the Work Order code Enter the Product ID Select Purchase Requisitions and click OK Once the requisition is complete, click Save You will be given the requisition number upon saving Enter Qty required and Price (net of VAT) Back to contents Back to contents
Approving a Requisition Back to contents
Click the task you wish to action If the requisition is ok, click Approve Select the task to action The following message appears If the requisition is incorrect, click Reject If rejected a comment must be entered. Click Reject again. The approval screen appears here The Requisition information will change Check all information is correct Back to contents