Download
1 / 9
90 likes | 264 Views
Digital Photography Workflow Using LightRoom 2 and PhotoShop CS4. JT Thomas – April 2009 www.JTPhotoGraphics.com. Taking the picture. Set camera to save in RAW mode if possible Set for highest setting if no RAW setting Use the lowest ISO (down to 100) possible for the shot

E N D
Digital Photography WorkflowUsing LightRoom 2 and PhotoShop CS4 JT Thomas – April 2009 www.JTPhotoGraphics.com
Taking the picture • Set camera to save in RAW mode if possible • Set for highest setting if no RAW setting • Use the lowest ISO (down to 100) possible for the shot • Watch shutter speed (Action above 1/250) • Try other modes (besides Program)on camera –A, S, M • Use “chimping” if just learning your skills • Learn to zoom in for sharpness
Importing the Images • Remove card from camera • Faster • Less risk for damage to camera • Less risk for loss of data • Use one base folder and all folders under that • Rename shots from camera format • Use Presets for info in metadata • Use Develop Presets for common adjustments • Some cameras need same adjustments • Personal taste settings • Use standard keywords that make sense for this shoot
Library Workflow • Look for best pictures • “P” for setting as Pick • “X” for setting as Rejected • Stack similar pics if keeping more than one • Add additional keywords • Use keyword suggestions and sets • Add comments to pics if needed • Save a collection of Picks • Finding images with LightRoom
Develop Workflow • Crop image first • Using level line • Keeping aspect ratio • Setting White Balance • Find neutral gray (all values equal) with eyedropper • Fine tune to taste • Setting Exposure • Look at Histogram • Recover highlights and fill for shadows • Turn on indicators for each • Adjust blacks • Use curves for contrast (not slider) • Add Clarity and Vibrance if needed • History States for changes • Before and After • From each panel • Overall • Special effects • Black and White • Toning • Presets
Targeted Image Adjustments • Non-destructive editing • Removing Red-eye • Removing Spots and blemishes • Graduated filter • Use shift key to keep horizontal • Image Adjustment Brush • Adjusting for selected area • Set size and feather • Auto Mask mode
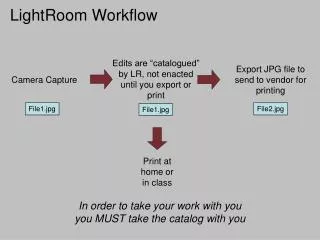
Moving to and from PhotoShop • Go to Photo/Edit in and select PS CSx • Edit copy with LR edits • Can open multiple docs in layers in PS • Save and close in PS • Saves a PSD file stacked in LR • Use Edit Original if modifying PSD file again
Output Modules - Slideshows • Select Pictures or use a collection • Use/Create Templates • Use first and last slides • Spacebar pauses/resumes • Escape exits • Slideshow as PDF
Output Modules - Printing • Select Pictures or use a collection • Can set to print to JPG or printer • Set print resolution to 240-300 for printers • Use print sharpening for cleaner prints • Use Standard for most, High for large (13x19 or bigger) • Select Matte or Glossy matching paper • Print Management • Get latest print driver for your printer • Download profiles for your printer/paper combination from your printer manufacturer • Select your profile and not managed by printer • Select Page Setup and select type of paper • Turn off Color Management on the printer if using a profile • Select Best Photo for best and fastest print